Roof to Wall Vent Guide: Steps for Perfect Airflow
Roof to Wall Vent: Perfect Steps Install Guid
A roof to wall vent is a specialized ventilation system designed to allow air circulation at the junction where a sloped roof meets a vertical wall, commonly found in shed roofs, porch additions, and architectural designs featuring roof-to-wall transitions. This critical component ensures proper attic ventilation, prevents moisture buildup, and extends the lifespan of your roofing structure by creating an exhaust pathway for hot, humid air. Understanding how to select, install, and maintain a roof to wall vent can save homeowners hundreds of dollars in potential water damage and energy costs while improving overall indoor air quality.
What is a Roof to Wall Vent
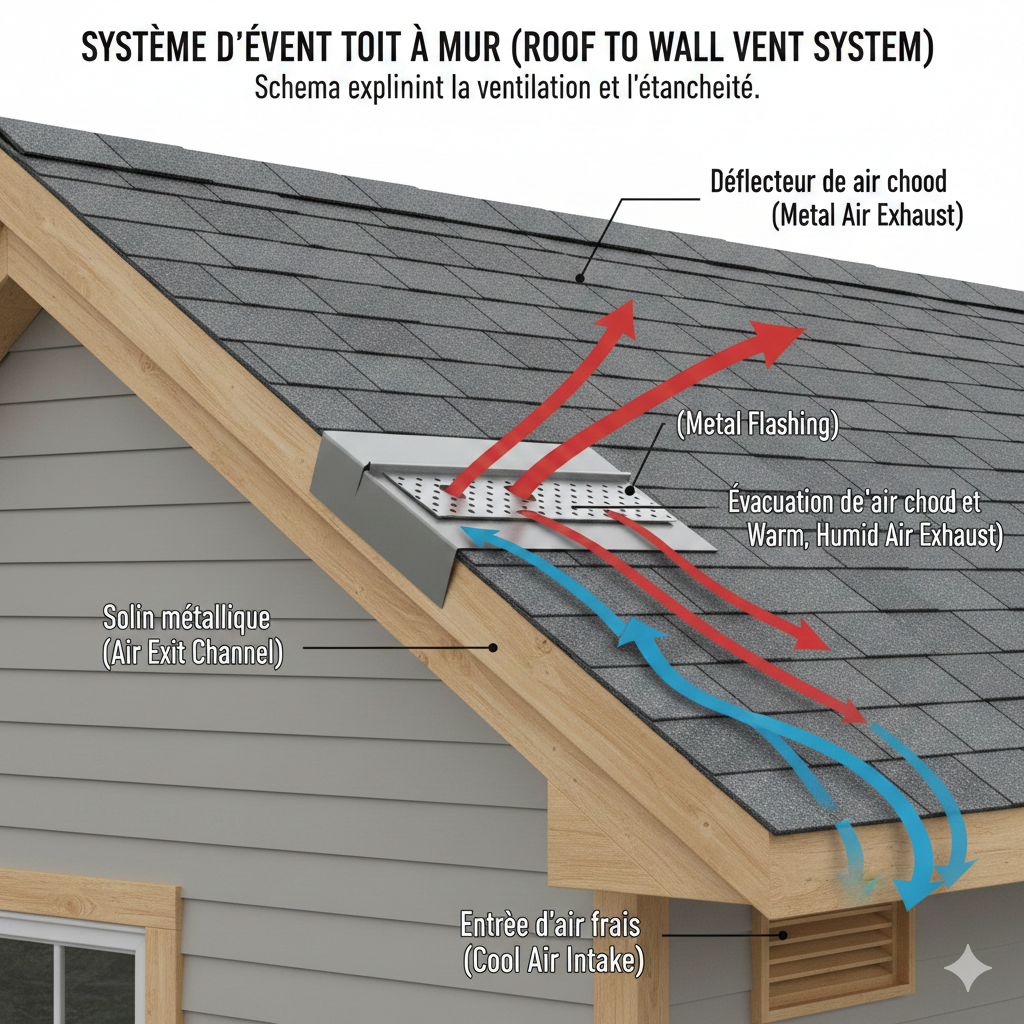
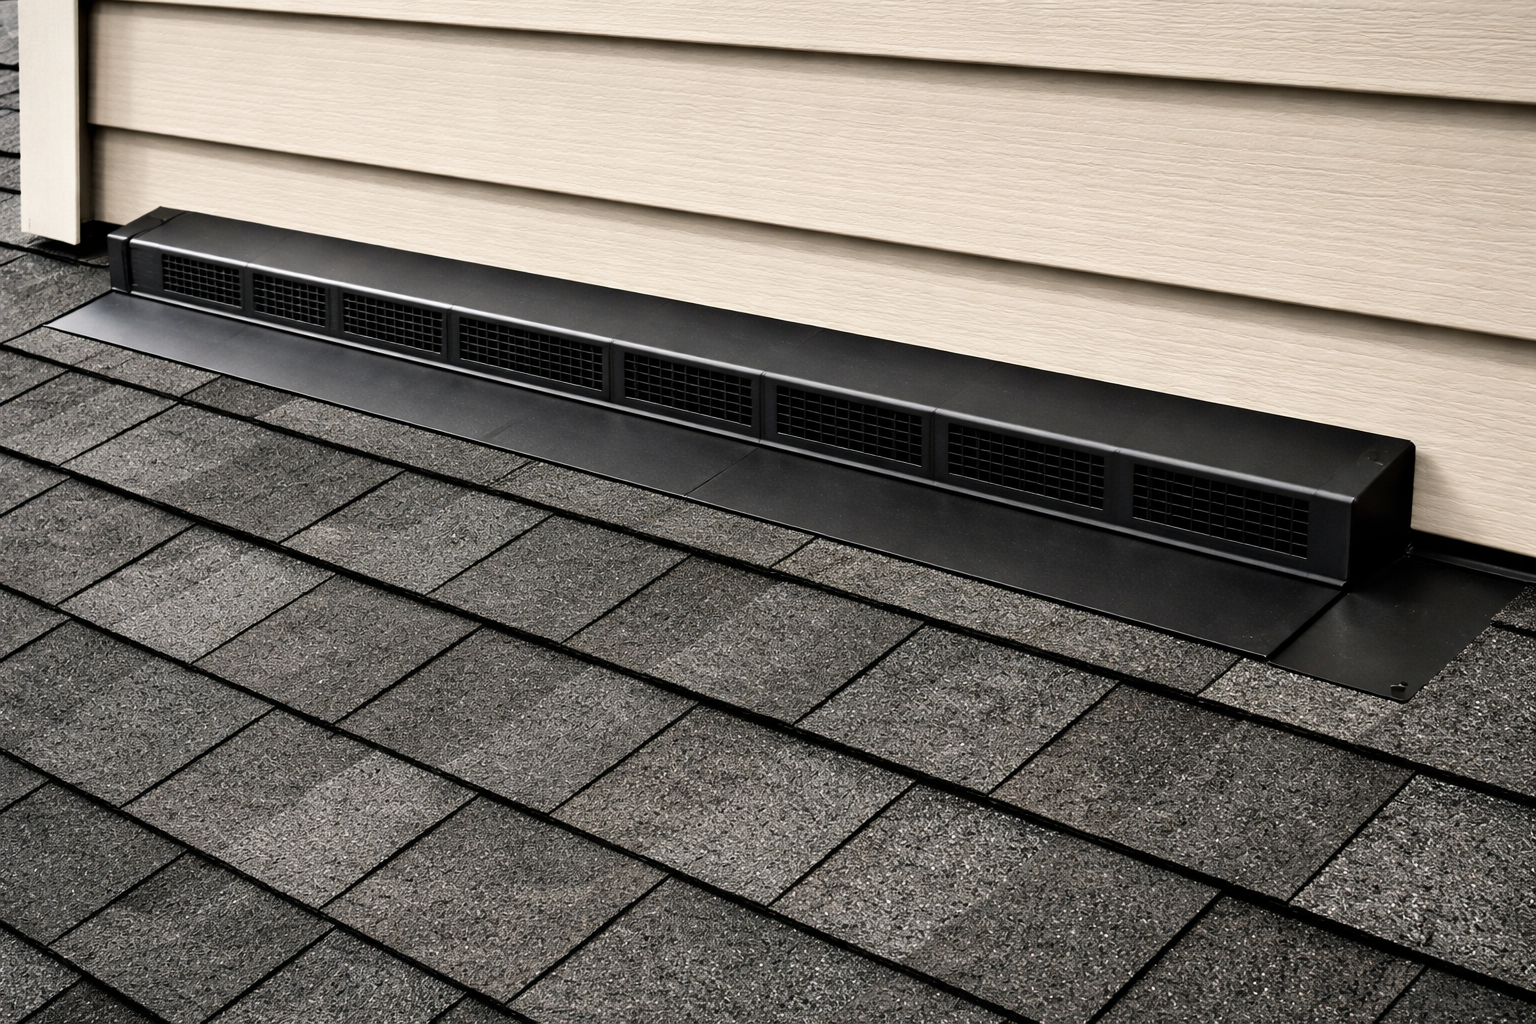
A roof to wall vent is a continuous or sectional ventilation product installed where a lower sloped roof abuts a vertical wall structure. The primary purpose of this ventilation system is to provide an exhaust outlet for warm air trapped in the attic or roof cavity, particularly in architectural configurations where traditional ridge vents cannot be installed. The roof to wall vent typically consists of a perforated plastic or metal channel that sits beneath the roofing material and extends up the wall, covered by flashing to ensure weatherproofing.
These specialized vents work in conjunction with soffit or eave intake vents to create a balanced airflow system. As cooler air enters through the soffits, it travels upward through the rafter bays, and the warm air naturally rises and exits through the roof to wall vent opening. This continuous air exchange prevents condensation, reduces attic temperatures during summer months, and minimizes the risk of ice damming in winter climates.
The design of a roof to wall vent allows for installation in situations where roof pitch changes, dormer walls meet lower roofs, or shed-style roof configurations require ventilation at the high wall junction. Most systems come in four-foot sections that can be installed by a single person and include end caps, flashing, and fasteners for complete weathertight installation.
How to Find the Right Roof to Wall Vent
Finding the appropriate roof to wall vent for your specific application requires careful assessment of several key factors to ensure optimal performance and compatibility with your roofing system. Begin by measuring the linear footage of the roof-to-wall junction where ventilation is needed, as most manufacturers sell vents in four-foot sections that must be calculated to cover the entire span.
-
Determine the net free area (NFA) requirements for your attic space by calculating the square footage of the attic and dividing by 150 (assuming you have adequate intake ventilation)
-
Verify that your roof pitch is compatible with the vent system, as some products work better with steeper or shallower slopes
-
Identify the roofing material you’ll be working with (asphalt shingles, metal roofing, tile, or cedar shake) to select compatible flashing and installation methods
-
Consider local building codes and seismic requirements that may dictate specific installation methods or vent spacing
-
Evaluate climate conditions in your area, as regions with heavy snow or ice buildup may require additional weatherproofing measures
Consult with roofing supply stores or manufacturers’ websites to compare different roof to wall vent products, looking for systems that include complete installation kits with flashing, end caps, fasteners, and detailed instructions. Many professional-grade products offer technical support and installation videos to guide homeowners through the selection process.
Check product reviews and manufacturer warranties to ensure you’re selecting a durable roof to wall vent that will withstand your local weather conditions. Some advanced systems feature integrated mesh screens to prevent insect infiltration while maintaining maximum airflow.
How to Buy a Roof to Wall Vent
Purchasing a roof to wall vent system involves selecting from several retail channels, each offering distinct advantages in pricing, product selection, and expert guidance. Local roofing supply distributors typically stock professional-grade roof to wall vent products and can provide technical specifications, installation advice, and contractor references.
-
Visit specialty roofing suppliers for the widest selection of professional roof to wall vent systems with complete installation kits
-
Check home improvement centers like Home Depot or Lowe’s for consumer-grade ventilation products at competitive prices
-
Explore online retailers and manufacturer websites for direct purchasing options with detailed product specifications and installation guides
-
Request samples or cross-sections from suppliers to examine the vent’s construction quality and mesh screening
-
Verify that the complete kit includes the vent sections, metal flashing, end caps, fasteners, and flexible caulking compound
When comparing roof to wall vent products, prioritize systems made from UV-resistant materials that won’t degrade under prolonged sun exposure. Professional-grade vents typically feature high-density polyethylene or PVC construction with reinforced edges for secure nailing.
Request documentation on the vent’s net free area per linear foot, as this specification determines how much ventilation each section provides. Most quality roof to wall vent systems offer between 9 and 18 square inches of NFA per linear foot.
Consider purchasing slightly more material than your measurements indicate to account for waste, cutting errors, and the requirement to extend vents at least six inches past the roof deck opening. Many suppliers offer bulk discounts for larger projects or multiple vent installations.
How Much Does a Roof to Wall Vent Cost
The cost of a roof to wall vent system varies significantly based on product quality, installation complexity, and whether you’re performing a DIY installation or hiring professional contractors. Material costs for roof to wall vent sections typically range from $8 to $15 per linear foot for basic systems, while premium products with enhanced weather sealing can cost $15 to $25 per linear foot.
Complete roof to wall vent installation kits that include flashing, end caps, fasteners, and sealant generally cost between $120 and $350 for a standard 20-foot installation. Professional installation adds labor costs ranging from $200 to $500, depending on roof accessibility, pitch steepness, and regional labor rates.
Additional cost factors include:
-
Roof penetration and decking modification: $50 to $150 depending on the extent of cutting required
-
Metal flashing fabrication: $30 to $80 if custom flashing is needed beyond what’s included in the kit
-
Sealants and weatherproofing materials: $15 to $40 for high-quality polyurethane caulk
-
Permit fees: $50 to $200 in jurisdictions requiring building permits for roof modifications
For a typical shed roof or dormer roof to wall vent installation covering 16 to 24 linear feet, expect total project costs between $300 and $600 for DIY installations, or $500 to $1,200 when professionally installed. These costs are considerably lower than addressing moisture damage or structural deterioration that can result from inadequate ventilation.
Compared to alternative exhaust ventilation solutions, roof to wall vent systems offer competitive pricing, with ridge vents costing $300 to $550 installed and powered attic vents ranging from $400 to $1,200. The relatively simple installation process makes roof to wall vents an economical choice for specific architectural applications where other vent types aren’t feasible.
How to Install a Roof to Wall Vent
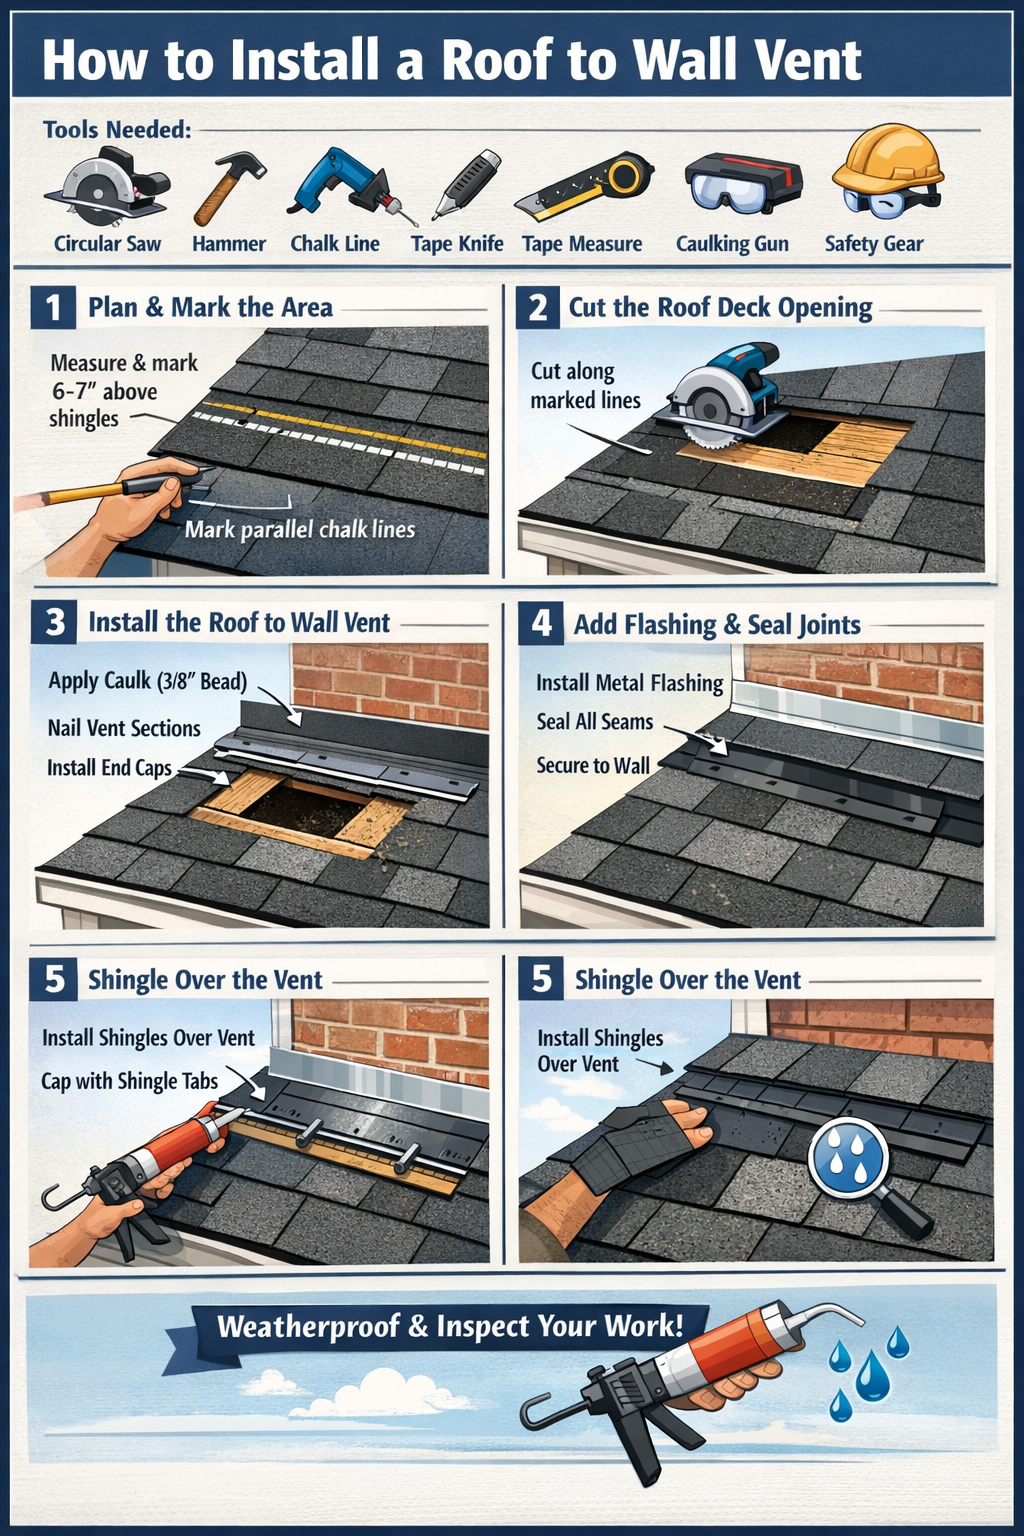
Installing a roof to wall vent requires careful planning, proper tools, and attention to weatherproofing details to ensure long-lasting performance and leak prevention. Before beginning installation, gather necessary tools including a circular saw, hammer, chalk line, utility knife, tape measure, caulking gun, and safety equipment.
Step 1: Plan and Mark the Installation Area
-
Determine the optimal location for the roof to wall vent, typically at the highest point where the roof meets the wall
-
Measure and mark a continuous line 6 to 7 inches up from the bottom edge of the shingle course where the vent will be installed
-
Create parallel chalk lines to define the slot that will be cut through the roof decking
-
Ensure the marked area extends at least the full length of the roof-to-wall junction to maximize ventilation
Step 2: Cut the Roof Deck Opening
-
Carefully cut through the previously installed shingles and roof decking along the marked lines using a circular saw set to the depth of the sheathing only
-
Exercise extreme caution not to cut through the rafters or any structural members
-
Remove the cut section of plywood decking to create a continuous slot opening
-
In seismic zones, drill 1-inch holes at 3-inch centers instead of a continuous slot if required by local building codes
Step 3: Install the Roof to Wall Vent Sections
-
Apply a 3/8-inch bead of polyurethane caulk (not roofing cement) beneath each roof to wall vent section before placement
-
Position the vent over the slot opening and nail down with the provided 2½-inch nails, using a minimum of three nails per four-foot section
-
Extend the vent at least 6 inches past the slot opening on each end to ensure complete coverage
-
Install end caps or plugs at both termination points, sealing them thoroughly with caulk
-
Apply another 3/8-inch bead of flexible caulk along the top edge of all installed roof to wall vent pieces
Step 4: Install Flashing and Complete Weatherproofing
-
Position the metal flashing provided with the kit over the vent, extending up onto the wall surface
-
Nail the flashing securely to the wall using corrosion-resistant fasteners
-
Ensure the flashing overlaps with house wrap, felt paper, or waterproof membrane according to proper flashing sequence
-
Seal all joints, seams, and penetrations with high-quality weatherproof caulk
Step 5: Install Roofing Over the Vent
-
Install shingles over the roof to wall vent system, ensuring proper overlap and alignment
-
Cap or cover the assembly with shingle tabs or a decorative metal cap that overhangs the vent by at least ½ inch
-
Verify that shingles do not block or cover the vent openings, which would restrict airflow
-
Complete a final inspection of all caulked joints to ensure water-tight installation
Professional installers recommend working on dry days with moderate temperatures to ensure proper caulk adhesion and easier material handling. The entire roof to wall vent installation typically takes 3 to 6 hours for an experienced DIYer working on a standard shed roof or dormer application.
How to Clean a Roof to Wall Vent
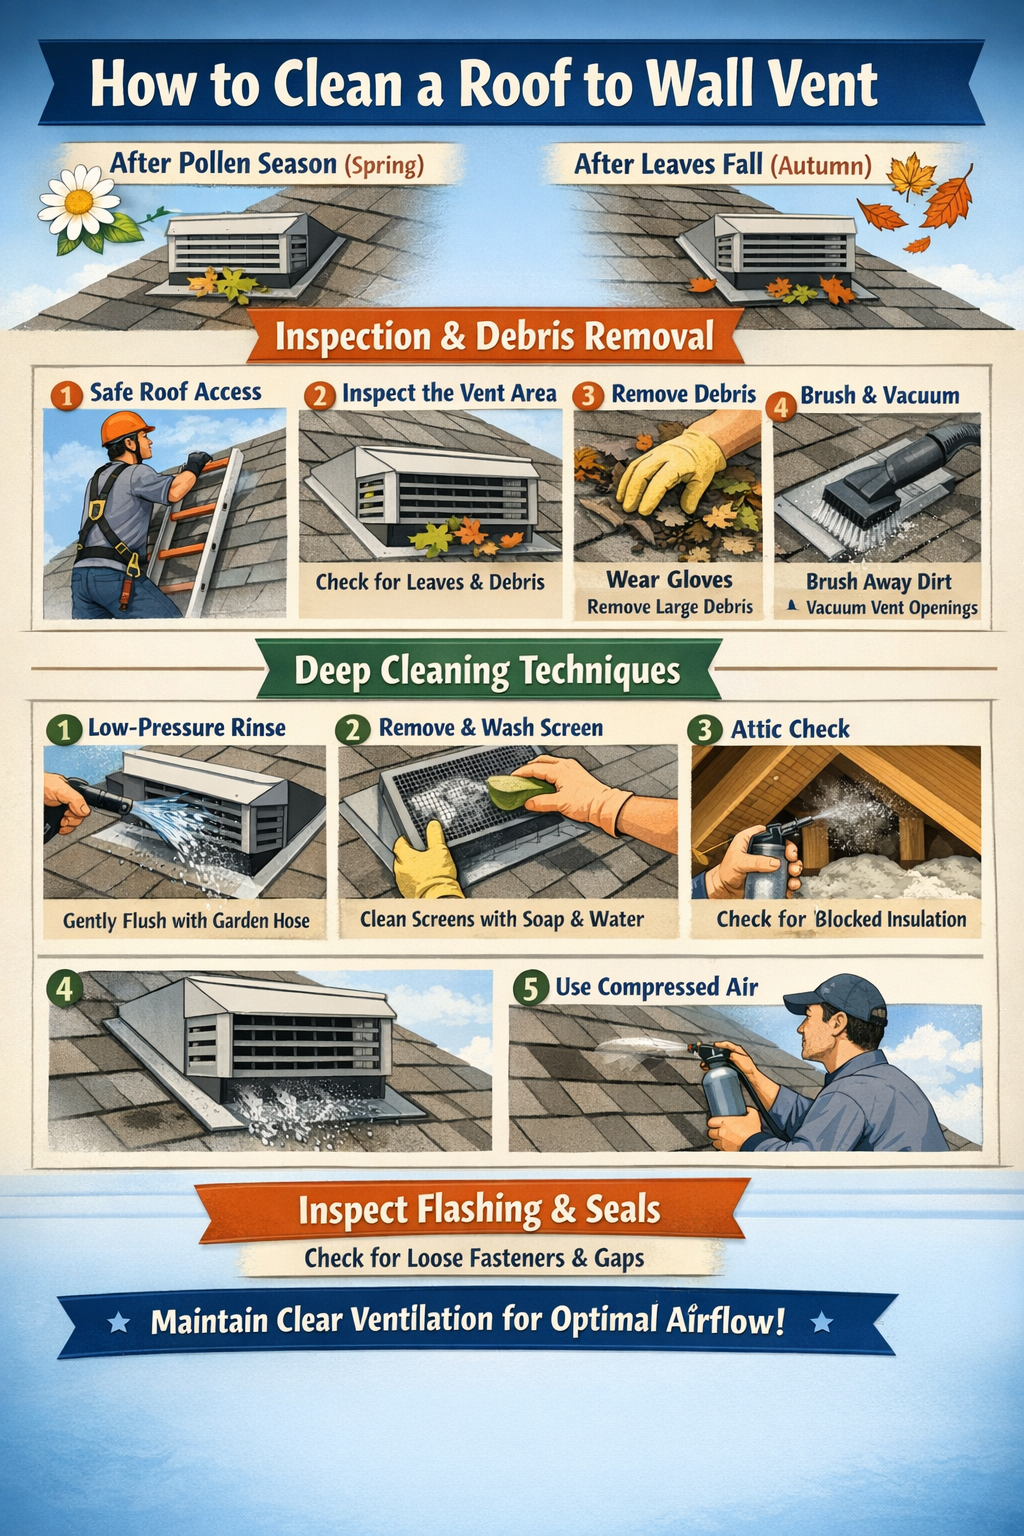
Regular maintenance and cleaning of your roof to wall vent ensures optimal airflow performance and prevents blockages that can compromise your ventilation system’s effectiveness. Establishing a cleaning schedule at least twice annually—once in spring after pollen season and again in fall after leaves have dropped—helps maintain consistent ventilation.
Inspection and Debris Removal Process:
-
Safely access the roof using proper ladder placement and fall protection equipment
-
Visually inspect the roof to wall vent area for accumulated leaves, twigs, dirt, and other debris
-
Remove larger debris by hand, wearing work gloves to protect against sharp edges or nesting materials
-
Use a soft-bristled brush to sweep away smaller particles and dirt from the vent surface and surrounding area
-
Employ a vacuum cleaner with a long narrow attachment to extract debris from the vent openings and mesh screens
Deep Cleaning Techniques:
For stubborn buildup or caked-on dirt, use a low-pressure garden hose to gently flush the roof to wall vent openings, directing water flow downward to avoid forcing water under the flashing. Avoid high-pressure washing, which can damage vent materials, compromise seals, or force water into the attic space.
If screens or grilles show significant dirt accumulation, carefully remove them (if designed to be removable) and clean with mild dish soap and water before reinstalling. Inspect the roof to wall vent flashing during cleaning to identify any loose fasteners, gaps, or deteriorating sealant that requires repair.
Check the interior attic side of the vent system to ensure no insulation has shifted to block the air pathway, as this can severely reduce ventilation effectiveness. Use compressed air to blow out fine dust or debris from hard-to-reach areas of the roof to wall vent assembly.
Advantages of a Roof to Wall Vent
The roof to wall vent system offers numerous benefits that make it an essential component for specific architectural configurations requiring exhaust ventilation at roof-to-wall junctions. These advantages contribute to improved building performance, energy efficiency, and long-term structural integrity.
Enhanced Ventilation Efficiency:
-
Works with natural convection principles as warm air rises and exits at the highest point where the roof meets the wall
-
Creates continuous airflow when paired with adequate soffit intake ventilation
-
Reduces attic temperatures by as much as 20-30 degrees during summer months
-
Prevents moisture accumulation that can lead to mold growth, wood rot, and insulation degradation
Architectural Versatility:
The roof to wall vent provides the only practical exhaust solution for shed roofs, porch additions, and dormer configurations where ridge vents cannot be installed. This specialized application makes it indispensable for certain home designs and renovation projects.
Cost-Effectiveness:
Compared to powered ventilation systems, the roof to wall vent requires no electricity, produces no operational noise, and incurs no ongoing energy costs. Installation costs remain moderate due to the straightforward installation process and included component kits.
Aesthetic Integration:
When properly installed and flashed, the roof to wall vent remains virtually invisible beneath the roofing material, maintaining clean exterior lines without protruding vent caps or visible hardware. This discrete profile preserves architectural aesthetics while providing essential ventilation.
Durability and Longevity:
Quality roof to wall vent systems constructed from UV-resistant materials can last 20-30 years with minimal maintenance. The simple design with no moving parts eliminates mechanical failure risks common in powered ventilation systems.
Challenges of Installing a Roof to Wall Vent
While the roof to wall vent offers substantial benefits, several installation challenges and potential complications require careful consideration and proper execution to avoid problems. Understanding these challenges helps homeowners and contractors prepare adequately for successful installation.
Complex Roof Penetration Requirements:
Creating the continuous slot through roof decking demands precision cutting to avoid damaging rafters or structural members. Inexperienced installers may accidentally cut through framing, compromising structural integrity. The roof to wall vent installation requires careful measurement and marking to ensure the opening aligns properly with the vent system.
Waterproofing and Leak Prevention:
-
Improper flashing installation represents the most common failure point for roof to wall vent systems
-
Inadequate sealing of joints and seams can allow water infiltration during heavy rain or snow melt
-
Using roofing cement instead of flexible polyurethane caulk can lead to seal failure as materials expand and contract
-
Failure to properly integrate flashing with house wrap or waterproof membranes creates vulnerable leak paths
Coordination with Other Building Systems:
The roof to wall vent must be carefully coordinated with siding installation, window flashing, and other wall penetrations to maintain proper water management sequences. Retrofit installations in existing structures present additional challenges when accessing and modifying enclosed roof cavities.
Balanced Ventilation Requirements:
Installing a roof to wall vent without adequate soffit intake ventilation can create negative pressure issues or result in insufficient airflow. Calculating proper intake-to-exhaust ratios requires understanding of ventilation principles that many DIYers lack.
Safety Concerns:
Working on sloped roofs near wall junctions increases fall risks, particularly when handling four-foot vent sections and metal flashing. Proper safety equipment and techniques become essential for roof to wall vent installation projects.
Special Ventilation Considerations
Can You Vent a Microwave Through Wall to Roof
Venting a microwave from an interior wall location through the attic and out via the roof represents a common solution when exterior wall access isn’t available. This venting approach requires running rigid metal ductwork (typically 4 to 6 inches in diameter) from the microwave’s exhaust port upward through the ceiling, across the attic space, and terminating at a roof vent cap.
The ducting must maintain proper slope to prevent condensation accumulation and should be insulated when passing through unconditioned attic spaces. Unlike a roof to wall vent designed for attic ventilation, microwave roof venting requires a dedicated exhaust path with a weatherproofed roof cap and proper flashing to prevent leaks. Local building codes typically require that microwave exhaust vents terminate outdoors rather than dumping into attic spaces.
Professional installation ensures proper duct sizing, adequate support to prevent sagging, and correct flashing techniques to maintain roof integrity. The total installation cost for microwave roof venting ranges from $300 to $800 depending on duct run length and roof access complexity.
How to Vent a Roof That Ties Into a Wall
Venting a roof section that terminates against a vertical wall structure requires creating an exhaust pathway at the roof-to-wall junction using specialized products like the roof to wall vent system. This configuration commonly occurs with shed roofs, porch additions, dormers, and architectural features where one roof plane meets a taller wall.
The venting strategy involves cutting a continuous slot through the roof decking 6 to 7 inches below the wall junction, installing the roof to wall vent product over this opening, and covering it with metal flashing that extends up the wall surface. This creates an exhaust outlet for warm air traveling up from soffit intakes at the lower roof edge.
For cathedral ceiling applications where insulation fills the rafter bays, maintaining a continuous air channel from intake to the roof to wall vent exhaust requires installing rafter baffles or ventilation chutes. Alternative solutions for particularly challenging configurations include the “icehouse roof” design, which creates a ventilated cavity above the structural roof deck.
Proper installation ensures the roof to wall vent opening isn’t blocked by shingles, and that adequate intake ventilation balances the exhaust capacity. Consulting with ventilation specialists helps determine the appropriate linear footage of roof to wall vent needed for specific roof areas.
Roof to Wall Ventilation
Roof to wall ventilation systems encompass various strategies for exhausting attic air where roofing surfaces meet vertical wall structures. Beyond the specialized roof to wall vent product, these strategies include powered wall-mounted exhaust fans, passive wall vents positioned near the roof line, and gable-end ventilation solutions.
The effectiveness of any roof to wall ventilation approach depends on creating balanced airflow with adequate intake ventilation at eaves or soffits. Insufficient intake restricts the volume of air that can be exhausted, reducing overall ventilation performance regardless of the exhaust vent type installed.
Climate considerations influence roof to wall ventilation design, with cold regions requiring careful insulation and air sealing to prevent heat loss while maintaining ventilation pathways. Hot climates benefit from maximizing ventilation rates to reduce radiant heat transfer into living spaces.
Professional ventilation designers calculate the required net free area based on attic square footage and recommend appropriate combinations of intake and exhaust vents. The roof to wall vent typically provides 9 to 18 square inches of NFA per linear foot, making it an efficient solution for specific applications.
Shed Roof Vent
Shed roof structures present unique ventilation challenges because they lack a traditional ridge where ridge vents would normally be installed. The roof to wall vent serves as the primary exhaust solution for shed roofs, positioned at the high wall where the sloped roof plane terminates.
For shed roof ventilation to function properly, intake vents must be installed at the lower eave or fascia to allow air entry. As exterior air enters at the low side, it travels upward through the rafter bays and exits through the roof to wall vent at the high wall junction.
Some shed roof designs incorporate soffit vents along the lower edge combined with a roof to wall vent system at the upper wall, creating effective cross-ventilation. Alternative approaches include installing gable vents at the shed ends, though this provides less effective ventilation than the low-to-high airflow pattern achieved with roof to wall vents.
Building codes typically require shed roof ventilation to meet minimum net free area requirements based on the roof cavity’s square footage. For a typical garden shed or small structure, installing 12 to 20 linear feet of roof to wall vent combined with proportional intake ventilation satisfies most code requirements.
Where to Find Professional Installation Services
Locating qualified contractors experienced in roof to wall vent installation ensures proper execution and long-lasting performance of your ventilation system. Licensed roofing contractors represent the primary professional resource, as they possess the expertise in roof penetrations, flashing techniques, and weatherproofing required for successful installations.
Finding Qualified Contractors:
-
Request referrals from local roofing supply distributors who often maintain lists of contractors they work with regularly
-
Check online contractor directories and review platforms such as Angi, HomeAdvisor, or local Better Business Bureau listings
-
Verify that contractors hold appropriate state or local licensing and carry liability insurance and workers’ compensation coverage
-
Request references from recent roof to wall vent installations and contact previous clients about their experience
-
Obtain written estimates from at least three contractors to compare pricing and scope of work
Questions to Ask Potential Contractors:
Ask candidates about their specific experience with roof to wall vent installations, as this specialized application differs from standard ridge vent or box vent projects. Inquire about the brands and products they recommend, their warranty policies, and whether they subcontract any portions of the work.
Request that estimates include detailed material specifications, labor costs, timeline for completion, and cleanup procedures. Ensure contractors will obtain necessary building permits and schedule required inspections.
Reputable professionals should provide proof of manufacturer certifications or training for specific roof to wall vent products they install. Many manufacturers offer technical support and can recommend certified installers in your area.
Common Mistakes to Avoid
Understanding frequent installation errors helps ensure your roof to wall vent project achieves optimal performance and avoids costly repairs. These common mistakes can compromise ventilation effectiveness, create leak pathways, or result in structural damage.
Critical Installation Errors:
-
Using roofing cement instead of flexible polyurethane caulk for sealing, which leads to brittle seals that crack and leak
-
Cutting through rafters or structural members when creating the roof deck opening
-
Installing the roof to wall vent without extending it at least 6 inches past the deck slot on each end
-
Failing to install end caps or plugs at termination points, allowing water and pest entry
-
Positioning flashing incorrectly in relation to house wrap or waterproof membranes
Ventilation System Mistakes:
Installing roof to wall vent exhaust without corresponding intake ventilation creates imbalanced airflow that reduces effectiveness. Blocking vent openings with shingles or roofing material during final installation prevents proper air circulation. Miscalculating the required linear footage of vent for the attic space results in inadequate ventilation capacity.
Safety and Planning Oversights:
Attempting roof to wall vent installation without proper fall protection equipment on sloped roofs creates serious injury risks. Working during wet or windy conditions compromises both safety and installation quality. Failing to check local building codes for specific requirements regarding ventilation ratios or seismic considerations can result in non-compliant installations.
FAQ : Roof to wall vent
What is the primary function of a roof to wall vent?
The roof to wall vent provides exhaust ventilation at the junction where a sloped roof meets a vertical wall, allowing hot humid air to escape from the attic or roof cavity. This prevents moisture accumulation, reduces attic temperatures, and extends roofing material lifespan by creating a continuous airflow path when combined with intake vents.
How many linear feet of roof to wall vent do I need for my shed roof?
Calculate the required roof to wall vent length by determining your attic square footage and dividing by 150 to find the net free area needed in square inches. Most roof to wall vent products provide 9 to 18 square inches of NFA per linear foot, so divide your required NFA by the product’s rating. For example, a 300-square-foot shed roof requires 2 square feet (288 square inches) of ventilation, which translates to approximately 16 to 32 linear feet of roof to wall vent depending on the product.
Can I install a roof to wall vent myself or should I hire a professional?
Experienced DIYers with roofing knowledge and proper safety equipment can successfully install roof to wall vent systems by following manufacturer instructions carefully. However, professional installation is recommended if you’re uncomfortable working on sloped roofs, lack experience with roof penetrations and flashing, or have complex roof configurations. Professional installation typically costs $200 to $500 in labor beyond material costs.
How does a roof to wall vent differ from a ridge vent?
A roof to wall vent installs at the junction where a roof meets a vertical wall and works specifically for shed roofs, dormers, or porch additions. Ridge vents install along the peak of a traditional gabled or hipped roof where two roof planes meet at the top. The roof to wall vent serves the same exhaust function but accommodates architectural situations where ridge vents cannot be used.
What maintenance does a roof to wall vent require?
The roof to wall vent requires inspection and cleaning at least twice annually to remove leaves, debris, and dirt that can block airflow. Use a soft brush and vacuum to clean vent openings, check flashing for loose fasteners or deteriorating sealant, and ensure attic insulation hasn’t shifted to block the air pathway. Properly maintained roof to wall vent systems can last 20 to 30 years with minimal intervention.
Will a roof to wall vent work without soffit vents?
A roof to wall vent requires adequate intake ventilation (typically soffit or eave vents) to function effectively. Without intake vents, insufficient air enters the system to create meaningful airflow, drastically reducing ventilation performance. The general rule requires balanced ventilation with intake area equal to or slightly greater than exhaust area.
What tools are needed to install a roof to wall vent?
Installing a roof to wall vent requires a circular saw for cutting roof decking, hammer for fastening, chalk line and tape measure for layout, utility knife for trimming, and a caulking gun for applying sealants. Safety equipment including fall protection harness, non-slip footwear, and eye protection are essential. Additional helpful tools include a reciprocating saw for precise cuts and tin snips for metal flashing adjustments.
How long does roof to wall vent installation take?
A typical roof to wall vent installation covering 16 to 24 linear feet takes an experienced DIYer approximately 3 to 6 hours to complete. Professional installers can often complete the same project in 2 to 4 hours due to specialized equipment and experience. Complex installations involving difficult roof access, steep pitches, or extensive flashing fabrication may require additional time.
Conclusion
The roof to wall vent represents an essential ventilation solution for architectural configurations where traditional ridge vents cannot be installed, providing effective exhaust for shed roofs, dormers, and porch additions. Proper selection, installation, and maintenance of a roof to wall vent system protects your home from moisture damage, reduces energy costs, and extends roofing material lifespan by ensuring adequate attic ventilation. By understanding the installation process, costs, benefits, and maintenance requirements detailed in this guide, homeowners can make informed decisions about implementing roof to wall vent solutions that deliver long-lasting performance and value.
Other Resources
Roof-2-Wall – Manufacturer website presenting roof-to-wall ventilation products designed to improve airflow at roof intersections.
DCI Products – Product page detailing shed roof roof-to-wall vent solutions for proper attic ventilation.
Cor-A-Vent – Informational blog post explaining roof-to-wall vent applications and installation benefits.
Other Helpful Articles
UPVC Roof Sheet Install Fast – Guide outlining efficient installation methods for UPVC roof sheets.
Amish Metal Roofing – Article providing information about Amish metal roofing services and materials.
Roof Pipe Supports – Guide explaining rooftop pipe support systems and their installation considerations.