Roof Harness Setup: Easy Steps to Secure
Roof Harness Guide: Vital Tips for Safety
Working at heights is an inherent part of home maintenance, but it carries significant risks that homeowners often underestimate. Whether you are clearing out gutters, inspecting shingles for storm damage, or applying a new coat of paint to a dormer, gravity is a constant threat. The single most effective tool to mitigate this danger is a high-quality roof harness.
Understanding the mechanics and necessity of a roof harness is the first step toward responsible home ownership. Falls from roofs remain a leading cause of injury in the construction and DIY sectors. By investing time in learning about this equipment, you are prioritizing your well-being.
This guide will walk you through everything you need to know, from the basic definitions to the intricate details of installation and maintenance, ensuring you are fully prepared for your next project.
What Is a Roof Harness System?
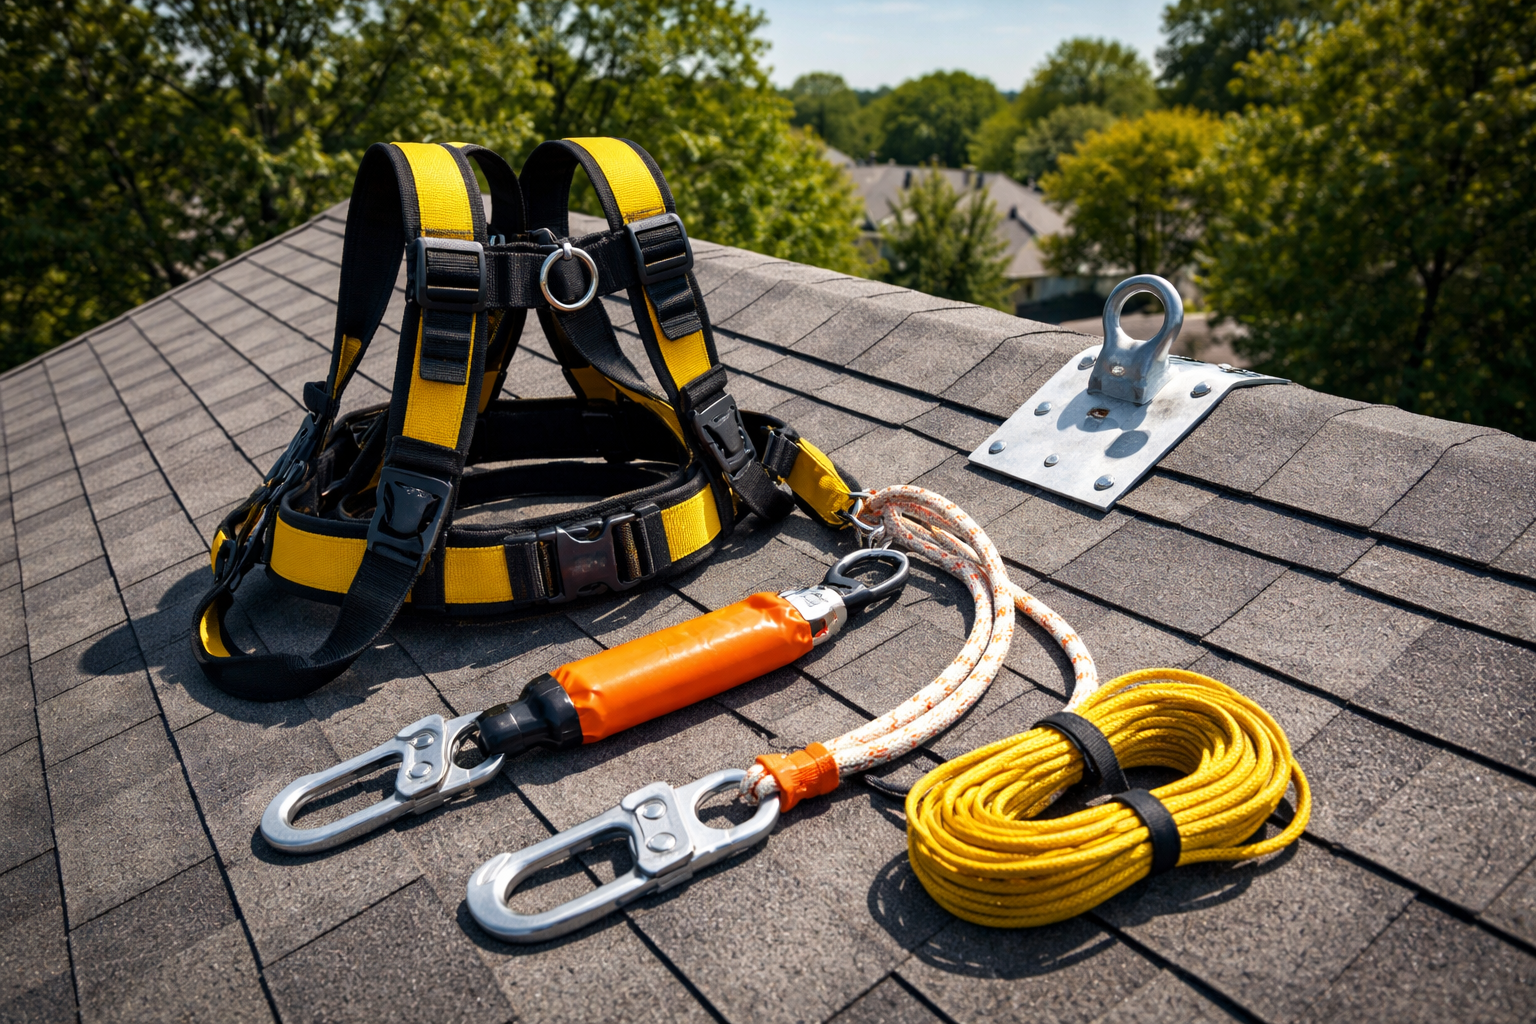
A roof harness is part of a larger system known as a Personal Fall Arrest System (PFAS). It is not merely a belt or a strap; it is an engineered device designed to distribute the forces of a fall across the strongest parts of the body, specifically the thighs, pelvis, chest, and shoulders. This distribution prevents severe injury that could occur if the force were concentrated on a single area, such as the waist.
The harness itself is constructed from durable, high-strength webbing, usually polyester or nylon, which is resistant to abrasion and UV damage. It features adjustable straps and buckles to ensure a snug fit, which is critical for the equipment to function correctly. A loose roof harness can cause significant trauma during a fall arrest or even allow the user to slip out entirely.
While the harness is the wearable component, it works in conjunction with other critical parts. These typically include a lanyard or lifeline, a rope grab to adjust the length of the line, and a secure anchor point attached to the roof structure. Without these connecting elements, the roof harness serves no purpose. Together, they form a safety chain where every link must be robust and reliable.
How to Find the Right Gear
Finding the appropriate roof harness requires more than just picking the first item off the shelf at a hardware store. You must consider the specific nature of the work you will be doing. For occasional DIY tasks, a basic compliance harness might suffice. However, for longer projects requiring extended suspension or frequent movement, a premium harness with added padding and ergonomic features is advisable to prevent fatigue and chafing.
You can find these systems at specialized industrial supply stores, major home improvement retailers, or online marketplaces dedicated to construction safety. Reading user reviews can also provide insight into the comfort and durability of a specific roof harness model before you make a purchase.
How to Buy Smartly
When you decide to buy a roof harness, avoid the temptation to purchase used equipment. Safety gear has a lifespan and a history. A used harness might have been subjected to a fall previously, which compromises its structural integrity even if the damage is not visible to the naked eye. UV exposure and chemical contact can also degrade the webbing over time. Always purchase new equipment to ensure maximum reliability.
Price should not be the only determining factor. While it is understandable to look for a deal, your life is worth more than the savings on a discount brand. Look for kits that include the roof harness, the rope, the shock absorber, and the reusable roof anchor. Buying a complete kit is often more cost-effective and ensures that all components are compatible with one another.
Tip: Look for brands that offer a warranty or guarantee. This often indicates the manufacturer’s confidence in their product.
When buying, also consider the climate you work in. If you work in hot weather, look for a roof harness with breathable mesh or moisture-wicking padding. For colder climates, ensure the harness is adjustable enough to fit over bulky winter clothing without restricting movement.
How Much Is the Investment?
The cost of a roof harness varies significantly based on features, brand, and material quality. Understanding the price tiers can help you budget effectively for your safety needs.
-
Basic Models: Entry-level harnesses can cost between $50 and $100. These are generally stripped-down versions with minimal padding. They are safe and compliant but may be uncomfortable for all-day use.
-
Mid-Range Models: For $100 to $250, you can find a roof harness with better ergonomic design, quick-connect buckles, and added back support. These are ideal for serious DIYers or semi-professionals.
-
Premium Models: Professional-grade harnesses can range from $250 to over $500. These offer superior comfort, specialized tool belts, suspension trauma relief straps, and lighter, stronger materials.
When calculating the total investment, remember to include the cost of the entire system, not just the roof harness. A full kit including the lifeline, anchor, and rope grab will typically range from $150 to $400 depending on the quality of the individual components. While this might seem like a significant expense, it is a fraction of the cost of emergency room visits or long-term rehabilitation following a fall.
How to Install the Anchor Point
The effectiveness of your roof harness is entirely dependent on the strength of your anchor point. The anchor is the secure point of attachment on the roof structure that supports the entire weight of the system and the user in the event of a fall.
- To install a temporary roof anchor:
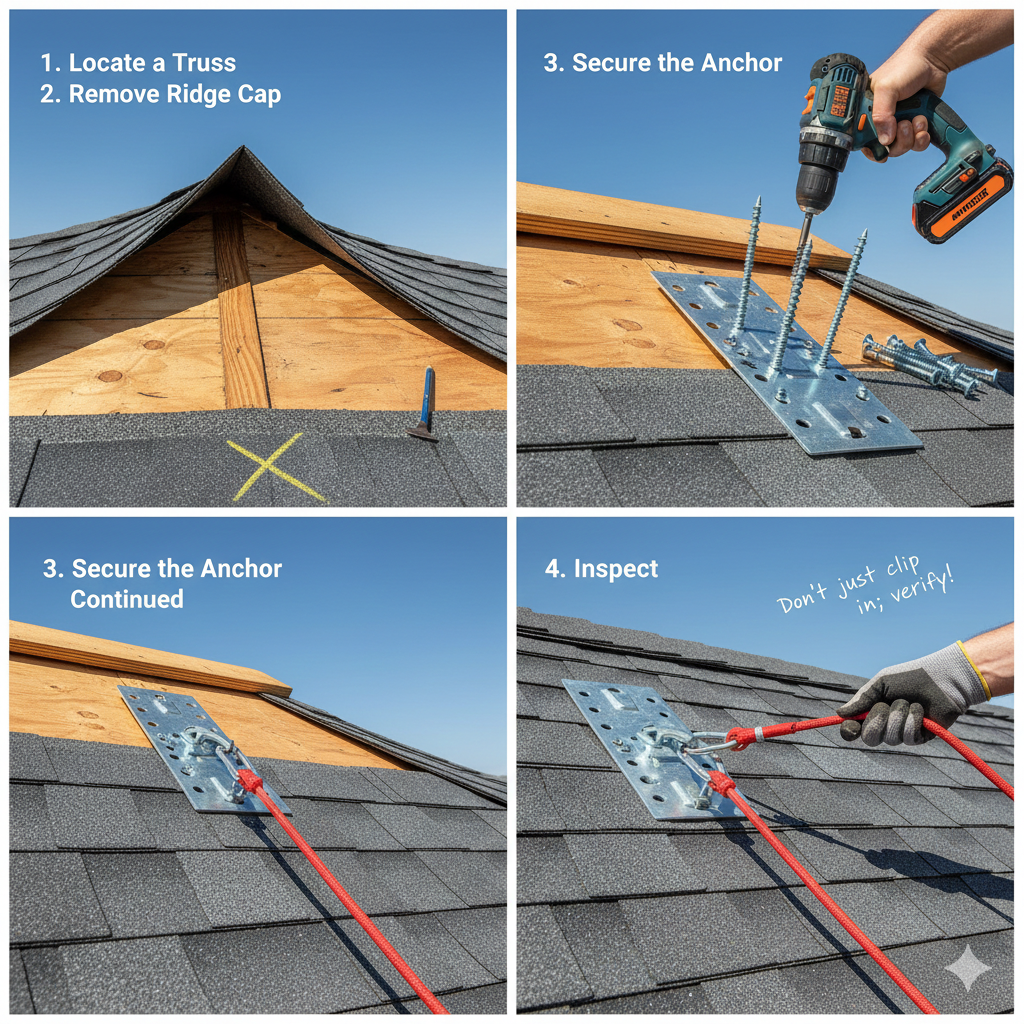
1. Locate a Truss: You must attach the anchor to a structural member of the roof, typically a truss or rafter. Do not attach it merely to the plywood sheathing, as this cannot support the dynamic load of a fall. - 2. Remove Ridge Cap: If installing at the peak, carefully lift or remove the ridge cap shingles to expose the sheathing over a truss.
- 3. Secure the Anchor: Place the anchor plate over the truss location. Use the specific screws or nails provided by the manufacturer. Fill every hole in the anchor plate to ensure full strength.
- 4. Inspect: Give the anchor a firm tug to ensure it is solid before clipping in your lifeline.
Once the anchor is secure, you can connect your lifeline and then attach it to the dorsal D-ring on your roof harness. Never assume an anchor is safe; verify the structure beneath it. If you have a permanent anchor installed, inspect it for rust or looseness before every use.
Special Focus: Usage and Safety Techniques
Using fall protection requires knowledge beyond just putting on the gear. It involves understanding how the equipment functions in real-world scenarios.
1: How to use a roof harness
Proper usage begins with the inspection. Before donning the gear, check the roof harness for frayed stitching, cut webbing, or bent hardware. Once inspected, slip the harness over your shoulders like a vest. Ensure the D-ring is located in the center of your back, between your shoulder blades. Fasten the leg straps first, then the chest strap. The fit should be snug but allow full range of motion. You should be able to slide a flat hand between the strap and your body, but not a fist.
2: Roof safety harness
The term “safety” implies that the equipment is foolproof, but a roof safety harness is only as good as the user’s discipline. Always maintain 100% tie-off. This means you are connected to the anchor point before you transition from the ladder to the roof. Many accidents happen during this transfer. Additionally, be aware of the “pendulum effect.” If you work too far sideways from your anchor point and fall, you will swing like a pendulum, potentially hitting the ground or the side of the building. Keep your work area within a 30-degree angle of the anchor.
3: Harness on roof
Wearing a harness on roof surfaces changes how you move. The rope can be a tripping hazard. You must constantly manage your line, keeping it behind you and taut enough to prevent a long freefall but loose enough to allow movement. Walk deliberately. Avoid crossing your legs or making sudden movements. The harness adds weight and can alter your center of gravity slightly, so take time to adjust to the sensation of being tethered.
4: How to use a safety harness on a roof
When you are actively working, use the rope grab to adjust your tether length. If you are moving down toward the edge, lengthen the line. If you are moving up toward the peak, shorten it. The goal of using a safety harness on a roof is to limit the distance you can fall. Ideally, you want to use it in “fall restraint” mode, where the rope is short enough that you physically cannot reach the edge of the roof. If fall restraint isn’t possible, you rely on fall arrest, where the roof harness catches you after a short drop.
What Is the Cost of Maintenance?
Maintaining your roof harness is relatively inexpensive but requires consistency. The primary cost is your time. Regular inspections take only a few minutes but can save your life. You do not need expensive chemicals or tools to maintain the gear.
If a harness is damaged—for example, if it has been involved in a fall, has been cut, or has come into contact with harsh chemicals like paint thinner or strong solvents—it must be retired immediately. The cost of replacement is the only monetary factor here. Never try to repair a damaged roof harness with sewing or tape. The structural integrity of the manufactured webbing cannot be replicated at home.
Storage also plays a role in maintenance costs. You need a cool, dry place away from direct sunlight. Investing in a simple storage bag or bin (often under $20) protects the harness from UV rays, rodents, and moisture, extending its usable life significantly.
How to Clean the Equipment
Dirt, grit, and sweat can degrade the fibers of your roof harness over time. Cleaning it properly ensures that the webbing remains flexible and strong.
2. Solution: Mix a mild detergent (like dish soap) with warm water. Do not use bleach, chlorine, or abrasive cleaners, as these can weaken the nylon or polyester fibers.
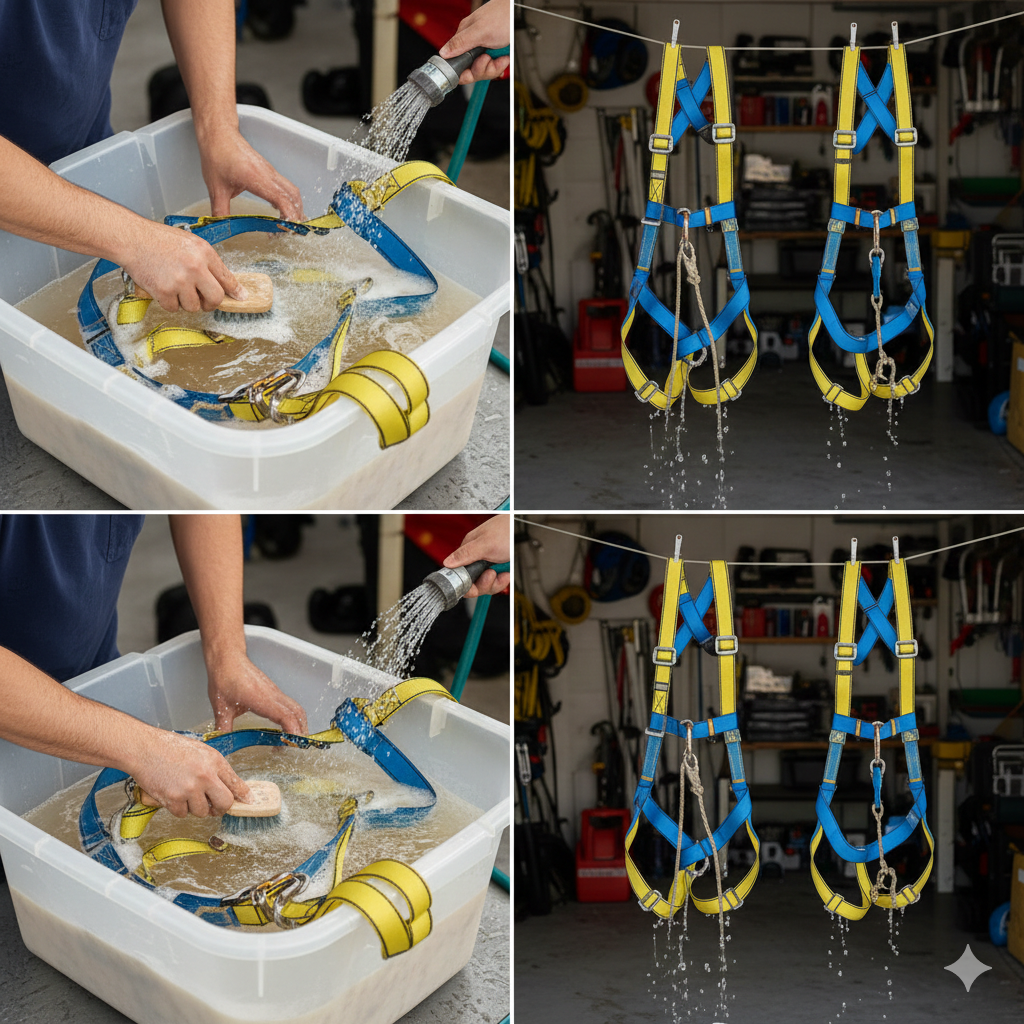
3. Scrubbing: Use a sponge or a soft-bristle brush to gently scrub the straps. Pay attention to areas that soak up sweat or have accumulated roof grit.
4. Rinsing: Rinse thoroughly with clean water. Ensure all soap residue is removed.
5. Drying: Hang the roof harness to air dry in a shaded, well-ventilated area. Never put it in a dryer or use a heat gun, as high heat can damage the synthetic materials.
Regular cleaning not only protects the material but also forces you to inspect every inch of the roof harness closely, helping you spot potential issues before they become dangerous.
Advantages of Using Protection
The primary advantage of using a roof harness is, unequivocally, the preservation of life. Falls from roofs can result in spinal injuries, traumatic brain injuries, or death. The harness prevents these catastrophic outcomes.
Beyond safety, using a roof harness provides psychological security. When you feel safe, you work more efficiently. You can focus on the repair or installation task at hand rather than constantly worrying about your footing. This increased confidence often leads to better workmanship and faster project completion.
Furthermore, using a roof harness ensures compliance with legal and insurance requirements. If you are a contractor, OSHA regulations mandate fall protection. Even as a homeowner, if you hire help, providing or requiring safety gear can protect you from liability lawsuits in the event of an accident on your property.
Challenges Connected to Safety Gear
Despite the benefits, there are challenges associated with wearing a roof harness. The most common complaint is comfort. In hot weather, the straps can feel restrictive and hot, leading to sweating and fatigue. The weight of the hardware can also be burdensome during long shifts.
Another challenge is restricted mobility. The lifeline can get tangible around obstacles like chimneys, vents, or solar panels. Managing the rope requires constant attention, which can be distracting. Learning to navigate the roof while tethered takes practice and patience.
Installation of the anchor point can also be a hurdle. Some homeowners are reluctant to drill holes into their roof to install a temporary anchor for a roof harness. However, the minor cosmetic repair needed after removing an anchor is a small price to pay compared to the cost of a fall.
How to Do a Fit Test
A properly fitted roof harness is essential for the system to work. If the straps are too loose, the force of a fall can cause severe injury to the groin or armpits.
To perform a fit test:
1. Buckle Up: Secure all chest, leg, and waist straps.
2. The Hand Test: Attempt to slide your flat hand under the leg straps. It should fit snugly. If you can make a fist and pull it out, the strap is too loose.
3. The Reach Test: Reach back and touch the dorsal D-ring. It should be located between your shoulder blades. If it rests on your neck or lower back, adjust the torso straps.
4. Movement Test: Squat down and stand up. The roof harness should move with you without pinching excessively or restricting your ability to stand straight.
Adjusting your gear before you ever step on the ladder is a critical “how-to” step that ensures the roof harness performs as designed.
Final Thoughts on Safety Culture
Adopting a safety culture means making the roof harness a non-negotiable part of your workflow. It is easy to think, “I’ll just be up there for a minute,” but accidents do not run on a schedule. They happen in split seconds. By normalizing the use of fall protection, you set a standard for everyone around you.
Whether you are a seasoned roofer or a weekend warrior, the roof harness is your most valuable tool. It represents a commitment to returning to your family safely at the end of the day. Do not view it as a burden or an optional accessory. View it as an essential component of the job, just like your hammer or your ladder.
Prioritizing safety through the use of a roof harness transforms a high-risk environment into a controlled workspace. It empowers you to maintain your home without risking your health.
FAQ : roof harness
Can I use a waist belt instead of a full-body roof harness?
No, a waist belt is dangerous for fall arrest. In a fall, a waist belt concentrates all the force on your midsection, which can cause severe internal injuries or spinal damage. A full-body roof harness distributes the force safely across the thighs, pelvis, chest, and shoulders.
Do roof harnesses expire?
Yes, most manufacturers recommend retiring a roof harness after 5 years of use, even if it looks fine. If the harness is subjected to a fall, it must be replaced immediately, regardless of its age.
Can I attach my roof harness to a chimney?
No, chimneys are not designed to withstand the lateral forces of a fall. You must attach your roof harness to a certified anchor point that is securely fastened to the structural trusses of the roof.
Is it difficult to walk with a roof harness on?
It takes some adjustment. The rope adds a tripping hazard, and the straps restrict movement slightly. However, with practice, you will learn to manage the line and move deliberately, which actually improves overall safety.
What is suspension trauma?
Suspension trauma occurs when a person hangs in a roof harness for too long after a fall. The leg straps can cut off blood circulation, leading to unconsciousness. Suspension trauma relief straps allow the user to stand up in the harness to relieve pressure while waiting for rescue.
Can I share my roof harness with someone else?
Yes, provided it is adjustable and fits the other person correctly. However, each user must perform their own fit test and inspection before using the roof harness to ensure it is safe for their specific body type.
Conclusion
Working on a roof demands respect for gravity and a dedication to safety protocols. The roof harness is the cornerstone of this protection. Throughout this guide, we have explored what the system is, how to find and buy the best options, and the critical steps for installation and maintenance. We have also discussed the specific techniques for using a roof harness effectively and the costs associated with staying safe.
The investment in a quality roof harness is minimal compared to the catastrophic costs of a fall. By choosing the right gear, maintaining it properly, and wearing it correctly every time you leave the ground, you ensure that your home improvement projects remain productive and, most importantly, accident-free. Remember, the best fall protection system is the one you actually use. Make the smart choice and buckle up before you climb up.
Other Resources
Columbia Safety – Product category featuring roof safety kits designed for fall protection on roofing projects.
Fall Protection Pros – Collection page offering roofer safety kits and fall protection systems.
YouTube – Roof Safety Harness Video – Instructional video demonstrating proper use of roof safety and fall protection equipment.
Safety Rail Source – Product listing of safety harnesses used for roofing and elevated work.
Other Helpful Articles
Roof Repair Estimate – Guide explaining how roof repair estimates are prepared and evaluated.
Roof Replacement Estimate – Article detailing cost factors and considerations for roof replacement estimates.
Roof Ridge Vent – Article describing roof ridge vents and their role in proper roof ventilation.