Roof Vent Cap: Amazing Benefits You Must Know
Roof Vent Cap: Complete Guide to Protection and Installation
A roof vent cap serves as a critical protective component for your home’s ventilation system. This essential roofing element prevents water, debris, animals, and harsh weather from entering your vent pipes while allowing proper air circulation throughout your home. Whether you’re dealing with plumbing vents, dryer exhausts, or attic ventilation, understanding the functionality and importance of a roof vent cap can save you from costly repairs and health hazards.
Many homeowners overlook the significance of properly installed and maintained roof vent caps until problems arise. Water damage, pest infestations, and inadequate ventilation can all stem from missing, damaged, or improperly installed caps. This comprehensive guide explores everything you need to know about roof vent cap selection, installation, maintenance, and troubleshooting to ensure your home remains protected year-round.
What Is a Roof Vent Cap
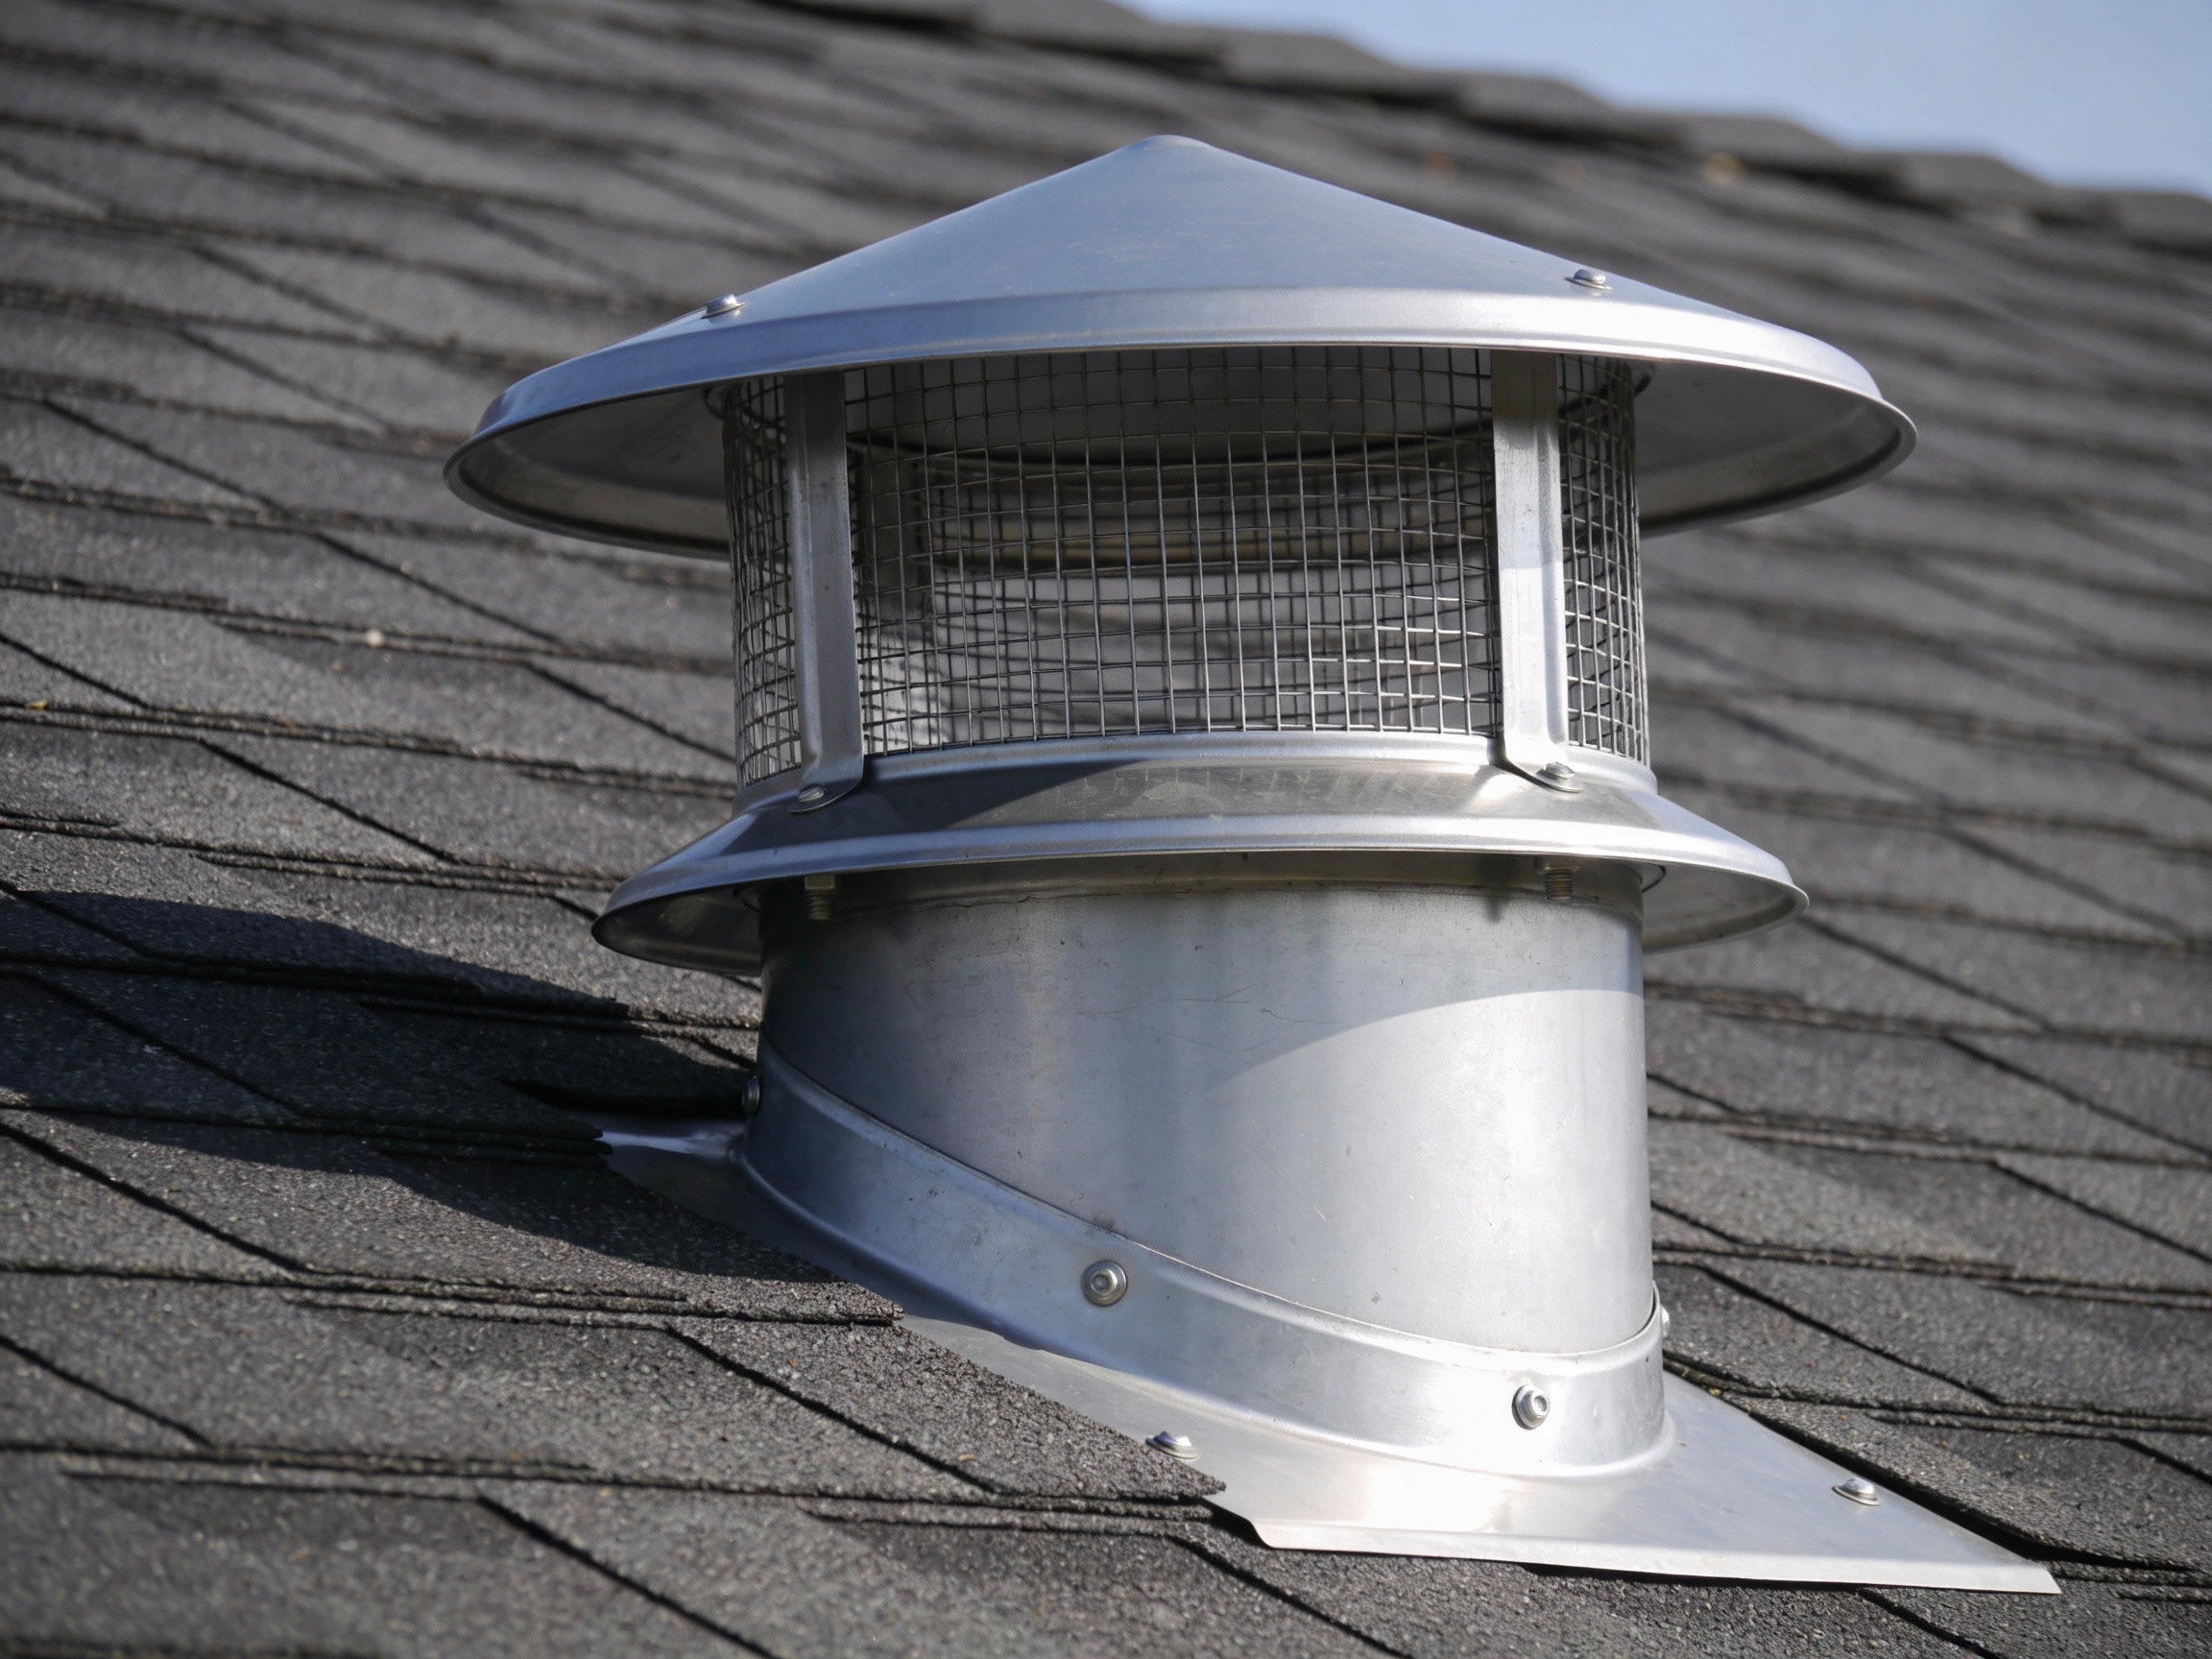
A roof vent cap is a protective covering installed at the top of vent pipes that penetrate through your roof surface. These caps feature a hood or dome design that shields the opening from precipitation while maintaining adequate airflow. The primary purpose of a roof vent cap is to create a barrier against external elements without restricting the ventilation system’s functionality.
The typical roof vent cap consists of several components that work together to provide protection. The base flange attaches securely to the roof surface, creating a watertight seal around the vent pipe. The cap portion extends above the pipe opening, featuring strategically placed openings or screens that allow air movement while blocking debris and wildlife entry.
Different types of roof vent caps serve specific ventilation needs throughout your home. Plumbing vent caps accommodate sewer gas exhaust, dryer vent caps handle moisture-laden air from laundry appliances, and general ventilation caps facilitate attic or roof space airflow. Each type features design elements optimized for its particular application and exposure conditions.
Materials used in roof vent cap manufacturing include aluminum, galvanized steel, copper, and high-grade plastics. The material selection impacts durability, weather resistance, and aesthetic compatibility with your roofing system. Quality roof vent caps undergo coating treatments or incorporate rust-resistant alloys to withstand continuous exposure to moisture, temperature fluctuations, and UV radiation.

How to Choose the Right Roof Vent Cap
Selecting an appropriate roof vent cap requires careful consideration of multiple factors that affect performance and longevity. The first step involves measuring your existing vent pipe diameter accurately, as roof vent caps are sized to fit specific pipe dimensions ranging from 1.5 inches to 4 inches or larger for specialized applications.
Climate conditions in your region significantly influence roof vent cap selection. Areas with heavy snowfall benefit from caps with steep slopes that prevent snow accumulation and ice damming. Coastal regions experiencing salt air exposure require corrosion-resistant materials like copper or marine-grade aluminum. High-wind areas necessitate low-profile designs with secure mounting systems.
The type of ventilation system determines the required roof vent cap specifications. Consider these key factors:
-
Plumbing vents need caps without dampers to maintain continuous airflow
-
Dryer vents require dampered caps that prevent backdrafts when appliances aren’t operating
-
Attic ventilation benefits from caps with larger openings for maximum air exchange
-
Kitchen and bathroom exhaust systems need caps with grease-resistant properties
Aesthetic considerations matter when selecting a roof vent cap visible from ground level or neighboring properties. Many manufacturers offer color options matching common roofing materials, allowing the cap to blend seamlessly with your roof’s appearance. Premium options feature architectural styling that enhances rather than detracts from your home’s curb appeal.
How to Find Quality Roof Vent Cap Products
Locating reliable roof vent cap suppliers requires research across multiple channels to ensure product quality and fair pricing. Start your search at local home improvement centers, where you can physically examine different models and consult with knowledgeable staff about compatibility with your specific needs.
Specialized roofing supply stores stock professional-grade roof vent caps often superior to big-box retailer options. These establishments cater to contractors and serious DIY enthusiasts, offering higher-quality materials and construction methods. Sales representatives at roofing suppliers typically possess extensive technical knowledge and can recommend appropriate solutions based on your roof type and climate conditions.
Online marketplaces provide extensive roof vent cap selections with detailed specifications, customer reviews, and competitive pricing. Reputable manufacturers maintain direct-to-consumer websites featuring comprehensive product information, installation guides, and warranty details. Compare multiple sources to identify the best value proposition balancing cost, quality, and shipping considerations.
Professional recommendations from licensed roofing contractors offer valuable insights into roof vent cap performance and reliability. Contractors who regularly install these products can identify brands with proven track records and warn against problematic models. Some contractors sell roof vent caps directly to homeowners at competitive prices while ensuring proper fit and compatibility.
Building code compliance represents a crucial consideration when selecting a roof vent cap for plumbing or mechanical systems. Contact your local building department to verify that your chosen product meets current codes and regulations. Non-compliant installations may fail inspections and create liability issues if problems develop.
How to Buy a Roof Vent Cap
The purchasing process for a roof vent cap begins with accurate measurement and system identification to ensure compatibility. Measure the outer diameter of your existing vent pipe or the opening if you’re installing new ventilation. Record your roof pitch angle, as some roof vent caps are designed specifically for steep or low-slope applications.
Budget allocation for roof vent cap purchases should account for quality differences between economy and premium options. Entry-level plastic caps retail for minimal investment but may require more frequent replacement. Mid-range aluminum or steel caps offer improved durability at moderate prices. Premium copper or architectural-grade caps command higher prices but provide superior longevity and aesthetic appeal.
When purchasing online, verify the seller’s reputation through reviews and ratings before committing to a transaction. Confirm the return policy in case the roof vent cap doesn’t fit properly or arrives damaged. Calculate total costs including shipping, taxes, and any required mounting hardware or sealants not included with the cap.
Bulk purchasing opportunities exist for homeowners replacing multiple roof vent caps simultaneously or contractors managing large projects. Many suppliers offer quantity discounts when ordering multiple units, potentially reducing per-unit costs significantly. Standardizing on a single model simplifies installation and future maintenance by ensuring parts compatibility.
Warranty coverage varies significantly between roof vent cap manufacturers and should influence purchasing decisions. Quality products typically include warranties ranging from 5 to 25 years, protecting against defects in materials and workmanship. Review warranty terms carefully to understand coverage limitations and registration requirements necessary to activate protection.
Roof Vent Cap Cost Analysis
Understanding roof vent cap pricing requires examining multiple cost factors beyond the initial product purchase. Basic plastic or galvanized steel caps for standard residential applications start at affordable price points per unit. Mid-range aluminum caps with improved weather resistance and design features cost moderately more. Premium copper or specially coated caps command higher prices reflecting superior materials and craftsmanship.
Professional installation costs add substantially to the total project expense when hiring contractors. Labor charges for roof vent cap replacement typically include removal of the old cap, roof surface preparation, proper flashing installation, and leak-proof sealing. Complex installations on steep roofs or hard-to-reach locations increase labor time and associated costs. Most contractors charge by the unit with reduced per-cap rates for multiple installations during a single service call.
DIY installation eliminates labor expenses but requires appropriate tools, materials, and safety equipment. Budget for sealants, flashing materials, roofing cement, and fasteners not included with most roof vent caps. Safety equipment including roof anchors, harnesses, and proper footwear represents additional upfront investment for homeowners lacking these items.
Long-term cost considerations extend beyond initial purchase and installation expenses. A quality roof vent cap installed correctly provides years of trouble-free service, whereas cheaper alternatives may require premature replacement. Calculate total cost of ownership by dividing the combined purchase and installation price by the expected service life to determine true annual cost.
Emergency replacement costs significantly exceed planned installations due to urgent service premiums and potential secondary damage. A failed roof vent cap allowing water infiltration can cause extensive interior damage requiring repairs far exceeding the cap’s replacement cost. Proactive replacement of aging caps prevents these expensive scenarios while providing predictable maintenance budgeting.
How to Install a Roof Vent Cap
Proper roof vent cap installation requires careful planning, appropriate tools, and adherence to safety protocols. Before beginning work, assess weather conditions and postpone installation during inclement weather or high winds. Gather all necessary materials including the new cap, roofing cement, caulking, replacement flashing if needed, and appropriate fasteners.
Safety measures are paramount when working on roofs. Use properly rated fall protection equipment including harnesses and anchor points on steep or high roofs. Wear non-slip footwear with good traction, and never work alone in case emergency assistance becomes necessary. Position ladders on stable ground with appropriate extension beyond the roof edge.
The installation process for a roof vent cap follows these sequential steps:
-
Remove the existing cap by carefully prying up fasteners and breaking sealant bonds
-
Inspect the vent pipe and surrounding roof surface for damage or deterioration
-
Clean the vent pipe opening and flashing area thoroughly, removing old sealant residue
-
Apply roofing cement around the base flange area where the new cap will sit
-
Position the new roof vent cap over the pipe, ensuring proper orientation and alignment
-
Secure the cap using appropriate fasteners driven through pre-drilled holes in the flange
-
Apply additional roofing cement around the flange perimeter, creating a waterproof seal
-
Smooth sealant edges to promote proper water drainage away from the cap
Specialized techniques apply when installing specific roof vent cap types. Dryer vent caps require proper damper orientation allowing outward airflow while preventing backdrafts. Ensure the damper operates freely without binding or sticking. Some roof vent caps feature adjustable bases accommodating various roof pitches; verify correct angle adjustment before final fastening.
Post-installation inspection verifies proper roof vent cap function and sealing. Check for gaps between the flange and roof surface that might allow water penetration. Verify that screens or louvers remain unobstructed and allow adequate airflow. Test any moving components like dampers to ensure smooth operation without interference.
Roof Dryer Vent Cap Specifications
A roof dryer vent cap serves the specific purpose of exhausting moisture-laden air from clothes dryers while preventing outdoor air, pests, and precipitation from entering the duct system. These specialized caps incorporate damper mechanisms that open under positive air pressure from the dryer and close automatically when the appliance stops operating, preventing heat loss and pest entry.
The design requirements for a roof dryer vent cap differ substantially from standard plumbing vent caps. The cap must accommodate high-volume airflow carrying lint particles that can accumulate on screens and dampers. Quality dryer vent caps feature larger openings, smooth interior surfaces minimizing lint buildup, and accessible designs facilitating regular cleaning and maintenance.
Material selection for roof dryer vent caps prioritizes durability against moisture exposure and temperature fluctuations. Aluminum construction offers excellent corrosion resistance and lightweight properties. The cap should feature a hood design that prevents rain penetration even during heavy downpours while maintaining adequate exhaust capacity for efficient dryer operation.
Installation considerations for a roof dryer vent cap include proper duct sizing and routing to minimize air resistance and lint accumulation. The duct run from the dryer to the roof vent cap should be as short and straight as possible, with minimal bends that create turbulence and reduce airflow efficiency. Use rigid metal ducting rather than flexible plastic or foil materials that trap lint and pose fire hazards.
How to Install a Roof Vent Cap Properly
- Professional installation techniques for a roof vent cap ensure long-lasting performance and complete weather protection. The critical foundation of any successful installation involves proper flashing integration with the roofing system. The base flashing must extend beneath surrounding shingles, creating a layered waterproofing system where each component sheds water to the layer below.
- Advanced sealing methods incorporate multiple layers of protection against water infiltration. Apply roofing cement beneath the flange before positioning the roof vent cap, then add bead sealant around the exposed flange edges after fastening. Some professionals apply additional sealant at shingle intersections near the cap for extra protection in vulnerable areas.
- Fastener selection and placement significantly impact roof vent cap longevity and weather resistance. Use corrosion-resistant screws or nails appropriate for your roofing material, driving fasteners through flange holes into solid roof decking. Avoid over-tightening that distorts the flange or under-tightening that allows movement. Space fasteners evenly around the flange perimeter at intervals specified by manufacturer guidelines.
- Pitch adaptation techniques ensure proper roof vent cap function regardless of roof slope. Some caps include adjustable bases accommodating various angles, while others require specific pitch-matched models. Verify that the installed cap sits level with its hood properly oriented to shed water downslope away from the vent opening.
- Common installation mistakes to avoid include inadequate sealant application, improper flashing layering, and insufficient fastener penetration. Never rely solely on sealant without mechanical fasteners, as temperature cycles and roof movement will eventually compromise adhesive-only installations. Ensure adequate clearance around the roof vent cap for future maintenance access and snow removal.

Do All Roof Vents Need a Cap
The question of whether all roof vents require caps depends on the vent type, purpose, and local building codes. Plumbing vent pipes extending through roofs universally require some form of protective covering to prevent debris accumulation, animal entry, and water infiltration that could affect drainage system function. A properly installed roof vent cap on plumbing vents maintains code compliance while protecting building integrity.
Passive attic ventilation systems may utilize different approaches depending on design type. Ridge vents incorporate built-in protection through their continuous design and baffle systems that prevent precipitation entry while maximizing airflow. Box vents and turbine vents include integral weather protection as part of their manufactured construction, functioning as self-contained units without separate caps.
Mechanical exhaust systems including kitchen and bathroom fans require terminal caps that combine weather protection with backdraft prevention. These specialized caps incorporate dampers closing when fans stop operating, preventing outdoor air infiltration and heat loss. The roof vent cap for mechanical exhausts must meet specific code requirements for makeup air and fire safety depending on the application.
Regional climate conditions influence roof vent cap necessity and design requirements. Areas experiencing extreme weather conditions including heavy snow, intense rainfall, or high winds benefit from robust capping solutions providing maximum protection. Moderate climates with less severe weather may accommodate simpler designs, though protection against pest entry remains important regardless of location.
Do Plumbing Roof Vents Need Caps
Plumbing roof vents absolutely require caps for multiple critical reasons affecting health, safety, and building integrity. The primary function of a roof vent cap on plumbing systems involves preventing blockages that would compromise drain-waste-vent system operation. Without proper capping, leaves, debris, bird nests, and other obstructions accumulate in vent pipes, restricting airflow necessary for proper drainage and causing system failures.
Building codes universally mandate roof vent cap installation on plumbing vents, though specific requirements vary by jurisdiction. The International Plumbing Code and similar regulations specify minimum standards for vent terminations including protective screening preventing pest entry while maintaining adequate airflow. Non-compliance risks inspection failures, insurance complications, and liability exposure if problems develop.
The health and safety implications of uncapped plumbing vents extend beyond simple drainage issues. Sewer gases escaping through unprotected vents create odor problems and potential health hazards from hydrogen sulfide and methane exposure. Animals entering uncapped vents may die within the system, creating severe odor problems and blockages requiring expensive remediation.
Weather protection provided by a roof vent cap prevents water accumulation within plumbing vent stacks that could freeze in cold climates, causing blockages or pipe damage. Rain and snow entering unprotected vents may travel down the stack into the building envelope, potentially causing water damage to walls, ceilings, and insulation. The minimal investment in proper capping prevents these extensive damage scenarios.
How to Clean and Maintain a Roof Vent Cap
Regular maintenance extends roof vent cap service life and ensures continued protection for your ventilation systems. Establish a biannual inspection schedule examining caps during spring and fall when accessing the roof safely is most practical. Look for signs of damage including cracks, corrosion, loose fasteners, or sealant deterioration requiring attention.
Cleaning procedures for a roof vent cap vary based on the type and exposure conditions. Dryer vent caps accumulate lint requiring removal to maintain proper airflow and reduce fire hazards. Use a stiff brush to dislodge accumulated lint from screens and louvers, then vacuum away loosened material. Kitchen exhaust caps may develop grease buildup necessitating degreasing cleaner application and thorough rinsing.
Standard roof vent cap maintenance involves these routine tasks:
-
Remove debris including leaves, twigs, and dirt from cap surfaces and openings
-
Inspect and clean screens or louvers ensuring unobstructed airflow
-
Test moving components like dampers for smooth operation without binding
-
Check sealant condition around the base flange and reapply if deteriorated
-
Tighten any loose fasteners and replace missing screws or nails
-
Verify that the cap remains properly aligned and hasn’t shifted position
Winter maintenance considerations address ice and snow accumulation affecting roof vent cap function. Heavy snow buildup around caps may block airflow or damage components through weight and freezing cycles. Carefully remove excessive snow accumulation while avoiding damage to the cap or surrounding roof surface. Never use sharp tools that might puncture roofing materials or damage cap components.
Professional maintenance services provide comprehensive roof vent cap inspections identifying problems before they cause damage. Roofing contractors performing annual roof inspections can assess cap condition and recommend repairs or replacements. This proactive approach prevents emergency situations and extends overall roofing system longevity.

How Long Does a Roof Vent Cap Last
The service life of a roof vent cap depends on material quality, installation workmanship, environmental exposure, and maintenance practices. Economy plastic caps exposed to intense UV radiation may deteriorate within five to seven years, becoming brittle and prone to cracking. Mid-grade aluminum or steel caps typically provide fifteen to twenty years of reliable service when properly maintained.
Premium materials significantly extend roof vent cap longevity. Copper caps develop a protective patina offering superior corrosion resistance, often lasting thirty to fifty years or longer with minimal maintenance. Stainless steel caps provide similar durability in harsh coastal environments where salt air accelerates corrosion of standard metals. These premium options justify higher initial costs through extended service life and reduced replacement frequency.
Environmental factors substantially impact roof vent cap deterioration rates. Coastal locations with salt air exposure accelerate corrosion of metal components. High-altitude areas experiencing intense UV radiation degrade plastic and rubber components faster. Regions with extreme temperature fluctuations create expansion and contraction cycles stressing materials and sealants. Industrial areas with air pollution may cause premature finish degradation and corrosion.
Installation quality directly affects roof vent cap longevity regardless of material choice. Properly sealed and fastened caps resist weather infiltration and mechanical stress that causes premature failure. Poor installations allowing water penetration behind flanges accelerate roof deck deterioration, ultimately requiring extensive repairs beyond simple cap replacement. Professional installation typically ensures longer service life than DIY attempts lacking proper techniques and materials.
Signs indicating roof vent cap replacement necessity include visible rust or corrosion, cracked or broken components, loose mounting, deteriorated sealants, and damaged screens or dampers. Don’t wait for complete failure before replacement, as leaking caps cause secondary damage far exceeding replacement costs. Proactive replacement when deterioration becomes evident prevents these expensive scenarios.
Advantages of Installing a Roof Vent Cap
The benefits of proper roof vent cap installation extend throughout your home’s systems and structure. Primary advantages include comprehensive weather protection preventing rain, snow, and ice from entering vent pipes and potentially damaging interior spaces. The minimal investment in quality caps protects against water damage scenarios costing thousands in repairs.
Pest exclusion represents a critical roof vent cap benefit often overlooked until problems develop. Birds, squirrels, bats, and insects view uncapped vents as attractive entry points to warm interior spaces. Once inside vent systems, these pests create nests blocking airflow, generate odors, spread diseases, and cause structural damage. Screen-equipped caps effectively prevent entry while maintaining necessary ventilation.
Energy efficiency improvements result from properly capped ventilation systems preventing unwanted air exchange. Dampered caps on dryer and exhaust vents close when systems aren’t operating, preventing heated or cooled air from escaping while blocking outdoor air infiltration. This controlled ventilation reduces heating and cooling costs while maintaining indoor comfort levels.
System performance optimization occurs when roof vent caps maintain proper airflow without restrictions. Plumbing systems depend on adequate venting for proper drainage and trap seal maintenance. HVAC systems require balanced ventilation preventing negative pressure problems. Clean, unobstructed caps ensure these systems operate as designed, extending equipment life and preventing performance problems.
Property value enhancement accompanies well-maintained roofing systems including properly capped ventilation. Home inspections note missing, damaged, or inadequate vent caps as deficiencies requiring correction. Addressing these items proactively maintains property value and prevents negotiation issues during real estate transactions. Quality roof vent caps contribute to positive overall impressions of home maintenance and care.
Challenges and Solutions for Roof Vent Cap Issues
Common challenges associated with roof vent caps include improper sizing causing installation difficulties or inadequate performance. Oversized caps may not seal properly against roof surfaces, while undersized caps restrict necessary airflow. Solution strategies involve accurate measurement before purchase and verification of dimensional compatibility with existing vent pipes and roof configurations.
Sealant failure represents a persistent roof vent cap challenge in regions experiencing temperature extremes. Standard roofing cements may crack or separate under repeated expansion and contraction cycles. Address this issue by using premium elastomeric sealants specifically formulated for roofing applications and capable of maintaining flexibility across wide temperature ranges. Reapply sealants during routine maintenance before complete failure occurs.
Damper malfunction in specialized roof vent caps affects performance and energy efficiency. Lint accumulation, corrosion, or mechanical damage may prevent proper damper operation. Regular cleaning prevents lint-related problems, while corrosion requires damper replacement using compatible parts. Some situations necessitate complete cap replacement when damper mechanisms become unrepairable.
Ice damming around roof vent caps creates blockages and potential water infiltration during freeze-thaw cycles. This challenge particularly affects cold-climate installations where inadequate attic insulation allows heat loss melting snow around penetrations. Solutions include improving attic insulation, ensuring proper cap height above roof surface, and installing heating cables around vulnerable areas during extreme conditions.
Aesthetic concerns arise when roof vent caps clash visually with roofing materials or architectural style. Mismatched colors or inappropriate designs detract from curb appeal despite serving functional purposes. Modern manufacturers address this challenge through expanded color options and architectural styling matching various design preferences. Custom fabrication provides solutions for unique aesthetic requirements on premium properties.
Wind-driven rain penetration challenges certain roof vent cap designs during severe weather events. Standard caps may allow water entry under extreme wind conditions forcing precipitation sideways or upward. Enhanced designs featuring deeper hoods, wind baffles, or specialized louver configurations provide superior protection. Consider upgrading to storm-resistant models in regions experiencing frequent severe weather.
Frequently Asked Questions
Can I install a roof vent cap myself or should I hire a professional?
DIY roof vent cap installation is feasible for homeowners with appropriate skills, tools, and safety equipment. Simple replacements on accessible, low-slope roofs present manageable projects for experienced DIYers. However, steep roofs, multi-story homes, or complex installations involving flashing repairs require professional expertise ensuring proper waterproofing and safety compliance.
How do I know when my roof vent cap needs replacement?
Visible deterioration including cracks, rust, or broken components indicates replacement necessity. Other warning signs include pest infiltration, water stains near vents, reduced ventilation performance, and loose mounting. Regular inspections every six months help identify problems before they cause secondary damage requiring expensive repairs beyond simple cap replacement.
What is the difference between a roof vent cap for plumbing and one for dryer exhaust?
Plumbing vent caps remain open continuously facilitating constant air exchange necessary for proper drainage system function. Dryer vent caps incorporate dampers that open during appliance operation and close afterward, preventing outdoor air infiltration and energy loss. The materials and designs accommodate different airflow volumes and particle exposure specific to each application.
Do roof vent caps come in different colors to match my roof?
Quality manufacturers offer roof vent caps in various colors matching common roofing materials including black, brown, gray, white, and metallic finishes. Some brands provide custom color matching for premium applications. Color selection affects both aesthetic integration and performance, as darker colors absorb more heat potentially reducing service life in extreme climates.
How much does professional roof vent cap installation typically cost?
Professional installation costs vary by location, roof accessibility, and project complexity. Single cap replacements typically range from moderate to higher prices including labor and materials. Multiple cap installations during one service call reduce per-unit costs through efficiency gains. Emergency repairs command premium pricing compared to scheduled maintenance work.
Can a damaged roof vent cap cause interior water damage?
Absolutely. Failed caps allow water infiltration during precipitation events, potentially causing ceiling stains, insulation damage, and structural deterioration. Water may travel considerable distances from entry points before becoming visible, making source identification challenging. Prompt cap repair or replacement prevents progressive damage requiring extensive and expensive remediation.
What maintenance does a roof vent cap require?
Regular maintenance includes debris removal, screen cleaning, damper testing, sealant inspection, and fastener tightening. Dryer vent caps need frequent lint removal preventing fire hazards and performance degradation. Establish biannual inspection schedules addressing problems before they escalate. Professional roof inspections provide comprehensive assessments identifying issues requiring attention.
Are there building codes governing roof vent cap installation?
Yes, local building codes specify requirements for vent terminations including minimum heights, screen specifications, and weather protection standards. Plumbing codes mandate proper venting for drainage systems. Mechanical codes address exhaust system requirements. Verify code compliance before purchasing and installing any roof vent cap to avoid inspection failures and safety hazards.
Conclusion
A roof vent cap provides essential protection for your home’s ventilation systems while preventing weather damage, pest infiltration, and system performance problems. Understanding the various types, materials, installation requirements, and maintenance needs empowers homeowners to make informed decisions protecting their property investment. Whether you’re replacing a damaged cap, upgrading to premium materials, or installing new ventilation, proper selection and installation ensure years of reliable service.
The relatively modest investment in quality roof vent caps prevents expensive damage scenarios while maintaining system efficiency and home comfort. Regular inspections and maintenance extend cap longevity, maximizing return on investment. When challenges arise, addressing them promptly prevents minor issues from escalating into major problems requiring extensive repairs.
Professional guidance proves valuable when uncertainties arise regarding appropriate products, installation techniques, or code compliance. Experienced roofing contractors provide expertise ensuring proper solutions for your specific situation. Whether you choose DIY installation or professional services, prioritizing quality materials and proper techniques guarantees successful outcomes protecting your home for years to come.
🔧 Other Resources
• Home Depot – Retail category page listing roof caps used for ventilation and vent pipe protection.
• Roof Drain Express – Product page describing vent pipe rain caps designed to prevent water entry.
• FAMCO Manufacturing – Manufacturer page presenting roof vent products and ventilation components.
• YouTube Short – Short video demonstrating roof vent or roof cap usage in a real installation context.
🔎 Other Helpful Articles
• Roof Sheathing – Informational article explaining roof sheathing materials and their role in roofing systems.
• Roof Underlayment – Educational guide describing roof underlayment types and how they protect roofing structures.
• Roof Vent Cost – Informational article outlining typical costs associated with roof vent installation and factors that affect pricing.