Roofing Brackets: Best Tools for Fast Repair
Roofing Brackets: Smart Ways to Save Money
What Are Roofing Brackets?
Roofing brackets are indispensable tools in the construction and home improvement industry. Often referred to as roof jacks or staging brackets, they serve as the foundational support system for workers operating on sloped surfaces. Essentially, roofing brackets are metal supports that are nailed directly into the roof decking to hold wooden planks. These planks create a secure, flat walkway or platform, allowing roofers to stand safely while they work, store materials, or move around without the risk of slipping.
When discussing safety, roofing brackets are the first line of defense against falls. They are typically made from heavy-duty steel to withstand significant weight and the harsh conditions of a construction site. While they might look like simple angled pieces of metal, their engineering is precise. They must grip the roof securely without causing permanent damage to the structure while remaining easy to remove once the job is done.
The versatility of roofing brackets cannot be overstated. They are used for a wide variety of tasks, including shingle installation, chimney repairs, and general roof maintenance. Whether you are a professional contractor or a dedicated DIY enthusiast, understanding the function of these brackets is crucial. They are not just accessories; they are critical safety components that transform a dangerous slope into a manageable workspace. Without proper roofing brackets, even a simple repair job can become hazardous and inefficient.
How to Find the Right Roofing Brackets
Finding the correct roofing brackets for your specific project requires a bit of research and an understanding of your roof’s pitch. The first place to look is your local hardware store or home improvement center. These retailers typically stock standard adjustable brackets that fit most residential roofs. However, for more specialized needs, such as steep-slope brackets or heavy-duty commercial options, you may need to visit a dedicated roofing supply distributor.
Online marketplaces have also become excellent resources for finding roofing brackets. Websites dedicated to construction tools often provide detailed specifications, user reviews, and safety ratings that can help you make an informed decision. When searching online, look for products that comply with OSHA (Occupational Safety and Health Administration) standards. This certification ensures that the roofing brackets have been tested for load-bearing capacity and durability.
Another effective way to find high-quality roofing brackets is to consult with roofing professionals. Contractors often have preferred brands that they trust for their own crews. Asking for recommendations on roofing forums or social media groups dedicated to construction can yield valuable insights. Remember that the cheapest option is rarely the best when safety is on the line. Prioritize durability and adjustability over the lowest price tag to ensure you get equipment that will protect you effectively.
How to Buy Roofing Brackets
Once you have identified the type of equipment you need, the process to buy roofing brackets is straightforward, but it requires attention to detail. Start by determining the scope of your project. If you are working on a small repair, you might only need a half-dozen brackets. However, for a full roof replacement, you will likely need several dozen to create multiple staging levels.
When you go to buy roofing brackets, check the adjustability features. Fixed-angle brackets are cheaper but less versatile. Adjustable brackets allow you to change the angle of the platform to match the pitch of the roof, providing a level surface regardless of the slope.
-
Check the Load Capacity: Ensure the brackets are rated to support the weight of the workers plus materials like shingles and tools.
-
Inspect the Material: Look for galvanized steel or powder-coated finishes to prevent rust and corrosion, especially if you plan to reuse them.
-
Verify Compatibility: Make sure the roofing brackets are compatible with the lumber size you intend to use for the staging planks (usually 2×6 or 2×10 boards).
Always buy a few more roofing brackets than you think you need. It is better to have extras on hand than to halt work because you ran short of safety equipment. Additionally, consider buying from retailers that offer a good return policy in case the brackets do not fit your specific roof decking as anticipated.
How Much Do Roofing Brackets Cost?
The cost of roofing brackets varies significantly based on the brand, material quality, and adjustability. Generally, these are affordable tools, which makes the investment in safety a no-brainer. For standard, fixed-angle brackets, you can expect to pay anywhere from $5 to $10 per unit. These are often sold in bundles, which can reduce the per-unit cost slightly.
Adjustable roofing brackets, which offer greater versatility and safety on varying slopes, are more expensive. These typically range from $15 to $25 per bracket. While the initial investment is higher, the ability to reuse them on different projects with different roof pitches often makes them a more economical choice in the long run for professionals.
High-end, heavy-duty commercial roofing brackets can cost upwards of $40 each. These are designed for extreme loads and frequent use. When calculating the total cost, do not forget to factor in the cost of the wooden planks required to create the walkway. The lumber is not included with the brackets. Therefore, a complete staging setup for a medium-sized house might cost between $200 and $500, depending on how many levels of staging you require. Compared to the potential medical costs of a fall, the price of quality roofing brackets is negligible.
Essential Section: Pergolas, Supports, and Installation
In this section, we will delve into specialized uses and specific installation techniques for various types of bracket systems.
1: Pergola Roof Brackets
Pergola roof brackets are distinct from standard staging brackets. These serve a structural rather than a temporary safety purpose. They are designed to connect the rafters of a pergola to the support beams or the house structure itself. High-quality roofing brackets for pergolas are often decorative as well as functional, usually made of black powder-coated steel to resist the elements while adding an industrial aesthetic. When selecting these, ensure they are rated for uplift to prevent the wind from damaging your pergola structure.
2: Roofing Support Brackets
Roofing support brackets are broad categories that can include everything from HVAC mounts to solar panel attachments. However, in the context of general construction, they often refer to permanent supports installed under the eaves or fascia to support gutters or overhangs. Unlike temporary safety jacks, these roofing brackets become a permanent part of the home’s architecture. They must be installed with weatherproofing in mind, ensuring that the fasteners do not create leak points that could rot the fascia board over time.
3: How to Install Roof Riser Brackets
Roof riser brackets are used primarily when adding a patio cover or pergola that attaches to an existing roof. They elevate the new structure above the existing roof surface to allow for proper water drainage and airflow.
-
First, locate the rafters of the existing roof.
-
Carefully cut back the roofing material to expose the decking above the rafter.
-
Bolt the riser bracket through the decking and securely into the rafter.
-
Apply ample flashing and roofing cement around the base of the riser to ensure a waterproof seal.
-
Attach the beam of your new structure to the top of the riser.
4: How to Use Roof Brackets
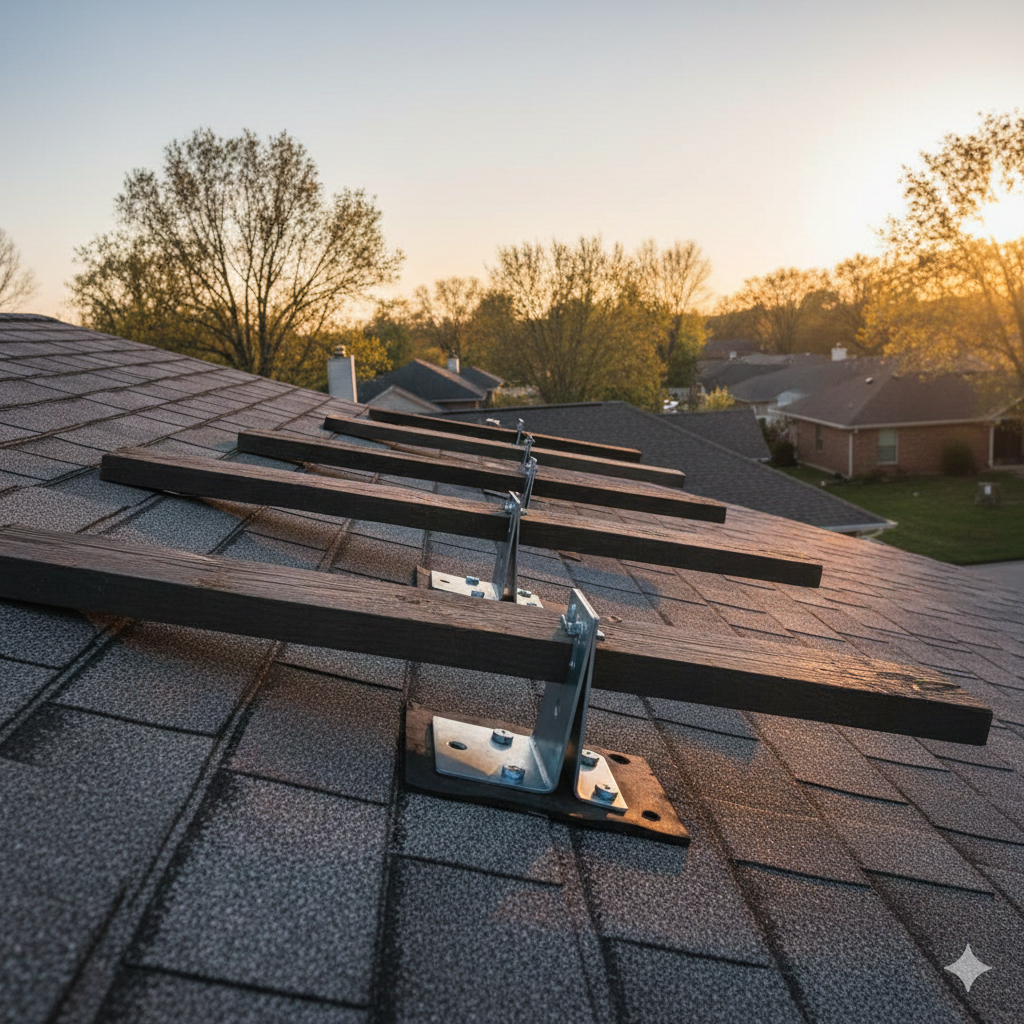
To effectively use roofing brackets for staging, spacing is key. They should typically be spaced no more than eight feet apart horizontally. Secure them with nails that penetrate fully into the rafters, not just the sheeting. Slide your wooden plank into the slot and secure it if the bracket design allows. Always inspect the roofing brackets before stepping onto the plank. Ensure there is no wobble and that the nails have not backed out. When the job is done, remove the nails, slide the bracket out, and tap the shingle back down to cover the nail holes, sealing them with a dab of roofing tar.
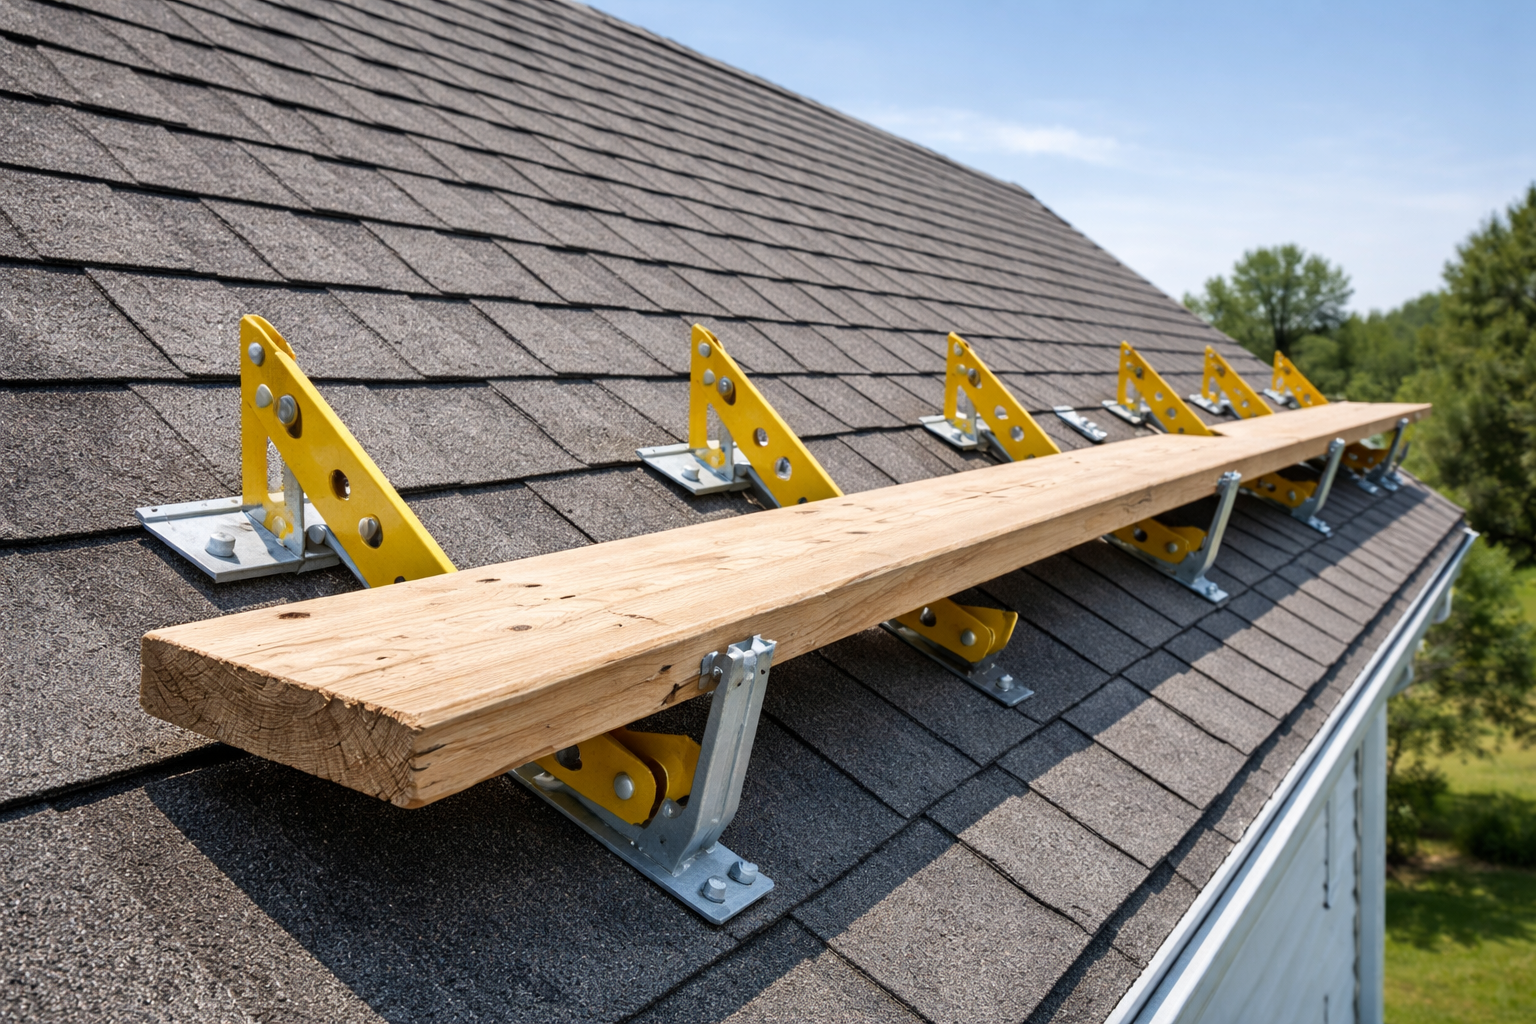
How to Install Roofing Brackets
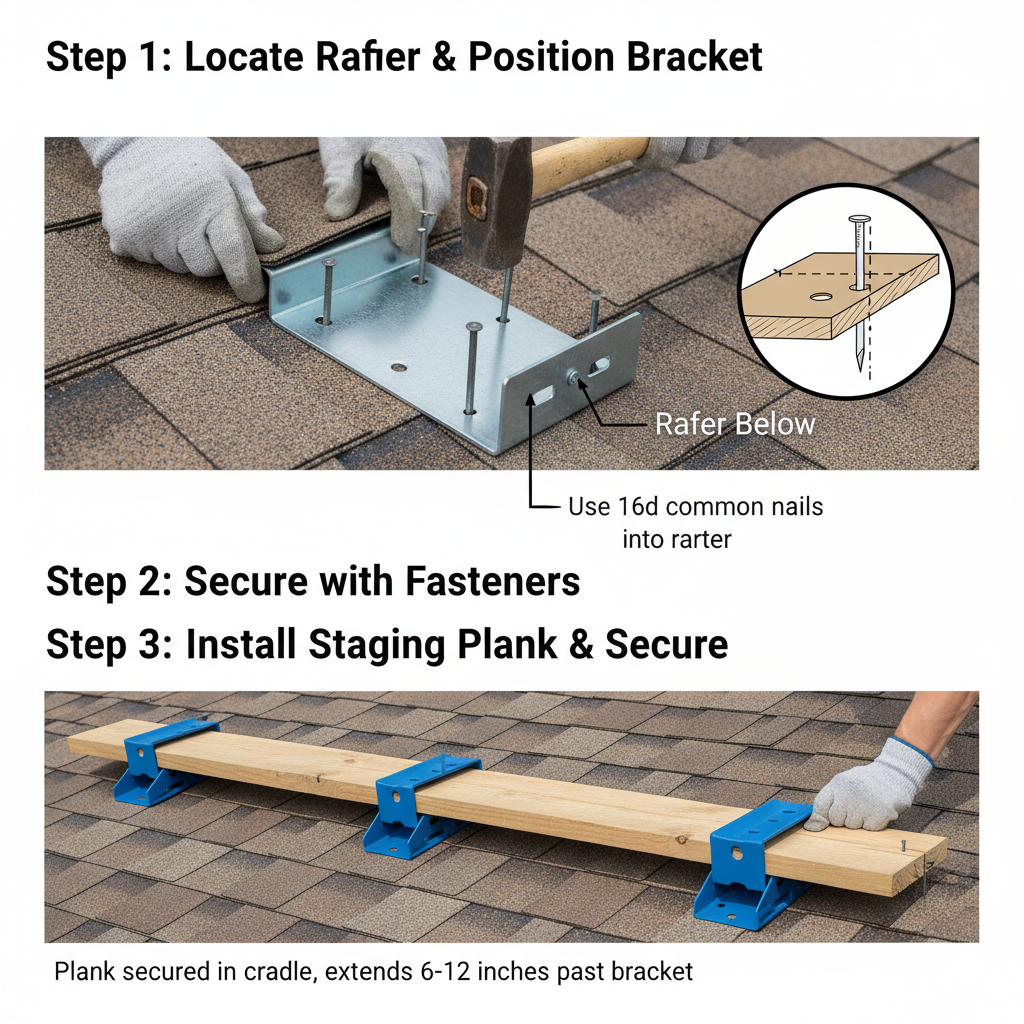
Installing roofing brackets correctly is the most critical step in ensuring roof safety. A poorly installed bracket can fail under weight, leading to catastrophic results. The installation process begins with identifying the location of the rafters. You want the nails holding the bracket to bite into the solid wood of the truss or rafter, as the plywood decking alone may not hold the weight of a worker.
Once the rafter is located, lift the tab of the shingle where you intend to place the bracket. Slide the top flat part of the roofing brackets underneath the shingle. It is vital that the bracket sits flush against the roof deck. Drive the nails through the designated slots in the bracket and into the rafter. Most manufacturers recommend using 16d common nails or specific heavy-duty screws. Do not skimp on the fasteners; use exactly what the manufacturer specifies.
After the roofing brackets are secured in a horizontal line, place your staging plank into the cradle of the brackets. The plank should extend past the last bracket by at least six inches but no more than twelve inches to prevent tipping. For added security, drive a nail through the hole in the bracket’s arm into the plank to keep it from sliding left or right. Repeat this process as you move up the roof, creating a “ladder” of staging levels.
How to Clean Roofing Brackets
Maintenance is key to the longevity of your tools, and roofing brackets are no exception. After a job, these tools are often covered in roofing tar, sawdust, dirt, and sometimes adhesive. If left uncleaned, the mechanical parts of adjustable brackets can seize up, and rust can begin to form under clumps of debris.
To clean roofing brackets, start by scraping off any large chunks of tar or mud with a putty knife. If there is stubborn roofing cement, you may need to use a solvent like mineral spirits. Apply the solvent to a rag and wipe down the affected areas. Be careful not to use corrosive chemicals that might damage the galvanized coating.
Once they are clean, dry them completely with a towel. Do not store them wet. Before putting them away, inspect them for any signs of damage, such as cracks in the welds or bent metal. A light spray of lubricant on the pivot points of adjustable roofing brackets will keep them moving smoothly for the next project. Proper cleaning ensures that your safety gear is ready and reliable when you need it next.

What is the Cost of Professional Installation?
While many people buy roofing brackets for DIY projects, understanding the cost implications when hiring professionals who use them is also valuable. When you hire a roofing contractor, the cost of using safety equipment like roofing brackets is usually built into the labor or overhead costs of the quote. You generally won’t see a line item for “bracket rental.”
However, if a roof is particularly steep (high pitch), the contractor will charge extra because the setup and teardown of the staging take significantly longer. This “steep charge” covers the extra time required to install multiple rows of roofing brackets and the slower pace of work required on a dangerous slope.
For small repairs where you might hire a handyman to install a few roofing brackets to fix a chimney, you might pay an hourly rate. In this scenario, expect to pay between $50 and $100 per hour for labor. The installation of the safety system might take an hour or two before the actual repair work begins. It is a cost worth paying, as it ensures the worker can focus on the quality of the repair rather than their balance. Ultimately, the cost associated with roofing brackets is an investment in efficiency and accident prevention.
Advantages of Using Roofing Brackets
The primary advantage of using roofing brackets is, without question, safety. They provide a stable platform that significantly reduces the risk of falling. This stability allows workers to use both hands for their tasks, rather than using one hand to hold onto a ladder or ridge. This leads to the second major advantage: efficiency. When a worker feels safe and stable, they can work much faster. Materials can be stacked on the planks, reducing the number of trips up and down the ladder.
Another advantage is the protection of the roof itself. Walking directly on shingles, especially on hot days, can scuff and damage the granular surface. By walking on planks supported by roofing brackets, you minimize foot traffic on the delicate roofing material. This preserves the integrity of the roof while repairs or installations are being carried out.
Furthermore, roofing brackets are incredibly durable and reusable. A good set of brackets is a one-time purchase that can last for decades if properly maintained. They are compact and easy to store, taking up very little space in a garage or truck. Their adjustability means that a single set of roofing brackets can be used on a wide variety of roof pitches, making them a versatile tool for any homeowner or contractor.
Challenges Connected to Roofing Brackets
Despite their benefits, there are challenges associated with using roofing brackets. The most significant challenge is the installation and removal process. It requires lifting shingles to drive nails into the deck. If this is done carelessly, it can tear the shingles or break the adhesive seal that protects against wind uplift. Older shingles are particularly brittle and prone to cracking when manipulated to insert roofing brackets.
Another challenge is the physical exertion required to set them up. Carrying heavy steel brackets and long wooden planks up a ladder to a sloped roof is physically demanding and carries its own risks. The setup time can be substantial; for a small repair job, it might take longer to set up the roofing brackets than to do the actual fix.
Finally, there is the issue of the holes left behind. When roofing brackets are removed, the nails leave holes in the decking and the shingle. While these are covered by the overlapping shingle above, they must be properly sealed to prevent water infiltration. If a worker forgets to seal these holes or does not tap the shingle back down securely, it can lead to leaks months or years later. Proper training and attention to detail are required to mitigate these challenges effectively.
FAQ : roofing brackets
What is the best spacing for roofing brackets?
Most safety guidelines suggest spacing roofing brackets no more than eight feet apart horizontally. However, for heavier loads or to prevent plank sagging, six feet is often preferred.
Can I use roofing brackets on a metal roof?
Standard roofing brackets are designed for asphalt shingle roofs. For metal roofs, you need specialized clamping brackets that attach to the standing seams without penetrating the metal surface.
Do roofing brackets damage the shingles?
If installed correctly, roofing brackets should not damage shingles. However, lifting old, brittle shingles to insert the bracket can cause cracking. Always work carefully and seal any nail holes upon removal.
Are roofing brackets reusable?
Yes, high-quality steel roofing brackets are designed to be reused many times. Regular cleaning and inspection for rust or damage will ensure they last for years.
What size lumber should be used with roofing brackets?
Typically, roofing brackets are designed to hold 2×6 or 2×10 wooden planks. Always check the manufacturer’s specifications to ensure the lumber fits securely in the bracket arm.
Conclusion
In conclusion, roofing brackets are an essential component of any roofing project, acting as the silent guardians of safety and efficiency. From understanding how to find and buy the right models to mastering the nuances of installation and cleaning, knowledge of these tools empowers homeowners and professionals alike. They transform the dangerous environment of a sloped roof into a secure workspace.
While there are costs involved and challenges regarding installation and shingle care, the benefits far outweigh the downsides. The stability provided by roofing brackets allows for higher quality work and, most importantly, ensures that everyone working on the roof returns to the ground safely. Whether you are installing a new roof, repairing a chimney, or setting up a pergola, investing time and resources into the proper use of roofing brackets is the smartest decision you can make for your property and your personal safety.
Other Resources
Home Depot – Category page listing roof brackets and related roofing support tools.
Amazon – ACRO Building Systems Roof Bracket – Product page detailing a contractor-grade adjustable roof bracket.
Metal Plus LLC – Product page describing a heavy-duty roofing bracket designed for professional use.
Lynn Ladder – Product listing for a steel adjustable roof bracket used in roofing applications.
Other Helpful Articles
Raking Snow From Roof – Guide explaining safe methods and timing for removing snow from a roof.
Roof Harness – Article describing roof harness systems and their role in fall protection.
High-Quality Roof Membrane Replacement – Article outlining considerations and benefits of replacing roof membranes with high-quality materials.