Step Flashing Roof Secrets: Powerful Guide
Step Flashing Roof Secrets: Powerful Guide
A step flashing roof detail is one of the most important defenses against leaks where a roof meets a vertical surface. Whether you are planning a new build or updating an older house, understanding how a step flashing roof works will help you avoid hidden water damage and expensive structural repairs. Many homeowners only learn about step flashing roof systems after a serious leak, but you can be more proactive.
Because this component hides under shingles and siding, you rarely see exactly what is happening. Still, a well-designed step flashing roof system quietly works for decades, shedding water every time it rains. If you plan a renovation or purchase a home, ask specifically about the step flashing roof details in inspection reports. That simple question can reveal a lot about the overall condition of the building envelope and the craftsmanship of past work.
What is a step flashing roof?
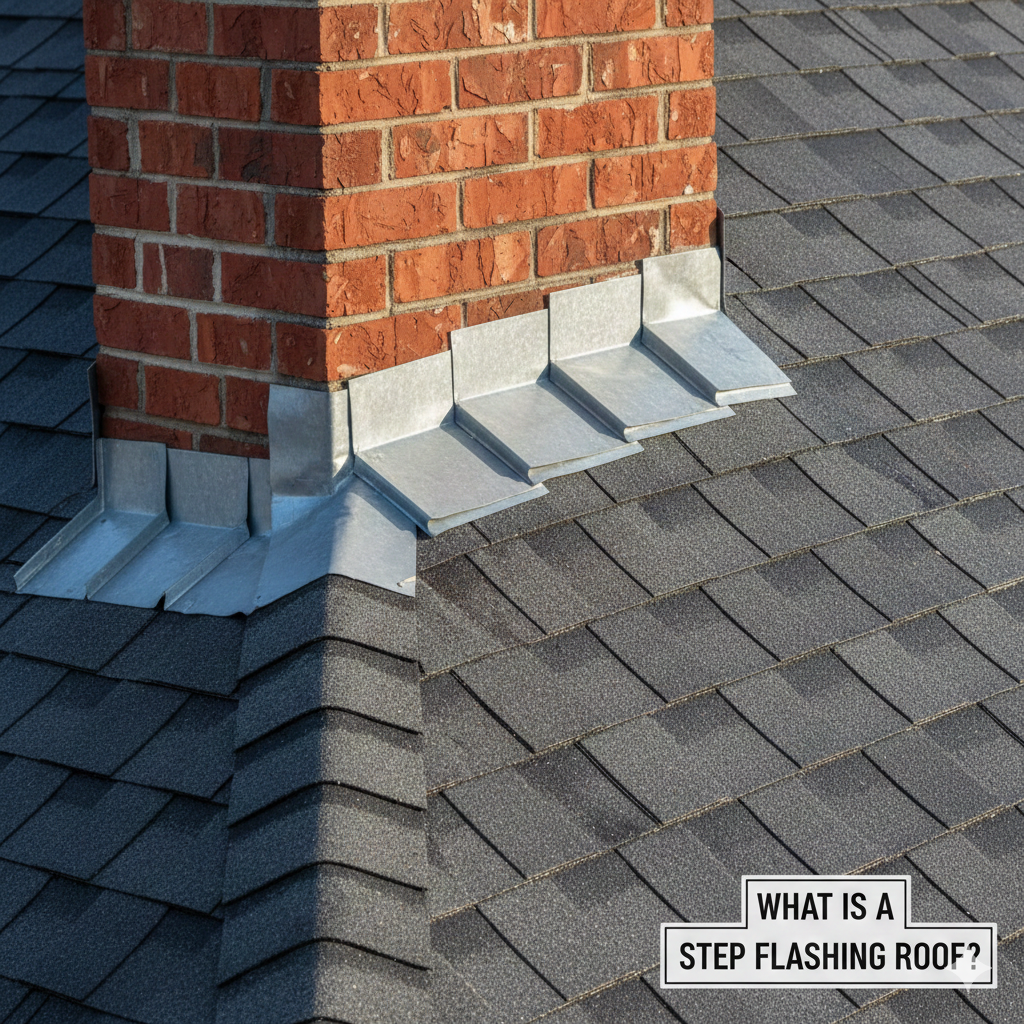
A step flashing roof setup uses a series of small metal pieces installed where shingles meet vertical walls. Each piece of metal overlaps the next, so water follows the steps downward. This stair-step shape gives the step flashing roof its name. Typically, each piece bends at a 90‑degree angle, with one leg on the roof and the other against the wall or chimney.
In a correct step flashing roof installation, every shingle course receives its own individual flashing piece. Metal, shingle, metal, shingle: that pattern repeats from the eave up to the top. The step flashing roof approach contrasts with continuous flashing, which uses one long strip. Continuous strips can trap water, while a flashing roof assembly lets water drain freely at each overlap. Understanding that difference is crucial when evaluating proposals or repairs.
Most often, roofers choose galvanized steel, aluminum, or copper for a flashing roof system, depending on budget and climate. The metal must resist corrosion and stay dimensionally stable over decades. While sealant sometimes appears in a flashing roof detail, sealants alone should never replace proper metal flashing. They age, crack, and fail, but a well‑built flashing roof continues to perform even if sealant lines deteriorate long after installation.

How a step flashing roof prevents leaks
At its core, a step flashing roof assembly controls water movement. Shingles handle most of the runoff, but they cannot seal tightly against vertical walls and complex shapes. Here, a step flashing roof provides a secondary path. Water that gets behind shingles encounters metal and is redirected back onto the shingle surface. Gravity takes over, carrying it down and away.
Every overlap in a step flashing roof layout creates a controlled path for water. Instead of seeking gaps in siding, caulk lines, or nail holes, water flows across each metal step. When combined with proper underlayment and siding, a step flashing roof creates a layered defense. If one layer fails temporarily, another catches the water. That redundancy is the true strength of a step flashing roof practice, especially in harsh climates or on wind‑driven rain exposures.
Additionally, a step flashing roof helps protect framing and insulation from slow, undetected leaks. Without it, moisture can creep into wall cavities and sheathing, leading to decay. Over years, this hidden damage can compromise structural members and require extensive reconstruction. By contrast, a correctly installed flashing roof significantly reduces that risk, adding peace of mind and long‑term durability to the home structure.
How to do a step flashing roof inspection
A basic visual check of your step flashing roof can reveal early warning signs of trouble. Start from the ground with binoculars, looking closely where the roof meets walls, dormers, and chimneys. On a sound step flashing roof, shingles should lie flat, and siding or counter‑flashing should overlap the metal with no obvious gaps. Rust streaks or staining suggest the step flashing roof may be failing.
If safe access is possible, a closer look from a ladder helps. Gently lift shingle edges near the wall, checking whether individual metal pieces exist at each shingle course. A proper step flashing roof always uses multiple pieces, not one long strip. Examine for cracked caulk, exposed nail heads, or corroded metal. Any of these can compromise the step flashing roof system and warrant a professional evaluation.
Indoor clues also matter. Look inside along the ceilings and walls next to dormers or chimneys. Water stains, bubbling paint, or musty odors may track back to problems in the flashing roof. Because issues can remain hidden for months, schedule a professional inspection every few years in stormy climates. Ask inspectors to photograph the flashing roof areas so you can understand the condition clearly and make informed maintenance decisions.
How to find qualified step flashing roof contractors
Finding a contractor who truly understands a step flashing roof detail requires a bit of homework. Many roofers focus on shingle brands and color options, but you should ask targeted questions about flashing. When interviewing prospects, request examples of their past step flashing roof projects. Look for photos showing open, clear step lines along dormers or chimneys, with neat overlaps and clean terminations.
Online reviews can provide clues as well. Mentions of leak repairs at walls or chimneys may indicate past problems with step flashing roof work, whether good or bad. Reach out to references and specifically ask if they had any issues around vertical transitions after installation. Contractors who emphasize their step flashing roof technique usually take overall waterproofing seriously, which bodes well for your project.
Licensing and insurance remain essential. However, technical knowledge is equally important. Ask how they integrate a step flashing roof with housewrap, siding, and counter‑flashing. A professional should easily explain how each layer interacts. If someone dismisses the importance of a step flashing roof or suggests caulk alone can substitute, consider that a red flag and continue your search for a more detail‑oriented roofer.
How to buy materials for a step flashing roof
Selecting the right materials for a step flashing roof requires balancing cost, durability, and compatibility with existing components. Many home centers carry pre‑bent galvanized steel step flashing sized for common shingle dimensions. For most asphalt shingle jobs, this standard material works well. Before purchasing, verify your building code requirements and manufacturer guidelines for the step flashing roof associated with your specific shingles.
In coastal or highly corrosive environments, upgrading the step flashing roof material to aluminum or copper often makes sense. Copper costs more but offers excellent longevity and pairs well with premium roofing systems. When matching existing components, consider galvanic reactions: mixing certain metals in a flashing roof assembly can accelerate corrosion. If unsure, consult a knowledgeable supplier or roofing professional before buying.
Also purchase appropriate fasteners and compatible sealants. Nails should match or complement the flashing roof metal to avoid rust streaks. Use roofing nails, not generic construction nails. Sealants can help at terminations but should never compensate for poor overlaps or gaps. When in doubt, focus your budget on quality metal and a correct flashing roof layout; those choices pay off far more than expensive caulks or decorative trims.
How much does a step flashing roof cost?
Costs for a step flashing roof vary depending on project scale, access, and materials. On a full roof replacement, flashing roof expenses often blend into the overall bid, but you can request a line item. Typically, material costs for standard galvanized step flashing roof pieces are modest, often a small fraction of total roofing expenses. Labor frequently represents the bulk of the investment.
Expect to pay more when adding a step flashing roof detail to complex roofs with multiple dormers, valleys, and chimneys. Each intersection requires careful cutting, overlapping, and integration with surrounding materials. Still, compared with the price of repairing rotten sheathing, framing, and interior finishes, a thorough step flashing roof installation remains excellent value. Skimping here almost always proves more expensive later.
For repair projects, pricing usually depends on access and how much siding or roofing must be disturbed. Rebuilding a neglected step flashing roof area around a chimney, for example, may involve scaffolding, masonry work, and new counter‑flashing. Always obtain multiple quotes and ensure each contractor includes a clear description of the step flashing roof scope, so you can compare offers accurately.
SPECIAL SECTION: Installation and function details
How to install step flashing on existing roof
When upgrading an older house, you can often retrofit a step flashing roof without replacing every shingle. Carefully remove siding near the problem area, then loosen shingle courses along the wall or chimney. Slide new metal pieces beneath each course, following the standard step flashing roof pattern. Nail sparingly, avoiding wall penetrations. Reinstall siding or counter‑flashing to overlap the new metal properly, restoring a reliable water‑shedding system.
Step flashing detail
A precise step flashing roof detail starts at the eave with a kick‑out flashing, steering water into gutters rather than behind siding. Each subsequent piece overlaps the one below by several inches, extending far enough onto shingles for proper coverage. The upright leg sits tight against the wall, later hidden by siding or counter‑flashing. Corners, transitions, and terminations demand custom‑bent pieces, reinforcing the step flashing roof integrity where leaks commonly start.
How does step flashing work on a roof
In operation, a step flashing roof acts as a series of metal ramps guiding water away from vulnerable seams. Any moisture sneaking past shingle edges encounters the vertical leg, then flows down to the overlap below. Because each piece functions independently, movement from temperature changes or settling affects the assembly less. This modular design allows a step flashing roof to adapt over time while continuing to channel water safely outward and downward.
Step flashing on roof
Builders integrate step flashing on roof systems wherever sloped surfaces meet vertical elements. Around dormers, every course receives its own metal step. At chimneys, step flashing pairs with counter‑flashing set into mortar joints. Over sidewalls, the step flashing roof assembly ties into housewrap and siding for continuous drainage. When all these components align, water cannot easily find a path into the structure, preserving sheathing, framing, and interior finishes for decades.
How long does a step flashing roof last?
The service life of a step flashing roof depends on metal type, local climate, and installation quality. In many regions, properly installed galvanized steel flashing roof systems last as long as the shingles, often 20 to 30 years or more. Higher‑grade metals such as copper can exceed that, sometimes outliving multiple shingle cycles without needing replacement, as long as other components remain intact.
Movement between roof and wall components can stress a flashing roof over time. Buildings settle, temperature swings cause expansion and contraction, and strong winds test every joint. If the original contractor allowed for movement with correct overlaps and fastener placement, the flashing roof should adapt gracefully. Poor workmanship, however, may shorten its lifespan, leading to separations, rust, or exposed nail holes that admit water.
How to install a step flashing roof on a new build
On new construction, installing a step flashing roof is straightforward but must follow a precise sequence. After underlayment goes down, the roofer starts shingles along the eave and works toward the wall intersection. The first metal piece of the flashing roof sits on that starter course, with its upright leg tight to the sheathing. Each new shingle course receives another piece, lapped properly over the one below.
Above the flashing roof, a weather‑resistant barrier on the wall should overlap the vertical legs. Later, siding or masonry counter‑flashing protects these joints from ultraviolet exposure and wind‑driven rain. For more complex roofs with dormers or intersecting ridges, the roofer must carefully plan the flashing roof path so water always flows over, never under, the metal pieces. This planning stage often separates experienced installers from beginners.
During final walkthroughs, ask your builder to show you areas where the flashing roof exists before siding covers everything. Photos at this stage become valuable records for future repairs or renovations. Knowing exactly how the original trade contractor installed the flashing roof system helps others diagnose issues quickly if leaks ever appear years down the road, saving investigation time and invasive exploratory demolition.

How to clean and maintain a step flashing roof
Cleaning a step flashing roof focuses more on keeping surrounding areas clear than scrubbing the metal itself. Debris buildup where roofs meet walls can trap moisture and encourage corrosion. Gently remove leaves, twigs, and dirt from these junctions during routine roof maintenance. Avoid harsh tools that might bend components of the flashing roof or damage shingle surfaces, which could shorten their lifespan.
Look for signs of biological growth such as moss or algae near the flashing roof. While mild discoloration does not always mean trouble, thick growth can lift shingles and alter water flow. Treat affected areas with appropriate roof cleaners and low‑pressure rinsing. Never direct high‑pressure washing at a flashing roof, because it can drive water under shingles and dislodge critical overlaps.
Inspect caulk joints at terminations and around penetrations. While the metal components of a flashing roof should not rely solely on sealant, ancillary caulk helps at tricky transitions. Replace failing sealant with products rated for roofing applications. Keep gutters clear so water can exit freely; a backed‑up gutter can submerge the lower parts of a flashing roof and accelerate deterioration, especially on older galvanized installations.
What is the cost of neglecting a step flashing roof?
Ignoring problems with a step flashing roof often leads to surprisingly high repair bills. A small gap or rust hole may only allow limited water entry, but repeated wetting cycles slowly damage sheathing and framing behind the scenes. By the time staining appears inside, repairs may require removing large sections of siding, drywall, insulation, and roofing to access the failed step flashing roof area properly.
Mold remediation adds further expense and complexity. Moisture trapped behind walls near a compromised step flashing roof creates ideal conditions for fungal growth. Addressing that involves specialized contractors, containment measures, and thorough drying, all of which cost far more than routine maintenance would have. Insurance may not always cover slow, preventable leaks linked to a neglected flashing roof, leaving homeowners responsible.
Energy efficiency can also suffer. Wet insulation loses performance, and draft paths may develop where materials rot away. Rebuilding a damaged intersection often means reframing, sheathing replacement, and careful restoration of the flashing roof detail, then re‑installing interior finishes. Considering these consequences, periodic inspections and timely repairs of your flashing roof stand out as some of the most cost‑effective preventive steps you can take.
Advantages of a well‑designed step flashing roof
A carefully executed step flashing roof provides exceptional leak resistance at some of the most vulnerable parts of any structure. By integrating shingles, metal, underlayment, and wall cladding, it forms a continuous water management system. When each piece overlaps correctly, the flashing roof quietly redirects thousands of gallons of water over its lifespan, keeping living spaces dry and comfortable even in severe weather.
Another advantage lies in flexibility. Because a flashing roof uses multiple small pieces, repairs and modifications become easier. If one area needs adjustment, the contractor can often work locally without dismantling the entire roof‑to‑wall junction. This modular approach makes the flashing roof particularly practical during renovations, window replacements, or siding upgrades where some disassembly is inevitable.
Challenges and common mistakes with step flashing roof systems
Despite its benefits, many installations suffer from shortcuts. A widespread mistake is substituting continuous L‑shaped metal for a true flashing roof. While it seems simpler, a single strip cannot adapt as well to movement and tends to trap water. Over time, this leads to leaks behind siding. Always insist on individual pieces for any flashing roof application, especially around dormers and sidewalls.
Another challenge appears when different trades do not coordinate. Roofers, siders, and masons must understand how their work interacts with the step flashing roof. Poor sequencing can leave flashing either buried incorrectly or exposed. For example, if siding goes on before the flashing roof is in place, workers might rely on caulk to close gaps later. That approach rarely lasts, inviting premature failure of the entire assembly.
")
FAQ about step flashing roof systems
Where is a step flashing roof absolutely required?
Building codes typically require a step flashing roof wherever a sloped roof intersects a vertical surface such as sidewalls, dormers, and chimneys. Always check your local regulations and shingle manufacturer instructions, but in practice, any roof‑to‑wall junction should receive a proper flashing roof detail.
Can I reuse existing flashing during a re‑roof?
Sometimes an old step flashing roof remains structurally sound, especially if made from copper. However, removing and reinstalling siding to access it can be labor‑intensive. Many contractors prefer installing new components so the step flashing roof matches the lifespan of the new shingles. Have a trusted roofer assess the current condition before deciding.
Does step flashing work with metal roofs?
Yes, but details differ. Instead of tucking under shingles, the flashing roof pieces integrate with metal panels, closure strips, and specialized trims. Engineering becomes more complex, and manufacturers often publish specific guidelines. Never assume shingle‑style step flashing roof methods translate directly to standing seam or other metal systems without consulting documentation.
How can I tell if my flashing is missing?
From the ground, look for clean, even lines where the roof meets walls. If you see wide beads of caulk instead of a clear step flashing roof transition, that can indicate missing or incorrect flashing. Indoors, stains near ceilings below dormers or chimneys also hint at possible step flashing roof problems that need closer investigation.
Conclusion
A well‑executed step flashing roof may be nearly invisible, but it plays an outsized role in protecting your home from water damage. By understanding what it is, how it works, and where it belongs, you can better evaluate contractors, spot early warning signs, and budget wisely for maintenance. Whether you are building new, re‑roofing, or troubleshooting leaks, prioritizing a robust step flashing roof detail delivers lasting benefits in durability, comfort, and peace of mind.
🏗️ Other Resources
Explore these professional guides and tutorials to learn more about roof flashing, step flashing installation, and leak prevention:
-
Home Depot – Step Flashing – Wide selection of step flashing and metal roof flashing components.
-
IKO – What Is Roof Flashing & How to Install It – Complete guide to flashing types and installation best practices.
-
YouTube – Kickout Flashing Tutorial – Demonstrates proper installation of kickout flashing to prevent water intrusion.
-
InterNACHI – Flashing Techniques – Detailed technical explanation of roof flashing methods and inspection tips.
🔎 Other Helpful Articles
-
Slate Roof Cost & Installation – Complete cost and installation guide for slate roofs.
-
Hail Damage Roof Guide – How to identify and repair hail-related roof damage.
-
Metal Roofing Screws – Guide to choosing and installing the right screws for metal roofs.