Flat Roof Bubble Repair Guide: Proven Steps to Fix Blisters
Comprehensive Guide to Flat Roof Bubble Repair: Costs, Methods, and Solutions
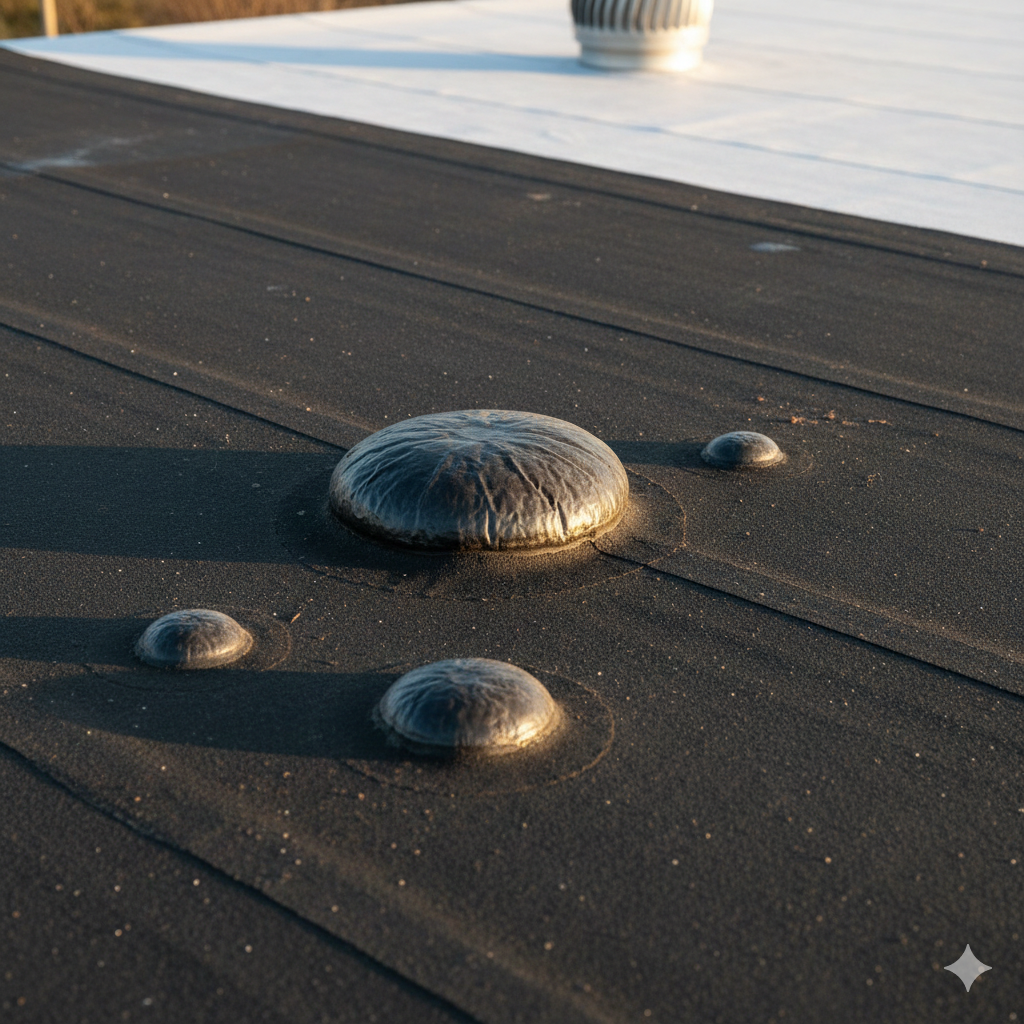
Flat roof bubble repair is an essential maintenance task that every homeowner with a low-slope structure must understand. When air or moisture becomes trapped between the layers of your roofing membrane, it expands under the heat of the sun, creating blisters or “bubbles.” If left unaddressed, these bubbles can rupture, leading to severe leaks, structural water damage, and costly mold remediation. This guide provides a deep dive into the world of flat roof bubble repair, offering actionable advice on everything from detection to final execution.
What Is Flat Roof Bubble Repair and Why Is It Critical?
Flat roof bubble repair refers to the specific process of identifying, cutting, drying, and patching blistered areas on a flat roof system. Unlike pitched roofs where shingles might simply blow off, flat roofs rely on a sealed, continuous membrane. When this seal is compromised by trapped pockets of gas or liquid, the integrity of the entire system is at risk. A bubble is not just a cosmetic flaw; it is a symptom of adhesion failure. The process of flat roof bubble repair restores this adhesion and reseals the waterproof barrier.
Performing flat roof bubble repair early is critical because bubbles grow over time. As the sun heats the roof, the trapped air expands, stretching the membrane. At night, it contracts. This cycle eventually cracks the material. Once the bubble cracks, water enters the insulation below, traveling far from the source. Effective flat roof bubble repair stops this cycle immediately. It preserves the insulation value of your roof and prevents wood rot in the decking.
Furthermore, flat roof bubble repair is often a requirement for insurance validity. Many policies require regular maintenance. Neglecting visible blisters can be seen as negligence, potentially voiding coverage for water damage. Therefore, understanding flat roof bubble repair is partially about protecting your financial investment in your property. It is a targeted intervention that extends the life of your existing roof, delaying the need for a full, expensive replacement.
Finally, flat roof bubble repair maintains the energy efficiency of your building. Wet insulation, which often results from popped bubbles, loses its R-value (thermal resistance). By performing flat roof bubble repair promptly, you ensure your building remains energy-efficient, keeping heating and cooling costs manageable.
How to Find Professional Flat Roof Bubble Repair Specialists
Finding a qualified contractor for flat roof bubble repair requires diligence. Not all roofers specialize in flat systems; many focus solely on residential shingles. You need a specialist who understands EPDM, TPO, or modified bitumen systems. Start by searching specifically for “flat roof bubble repair specialists” rather than general roofers. Look for certifications from major membrane manufacturers like Firestone, Carlisle, or GAF, as these indicate the roofer is trained in specific repair protocols.
When vetting candidates for flat roof bubble repair, ask for a portfolio of past repairs. You want to see “before and after” photos specifically of blisters they have fixed. A reputable contractor will be transparent about their methods for flat roof bubble repair. They should explain whether they intend to cut and patch the bubble or if they recommend a larger sectional replacement. Avoid contractors who suggest simply coating over a live bubble without addressing the trapped moisture, as this is not a true flat roof bubble repair.
Local reviews are invaluable. Check Google Maps and Yelp for mentions of flat roof bubble repair in customer feedback. If a company has successfully handled flat roof bubble repair for other clients in your area, they are likely familiar with the local climate challenges that caused your blisters in the first place.
Request detailed written estimates. The quote should explicitly list flat roof bubble repair as a line item, separating labor and materials. It should also detail the type of patch material they will use. High-quality flat roof bubble repair usually involves a three-course application (cement, mesh, cement) or a specific heat-welded patch, depending on the roof type. Ensure the warranty covers the repair specifically, not just the new materials.
Finally, verify their insurance. Flat roof bubble repair often involves open flames (for torch-down roofs) or harsh chemicals. Ensure they have liability insurance and workers’ compensation. This protects you in case an accident occurs during the flat roof bubble repair process.
How to Buy Materials for DIY Flat Roof Bubble Repair
If you decide to tackle flat roof bubble repair yourself, sourcing the right materials is the first step. You cannot simply use tar from a hardware store for every roof type. You must identify your membrane first. EPDM (rubber) requires different adhesives than TPO (thermoplastic). Buying the wrong chemicals can melt your roof, making the flat roof bubble repair a disaster.
For a standard asphalt-based or modified bitumen roof, you will need roofing cement, asphalt primer, and reinforcing fabric (often fiberglass mesh). These are the staples of flat roof bubble repair. You can buy these at big-box home improvement stores, but professional roofing supply houses often sell higher-grade versions. Ask for “flashing cement” or “mastic” suitable for flat roof bubble repair.
For EPDM rubber roofs, you need an EPDM patch kit. These kits usually include a scrubber pad, primer, and a “peel-and-stick” pressure-sensitive patch. Do not try to glue a piece of rubber down with standard glue; flat roof bubble repair on EPDM relies on a chemical bond created by the primer. You can find these kits online or at specialized roofing distributors. Search for “EPDM flat roof bubble repair kit.”
Shopping List for General Repair:
Utility knife with hook blades (essential for cutting the bubble safely).
Trowel for spreading cement.
Roofing cement (tube or bucket).
Reinforcing mesh/fabric.
Brayer or seam roller (for pressing down the patch).
When buying materials for flat roofing bubble repair, always buy 20% more than you think you need. Blisters often extend further than they appear on the surface. Having extra material ensures you don’t have to stop the flat roofing bubble repair midway through, leaving your roof exposed. Also, check the expiration dates on primers and adhesives; expired chemicals are a leading cause of flat roof bubble repair failure.
How Much Does Flat Roof Bubble Repair Cost in 2026?
The cost of flat roof bubble repair varies significantly based on the size of the damage, the roofing material, and your location. In 2026, minor professional repairs typically start around $250. This minimum charge covers the roofer’s travel and setup time. For more extensive issues, flat roof bubble repair can range between $4 and $15 per square foot of affected area.
If you have multiple bubbles, the cost can escalate. A standard residential project involving scattered flat roof bubble repair often lands in the $400 to $1,300 range. This price usually includes the inspection, labor, and materials. If the flat roof bubble repair requires replacing wet insulation underneath the membrane, the cost will be on the higher end, as this is more labor-intensive.
Estimated Cost Breakdown:
Minor Blister Patching: $250 – $500
Moderate Repair (Multiple Bubbles): $500 – $1,000
Severe Blistering (Requires Insulation Work): $1,000 – $2,500
DIY Materials Only: $50 – $150
It is important to note that flat roof bubble repair is significantly cheaper than replacement. A full replacement can cost between $4 and $15 per square foot for the entire roof, leading to bills of $10,000 or more. Therefore, spending $500 on flat roof bubble repair is a wise investment.
Geographic location affects these prices. Flat roofing bubble repair in urban centers with high labor costs will be more expensive than in rural areas. However, rural areas might have higher travel fees. Always ask if the quote for flat roof bubble repair is a fixed price or an hourly rate to avoid surprises.
Lastly, keep in mind that emergency flat roof bubble repair—performed during a storm or immediately after a leak is discovered—will carry a premium. Scheduling your flat roof bubble repair during fair weather and standard business hours is the best way to control costs.
Advantages and Challenges Connected to Flat Roof Bubble Repair
Engaging in flat roofing bubble repair offers numerous advantages, primarily centered on cost savings and longevity. The most obvious benefit is extending the service life of your roof. A well-executed flat roof bubble repair can add years to a roof that might otherwise fail prematurely. It stops the progression of damage, preventing a small air pocket from becoming a massive tear.
Another advantage of flat roof bubble repair is the prevention of interior damage. By sealing the envelope of your home, you protect drywall, paint, and flooring from water intrusion. This makes flat roof bubble repair a protective measure for your entire property, not just the roof itself. Additionally, it improves the aesthetics of the building; a roof free of lumpy blisters looks better and signals to potential buyers that the home is well-maintained.
However, there are challenges connected to flat roof bubble repair. The primary challenge is diagnosing the underlying cause. If you perform flat roof bubble repair without addressing the source of the moisture—such as a leak elsewhere or poor ventilation—the bubbles will simply return. This makes flat roof bubble repair a recurring headache if not done holistically.
Challenge: Identifying wet insulation.
Challenge: Achieving a perfect bond on dirty, aged membranes.
Challenge: Weather dependency (you cannot perform repairs in rain).
Another challenge is the physical risk. Working on a roof is inherently dangerous. Flat roofing bubble repair requires kneeling, bending, and handling sharp tools and chemicals at heights. For DIYers, the risk of falls or burns (from hot asphalt) is real. Furthermore, improper flat roofing bubble repair techniques can void manufacturer warranties. Using a compatible patch is crucial; getting it wrong can cause chemical reactions that eat away the roof, making the flat roof bubble repair counterproductive.
Despite these challenges, the advantages of proactive flat roof bubble repair far outweigh the risks, especially when hired out to professionals who have the safety gear and expertise to handle the complexities.
How to Install a Patch During Flat Roof Bubble Repair
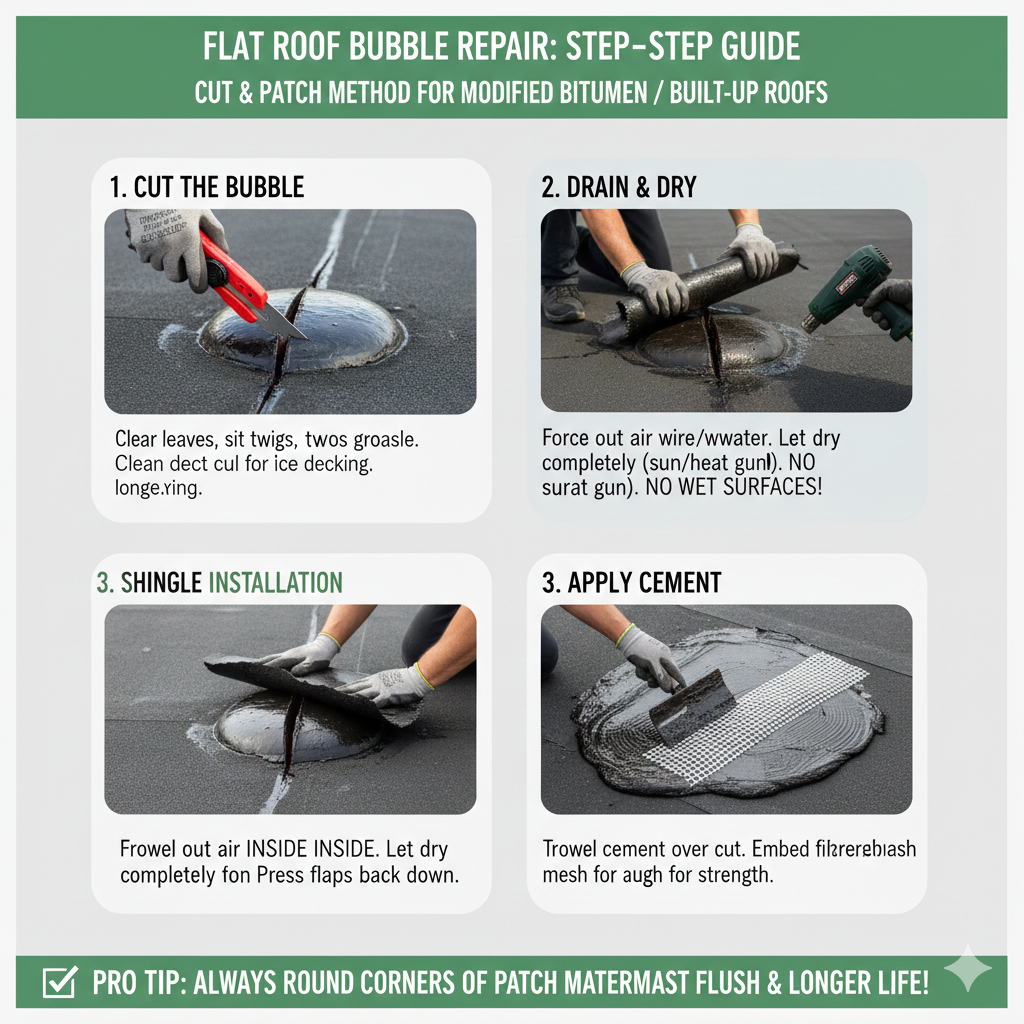
Executing a flat roof bubble repair involves a specific sequence of steps. Whether you are working on modified bitumen or built-up roofing, the core principle is to release the pressure and reseal the void. Here is a step-by-step guide to the standard “cut and patch” method for flat roofing bubble repair.
-
Cut the Bubble: Using a sharp utility knife, carefully slit the bubble down the center. Do not cut deep enough to damage the decking below. This is the first action of flat roofing bubble repair.
-
Drain and Dry: Press down on the sides of the bubble to force out air and water. If the inside is damp, you must let it dry completely. You can use a heat gun (carefully) or let the sun dry it. You cannot perform flat roof bubble repair over wet surfaces.
-
Apply Cement: Once dry, trowel a layer of roofing cement inside the blister, under the flaps you created. Press the flaps back down into the cement. This re-adheres the loose membrane, a crucial step in flat roofing bubble repair.
-
Top Coat and Mesh: Apply a layer of roofing cement over the cut. Then, embed a strip of fiberglass reinforcing mesh into the wet cement. This adds strength to your flat roofing bubble repair and prevents the crack from reopening.
-
Final Seal: Trowel a final layer of roofing cement over the mesh, feathering the edges so water flows smoothly over the patch.
For single-ply membranes like EPDM, the flat roof bubble repair process differs. You generally do not cut the bubble unless it is huge. Instead, you often apply a specialized pressure-sensitive patch over the area after priming. If you do cut it, you must use a patch that extends at least 3 inches beyond the cut in all directions.
Pro Tip: Always round the corners of your patch materials. Sharp corners are more likely to peel up over time. Rounding them ensures a longer-lasting flat roof bubble repair.
Wait for the patch to cure before walking on it. A successful flat roof bubble repair should be flush with the roof surface and completely watertight. Monitor the repair area for a few weeks to ensure no new bubbles form around the perimeter of your flat roof bubble repair.
How to Clean Your Roof Before Starting Flat Roof Bubble Repair
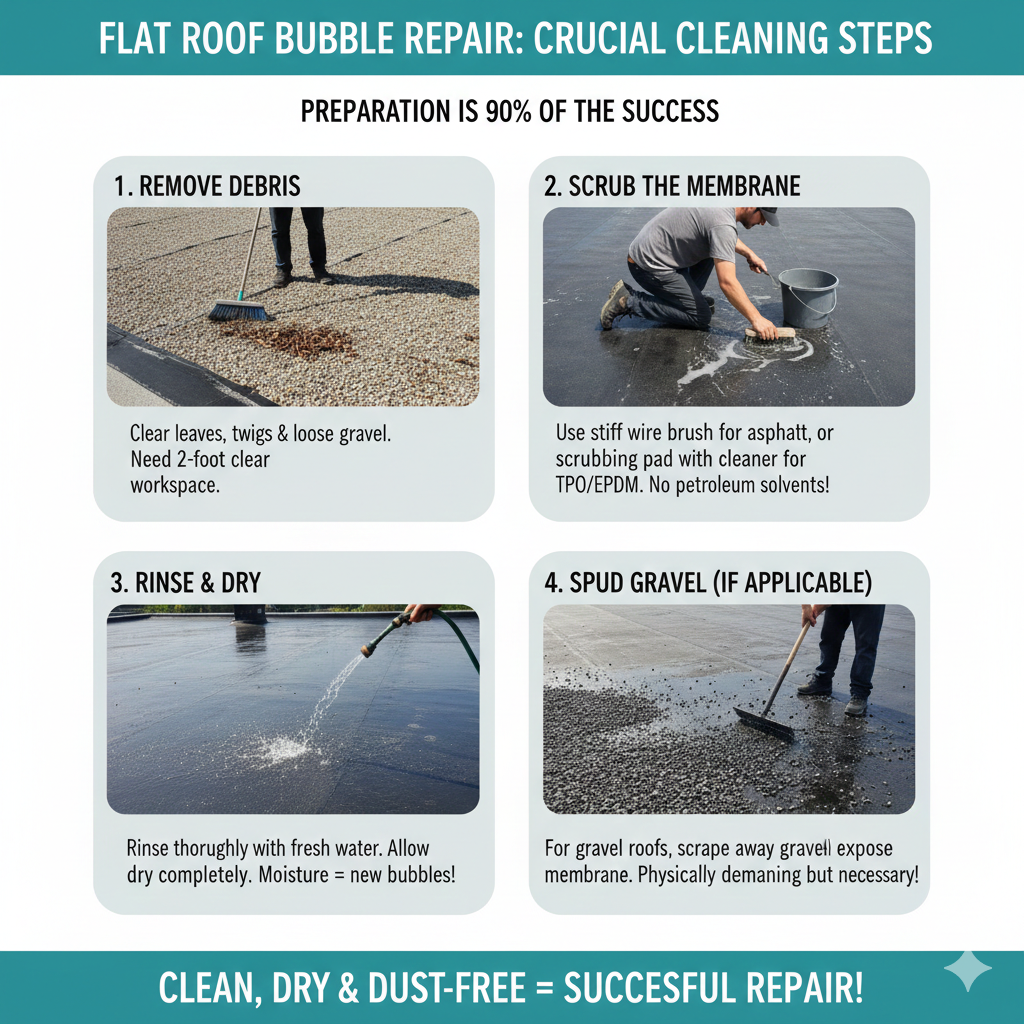
Preparation is 90% of the success in flat roofing bubble repair. You cannot adhere a patch to dirt, moss, or oxidation. Cleaning the area thoroughly ensures that the new materials bond chemically and physically with the old roof. Without this step, your flat roofing bubble repair will peel off within months.
Begin by removing loose debris. Use a broom or leaf blower to clear leaves, twigs, and loose gravel (if you have a tar and gravel roof) from the immediate area where you plan to perform flat roofing bubble repair. You need a clear workspace of at least two feet around the bubble.
Next, scrub the membrane. For asphalt-based roofs, a stiff wire brush can help remove loose granules and oxidized bitumen. For single-ply membranes like TPO or EPDM, use a scrubbing pad with a specialized roof cleaner or a mild detergent. Do not use petroleum-based solvents on rubber roofs, as they will damage the membrane and complicate the flat roofing bubble repair.
Cleaning Steps:
Sweep the area.
Scrub with water and appropriate cleaner.
Rinse thoroughly with fresh water.
Allow to dry completely.
Moisture is the enemy of flat roof bubble repair. If you trap water under your patch because you didn’t let the cleaning water dry, you will create a new bubble immediately. This defeats the purpose of the flat roofing bubble repair. On sunny days, this might take an hour; on cooler days, it might take longer.
For gravel roofs (built-up roofing), you must spud (scrape) away the gravel to expose the bare membrane before you can even see the bubble clearly. This makes the cleaning phase of flat roofing bubble repair physically demanding but absolutely necessary. Once the area is clean, dry, and free of dust, you are ready to begin the actual flat roof bubble repair installation.
Specialized Solutions for Local and Technical Issues
When addressing flat roof bubble repair, one must consider regional and specific technical variations. The approach to flat roof bubble repair can change based on climate and specific terminology used by experts.
1: flat roof bubble repair wenatchee wa
In regions like Wenatchee, WA, the climate oscillates between hot summers and snowy winters. This thermal cycling puts immense stress on roofs. Flat roof bubble repair wenatchee wa services often focus on issues caused by ice dams and rapid thawing. Local contractors like Columbia Plateau Roofing understand that flat roofing bubble repair in this area requires materials that remain flexible in freezing temperatures. If you ignore flat roof bubble repair wenatchee wa needs, the freezing water inside a blister can expand and tear the roof deck.
2: flat roof blistering
Technically, a bubble is a form of blistering. Flat roof blistering occurs when voids in the roof system expand. Addressing flat roof blistering is identical to bubble repair, but the term “blistering” often implies a systemic issue with many small bubbles. When dealing with widespread flat roof blistering, spot repairs might not be enough. You may need to resurface the entire section. Understanding the science of flat roof blistering helps you decide between a patch and a full recover.
3: how to repair a bubble in a flat roof
Homeowners frequently search for how to repair a bubble in a flat roof when they notice the first signs of trouble. The key is to act fast. Learning how to repair a bubble in a flat roof involves gathering the right tools: a knife, patch material, and cement. If you know how to repair a bubble in a flat roof, you can save hundreds of dollars in professional service calls for minor issues.
4: how to repair bubbles on my flat roof
If you are asking how to repair bubbles on my flat roof, you likely have a DIY spirit. The answer depends on your material. For a torch-down roof, how to repair bubbles on my flat roof involves heating and fusing. For rubber, it involves gluing. Knowing exactly how to repair bubbles on my flat roof requires identifying your roof type first to avoid using incompatible chemicals.
Preventative Maintenance to Avoid Future Flat Roof Bubble Repair
The best way to handle flat roof bubble repair is to prevent the need for it in the first place. Regular maintenance can catch small adhesion issues before they become large blisters. You should inspect your flat roof at least twice a year, ideally in the spring and fall. These inspections can dramatically reduce the frequency of required flat roof bubble repair.
During inspections, look for low spots where water ponds. Standing water can degrade the membrane and seep into micro-cracks, eventually turning into vapor that causes bubbles. addressing drainage issues is a form of preventative flat roofing bubble repair. If you keep the roof dry, you minimize the risk of blistering.
Limit foot traffic. Flat roofs are not always designed as decks. Heavy foot traffic can bruise the membrane and separate the layers, leading to the need for flat roof bubble repair. If you must walk on the roof, stick to designated walkways or use walk pads.
Maintenance Checklist:
Clean gutters and drains to prevent ponding.
Trim overhanging tree branches (impact damage causes leaks that become bubbles).
Check flashings and seams for early signs of lifting.
Reflective coatings can also help. By applying a white, reflective coating, you lower the roof temperature. Since heat causes the air inside blisters to expand, keeping the roof cool reduces the stress on any trapped air pockets. This simple step can delay the need for flat roof bubble repair significantly.
Finally, keep records of your roof installation. Knowing exactly what materials were used helps you select the correct products for any future flat roof bubble repair. Using the same brand of primer and patch ensures chemical compatibility and a longer-lasting repair.
Signs You Need Immediate Flat Roof Bubble Repair Services
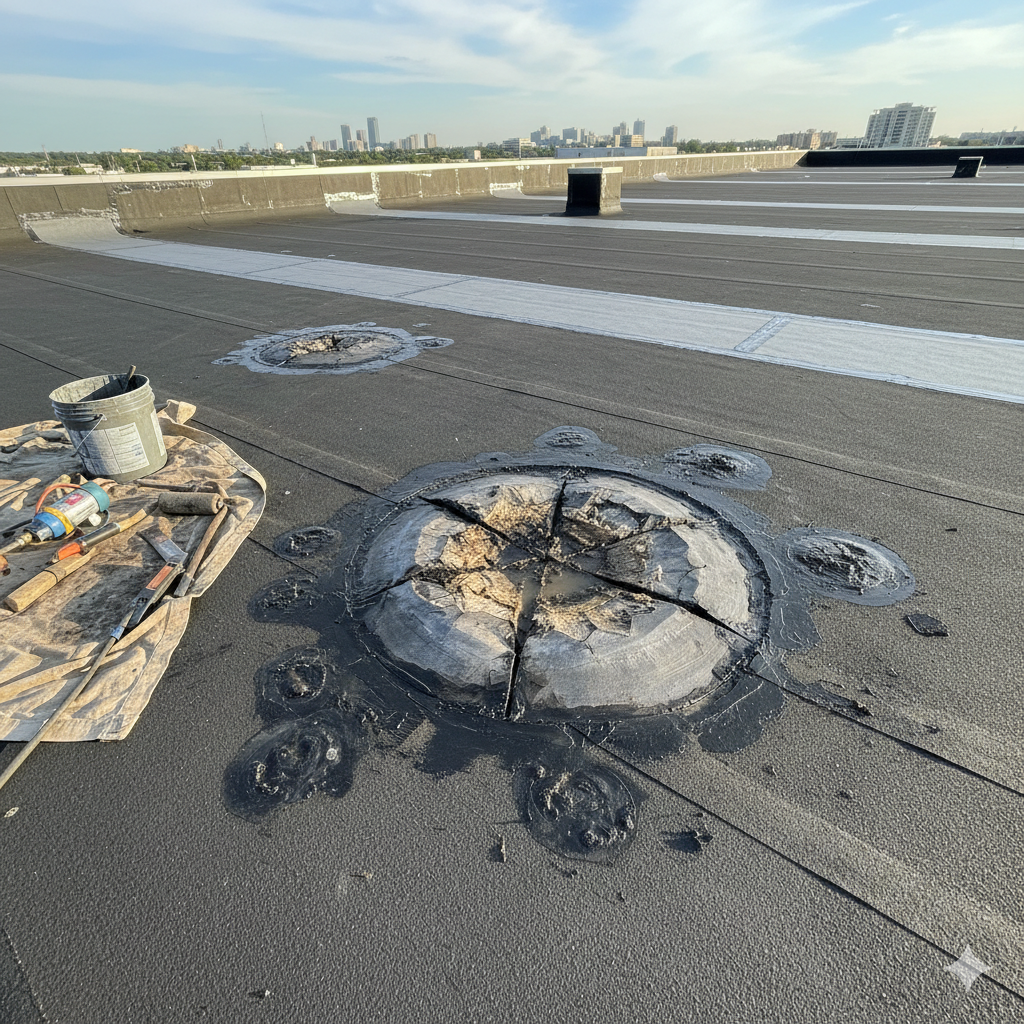
Not all bubbles require panic, but some signs indicate you need flat roofing bubble repair immediately. The most obvious sign is a leak inside the house directly under the blister location. If water is penetrating, the bubble has already compromised the waterproof layer, and flat roof bubble repair is urgent to prevent mold.
If you step on a bubble and water squirts out, or it feels spongy and full of liquid, you need flat roofing bubble repair now. This indicates the insulation is saturated. Saturated insulation acts like a sponge, holding water against the deck and causing rot. Prompt flat roof bubble repair in this scenario might require cutting out the wet insulation and replacing it.
Urgency Indicators:
Cracked Surface: If the skin of the bubble is cracked or “alligatoring.”
Growth: If a bubble is noticeably getting larger week by week.
Location: Bubbles near seams or flashings are high-risk.
Another sign is if the bubbles are in a high-traffic area. If a bubble is located where people walk to service HVAC units, it is likely to be punctured. Proactive flat roof bubble repair in these zones prevents accidental tears.
Finally, if you see “runs” or ridges forming a pattern, the roofing felt may be slipping. This is a severe structural issue that requires professional evaluation, likely involving extensive flat roof bubble repair or even partial replacement. Ignoring these signs usually leads to more expensive repairs down the road.

Frequently Asked Questions About Flat Roof Bubble Repair
What causes bubbles in flat roofs?
Bubbles are caused by trapped moisture or air between the layers of the roof. When the sun heats the roof, this trapped pocket expands, pushing the layers apart. Poor installation, lack of ventilation, or leaks can all lead to the need for flat roof bubble repair.
Can I just flatten the bubble without cutting it?
No. You cannot simply smash a bubble flat. The air or water inside has nowhere to go. Proper flat roof bubble repair requires cutting the bubble to release the pressure and dry out the cavity before resealing it.
Is flat roof bubble repair covered by insurance?
Typically, standard maintenance like flat roofing bubble repair is not covered by insurance. However, if the bubble was caused by a covered peril like storm damage or hail, your policy might pay for the repair. Check with your adjuster.
How long does a flat roof bubble repair last?
A professionally executed flat roofing bubble repair can last as long as the rest of the roof, often 5 to 10 years or more. However, if the underlying cause (like a persistent leak) isn’t fixed, the repair may fail sooner.
Can I perform flat roof bubble repair in winter?
It is difficult. Most adhesives and cements require specific temperatures to cure properly. Flat roofing bubble repair is best performed in warm, dry weather. In emergencies, temporary patches can be used until the weather improves.
Conclusion
Mastering flat roof bubble repair is a vital skill for maintaining the integrity of your property. Whether you choose to hire a professional or attempt a DIY solution, understanding the process ensures you make informed decisions. From identifying the early signs of blistering to understanding the costs involved in 2026, this guide has covered every aspect of flat roof bubble repair.
Remember that a bubble is a symptom of a deeper issue—adhesion failure or moisture entrapment. Effective flat roofing bubble repair does not just hide the bump; it resolves the root cause, dries the substrate, and reseals the membrane against the elements. By prioritizing flat roofing bubble repair, you protect your insulation, your roof deck, and ultimately, the interior of your home.