Roof Ladder Safety: Essential Tips to Avoid Risks
Roof Ladder Danger: Critical Mistakes to Prevent
What Is a Roof Ladder and Why Do You Need It?
When it comes to home maintenance, having the right equipment is the difference between a successful project and a trip to the emergency room. A roof ladder is a specialized tool designed specifically for accessing and working on sloped surfaces. Unlike a standard extension ladder that leans against a wall, this tool is engineered to hook over the ridge of the roof, distributing weight evenly and preventing slippage. This design is crucial for anyone attempting to repair shingles, clean chimneys, or inspect flashing.
The primary distinction of a roof ladder lies in its ridge hook. This attachment secures the unit to the peak of the house, allowing the user to climb up and down the slope safely without damaging the roofing materials. While standard ladders rely on friction against the ground and a vertical wall, a roof ladder relies on mechanical grip at the highest point of the structure. This makes it indispensable for steep pitches where walking is impossible or dangerous.
Understanding the anatomy of this tool is the first step in using it correctly. Most units consist of lightweight aluminum sections that are easy to maneuver. The ridge hook often includes wheels, which allow you to roll the ladder up the roof on its side or back before flipping it over to engage the hook. Without a dedicated roof ladder, homeowners often resort to unsafe practices, such as tying ropes around chimneys or relying on standard ladders that can easily slide out on granular shingles.
If you own a home with a pitched roof, this tool is not a luxury; it is a necessity for safe access. Whether you are a DIY enthusiast or simply want to clean your gutters from a higher vantage point, investing in a high-quality roof ladder ensures that you have a stable platform. It transforms a precarious balancing act into a secure working environment, giving you the confidence to tackle necessary repairs.

How to Find the Right Roof Ladder for Your Needs
Finding the perfect roof ladder requires a bit of research, as not all models are created equal. You can start by visiting local hardware stores or home improvement centers. These physical locations often have display models, allowing you to gauge the weight and build quality of the ladder before purchasing. However, local inventory can be limited, so looking online is often the best way to find a wider variety of lengths and load capacities.
When searching online, specific keywords will help narrow down the results. Look for terms like “roofing ladder with ridge hook” or “sectional crawling ladder.” Reading user reviews is incredibly valuable during this phase. Previous buyers will often comment on the stability of the ridge hook or the durability of the wheels. A roof ladder with poor reviews regarding stability should be avoided at all costs, regardless of the price.
Another avenue is checking with professional roofing supply companies. These distributors cater to contractors and usually stock industrial-grade equipment. While the cost might be higher, a professional-grade roof ladder offers superior longevity and safety features. They are built to withstand daily abuse and often come with better warranties than consumer-grade models found at big-box stores.
Don’t forget to check the specifications regarding weight ratings. You need to account for your body weight plus the weight of any tools or materials you will be carrying. If you plan on hauling bundles of shingles, a heavy-duty roof ladder is mandatory. Taking the time to find the right specifications ensures that the equipment you buy will actually serve your specific needs safely.
How to Buy a Quality Roof Ladder
Once you have identified potential models, the buying process involves checking for certification and safety standards. A reliable roof ladder should meet the standards set by safety organizations such as OSHA or ANSI. These certifications indicate that the ladder has been tested for load capacity and structural integrity. Never purchase a generic or unbranded ladder that lacks these safety stamps.
2. Verify the length: Measure your roof slope length before buying. The **roof ladder** needs to reach from the eaves to the ridge with a little room to spare.
3. Inspect the hook assembly: The ridge hook is the most critical component. Ensure it is robust, securely attached, and preferably adjustable.
When you are ready to make the purchase, compare shipping costs if buying online. Because a roof ladder is a long, bulky item, shipping can be expensive. Some retailers offer free ship-to-store options, which can save you a significant amount of money. If buying second-hand, inspect the ladder rigorously for bends, cracks, or loose rivets. A compromised ladder is a severe safety hazard.
Warranties are also a major factor. A reputable manufacturer will stand behind their product. Look for a warranty that covers the structural integrity of the roof ladder for at least a few years. This protects your investment and gives you peace of mind knowing that the manufacturer is confident in their product’s durability.
Finally, consider buying bundles. Some retailers sell the roof ladder along with safety harnesses or stabilizers as a package deal. This can be a cost-effective way to get all the necessary safety gear in one purchase. Remember, the goal is not just to buy a ladder, but to buy a complete safety system for your roof work.
How Much Does a Roof Ladder Cost?
The price of a roof ladder varies significantly based on material, length, and brand. generally, you can expect to pay anywhere from $150 to over $400 for a quality unit. Entry-level models that are shorter or designed for occasional light use will be at the lower end of this spectrum. These are often sufficient for simple inspections or minor cleaning tasks on smaller homes.
Mid-range options, typically costing between $250 and $350, usually offer better build quality and more robust ridge hooks. At this price point, you often get features like wider rungs for better foot comfort and heavier gauge aluminum. For most homeowners who plan to do their own maintenance, a mid-range roof ladder offers the best balance of cost and performance.
Professional-grade ladders can exceed $500. These are designed for daily use by contractors. They feature reinforced rails, heavy-duty wheels, and replaceable parts. While the initial investment is high, a professional roof ladder will last for decades if well-maintained. If you have a large property or plan to do extensive renovations, the extra cost is justified by the increased safety and durability.
It is important to remember that the cost of the roof ladder is cheaper than the cost of an injury. Trying to save money by building a makeshift ladder or using inappropriate equipment is a false economy. The medical bills from a fall far outweigh the price of proper equipment. Treat the purchase as an investment in your personal safety and the long-term maintenance of your home.
Additionally, keep in mind the cost of accessories. You may need to buy a roof rack for your vehicle or a storage system for your garage. While these are secondary costs, they contribute to the total investment. However, once you own a roof ladder, you save money by not having to hire professionals for minor tasks like gutter cleaning or tile replacement.
How Long Does a Roof Ladder Last?
The lifespan of a roof ladder is largely determined by how well it is maintained and stored. A high-quality aluminum ladder can easily last 15 to 20 years or more. Aluminum does not rust, which makes it ideal for outdoor use, but it can corrode if exposed to certain chemicals or salt environments. Regular cleaning helps extend the life of the metal.
Usage frequency also plays a role. A roof ladder used daily by a contractor will naturally show wear and tear faster than one used twice a year by a homeowner. The wheels and ridge hook are usually the first components to degrade. However, on many quality models, these parts are replaceable, meaning you don’t have to buy a whole new ladder just because a wheel is stuck.
Storage is critical for longevity. Leaving a roof ladder outside, exposed to the elements year-round, will shorten its life. UV rays can damage plastic components, and moisture can eventually affect the moving parts of the ridge hook. Storing the ladder in a garage or shed, off the ground, prevents unnecessary weathering and physical damage from falling objects.
Inspections should be routine. Before every use, check the roof ladder for loose rungs, cracks in the side rails, or loose bolts on the hook assembly. If you spot structural damage, the ladder has reached the end of its life. Never attempt to weld or patch a broken ladder rail; the heat can weaken the metal, making it unsafe. When a ladder is structurally compromised, it must be retired immediately.
How to Install and Set Up Your Ladder
Setting up a roof ladder correctly is the most critical phase of using it. The process begins on the ground. Ensure that the ridge hook is securely fastened to the top of the ladder section. Double-check all nuts and bolts. Once the assembly is ready, extend your base ladder (the extension ladder used to reach the eaves) and ensure it is stable and set at the correct angle (roughly 75 degrees).
It is vital to verify that the hook is solid before putting your full weight on the roof ladder. Give it a firm tug downwards to ensure it has grabbed the ridge securely. The ladder should lay flat against the roof surface. If the roof is uneven, ensure the ladder isn’t wobbling. Sometimes, you may need to adjust the position slightly to avoid roof vents or loose tiles.
Never try to install a roof ladder during high winds or wet conditions. The installation process requires balance and precision. A gust of wind can easily catch the ladder while you are pushing it up the roof, causing you to lose control. Always choose a calm, dry day for setup. If the roof pitch is extremely steep, consider using a safety harness in addition to the ladder for redundancy.
Taking the ladder down is the reverse of the installation. Climb down to the eaves, flip the roof ladder so it rests on its wheels, and carefully roll it down to you. Ensure you have a firm grip before disengaging it from the roof, as gravity will want to pull it down quickly. Controlled movements are key to a safe installation and removal process.

Advantages and Challenges Connected to Roof Ladder
There are distinct advantages to owning a roof ladder. The primary benefit is safety. By providing a secure, dedicated path up the slope, it minimizes the risk of slipping on loose granules or moss. It distributes your weight across the length of the rails rather than concentrating it under your feet, which protects fragile roofing materials like slate or asphalt shingles from cracking under pressure.
Another advantage is efficiency. With a roof ladder, you can move up and down the workspace quickly. You don’t have to constantly reposition a ladder from the ground. It acts as a staging area where you can pause, inspect your work, and hold onto the rungs for balance. This stability leads to better quality work, as you aren’t rushing to get back to safety.
However, there are challenges. The main challenge is the weight and bulk. A roof ladder can be awkward to maneuver, especially for one person. getting it up the extension ladder and onto the roof requires physical strength and coordination. If you are not physically fit, handling a long aluminum ladder at heights can be exhausting and dangerous.
Storage is another logistical challenge. Because they are long and rigid, finding a place to keep a roof ladder can be difficult for homeowners with small garages. Additionally, the initial cost is a barrier for some. People often try to make do without one to save money, only realizing the difficulty of the task once they are stuck on a slippery roof.
Ultimately, the advantages of safety and protection of property far outweigh the challenges of storage and handling. Once you overcome the learning curve of setting it up, the roof ladder becomes an invaluable asset for home maintenance.
Critical Usage Techniques and Transportation
Using a roof ladder involves more than just climbing; it requires specific techniques to ensure stability and ease of transport. This section covers four specific topics that users often struggle with.
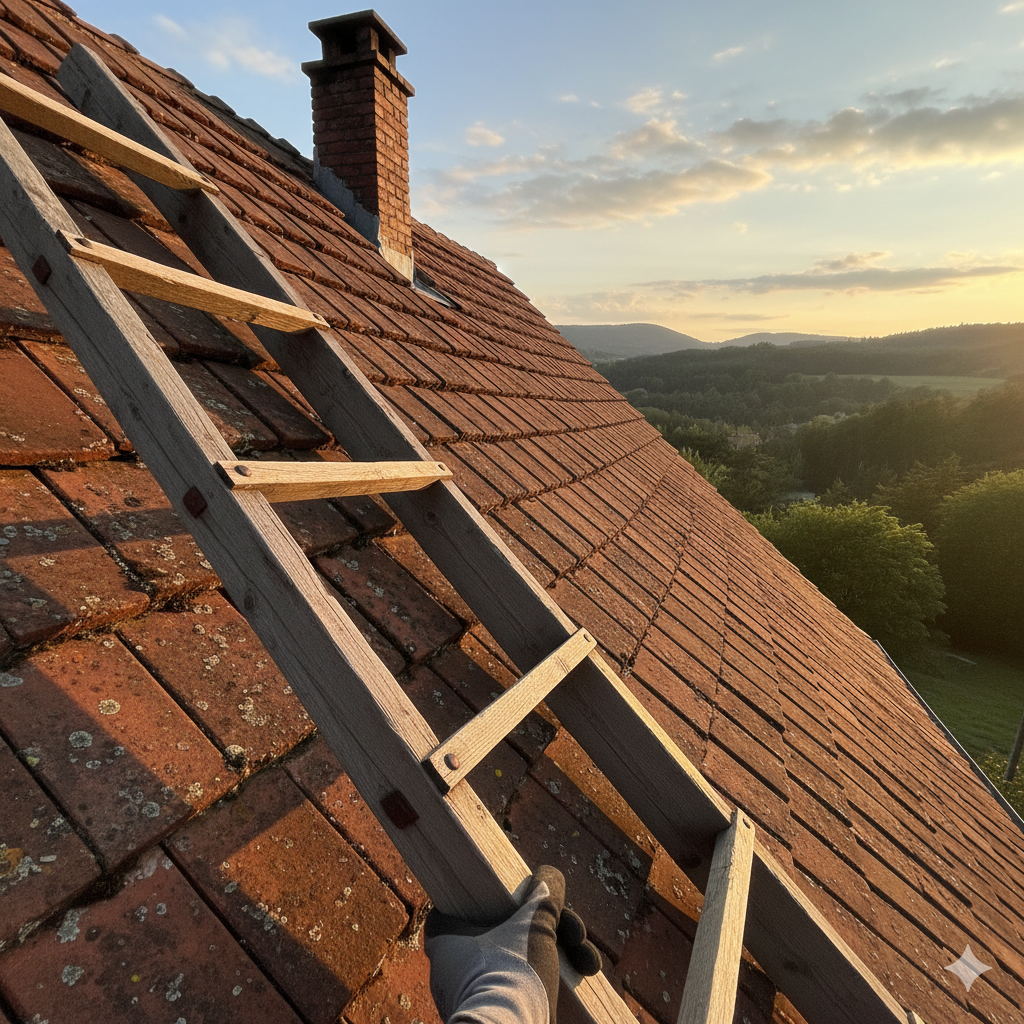
1: How to Put a Ladder on a Sloped Roof
To put the ladder on a sloped roof, you must utilize the wheels attached to the ridge hook. Never try to slide the raw metal rails up the shingles, as this will tear the granules off. Stand on your access ladder at the eave. push the roof ladder upward with the wheels touching the roof. The wheels allow it to glide smoothly. Keep pushing until the hooks clear the ridge line. Then, rotate the ladder 180 degrees. This flips the hooks downward, locking them over the peak. Pull down firmly to seat the hooks.
2: How to Transport a Ladder Without a Roof Rack
Transporting a roof ladder without a rack is tricky but possible for short distances. You can wrap the ladder rails in moving blankets to protect your car’s roof paint. Lay the ladder flat on the roof of the car and run ratchet straps through the open windows (not the doors, or you can’t open them) to secure it. Tighten the straps significantly so the ladder cannot slide forward or backward. Alternatively, if the ladder is sectional, disassemble it and fold down the back seats to fit it inside the cabin.
3: Roof Ladder Hook
The hook is the anchor of the system. A high-quality roof ladder hook usually features a rubber coating or a flat bar design to prevent damage to the ridge tiles. The geometry is designed to grab the opposite side of the peak. Inspect the bolts connecting the hook to the ladder frequently. Some hooks are universal and can be added to standard ladders, converting them into a roof ladder. Ensure the wing nuts are tightened with pliers, not just finger-tight, before trusting it with your life.
4: How to Use a Roof Ladder
When climbing, keep your center of gravity low. Hold the rails, not the rungs, as this gives you a better chance of catching yourself if you slip. Never lean out far to the side of the roof ladder; this can cause the bottom to swing out, disengaging the hook. Move tools in a belt or hoist them up with a rope; do not carry heavy loads in one hand while climbing. Always maintain three points of contact—two feet and one hand, or two hands and one foot—on the ladder at all times.
How to Clean and Maintain Your Equipment
Cleaning your roof ladder is essential for maintaining its grip and functionality. After a job, the ladder may be covered in moss, roofing tar, or mud. This debris can make the rungs slippery, creating a hazard for the next user. A simple wash with a garden hose and a stiff brush is usually sufficient to remove dirt. If you encounter roofing tar, use a specialized solvent or mineral spirits to wipe the rails clean, but ensure the solvent doesn’t damage any rubber feet or plastic wheels.
Pay special attention to the moving parts. The wheels on the ridge hook assembly of the roof ladder need to spin freely to work correctly during installation. If they are jammed with grit, you will struggle to push the ladder up the roof. specific lubrication, like silicone spray, can keep the axles moving smoothly. Avoid heavy grease, as it attracts more dirt.
Inspect the rungs for dents. A hollow aluminum rung that is dented loses a significant amount of its structural strength. If your roof ladder has taken a heavy impact, check for stress fractures near the welds. Aluminum fatigue is not always obvious, so look for fine lines in the metal.
By keeping your roof ladder clean, you not only extend its life but also ensure that it is safe to use. A slippery rung is a recipe for disaster. Regular maintenance is a small time investment that pays off in safety and equipment longevity.

What is the Cost of Hiring a Professional vs. DIY?
When considering whether to buy a roof ladder and do the work yourself or hire a professional, cost is a major factor. Hiring a roofing contractor for minor repairs can cost anywhere from $300 to $1,000, depending on the job’s complexity. If you have recurring issues, like gutters that fill up twice a year, hiring a pro every time adds up quickly.
In contrast, purchasing a roof ladder costs between $200 and $400 as a one-time expense. If you use the ladder just twice, it has likely paid for itself compared to the minimum call-out fee of a contractor. For homeowners comfortable with heights, the DIY route offers significant long-term savings. You have the freedom to inspect your roof after every storm without waiting for a contractor’s schedule.
However, the “cost” of DIY also includes risk. If you are not confident, the potential cost of an injury far exceeds the price of a contractor. Furthermore, professionals have insurance. If they damage your roof, they fix it. If you use your roof ladder improperly and crack a slate tile, the cost of repair falls on you.
Ultimately, the decision depends on your comfort level and the frequency of the tasks. For regular maintenance like cleaning, the roof ladder is a smart financial move. For complex structural repairs, hiring a pro is usually the better value, as they bring expertise that goes beyond just having the right ladder.
FAQ : Roof ladder
What is the maximum weight a roof ladder can support?
Most standard aluminum ladders are rated for 250 to 300 pounds (Type I or Type IA). However, heavy-duty industrial models can support up to 375 pounds (Type IAA). Always check the specific rating label on the rail before use.
Can I use a regular extension ladder as a roof ladder?
You can, but only if you attach a specialized ridge hook accessory. Using a standard extension ladder flat on a roof without a hook is extremely dangerous as it has nothing to prevent it from sliding down.
Do roof ladders work on all types of roofs?
They work best on asphalt shingle, slate, and tile roofs with a standard pitch. They are not suitable for flat roofs (where they aren’t needed) or extremely steep A-frame roofs where additional harnessing is legally required.
Is it safe to leave a roof ladder up overnight?
No. You should never leave equipment unattended on a roof. Wind can dislodge it, causing it to fall and injure someone or damage property. Additionally, it provides unauthorized access to your home for intruders.
How do I stop the roof ladder from damaging my shingles?
High-quality ladders come with rubberized wheels or padded bars on the hook. If yours does not, you can wrap the hook bar in foam or heavy cloth to create a buffer between the metal and the roofing material.
Conclusion
Investing in a roof ladder is one of the smartest decisions a homeowner can make for property maintenance. It provides the stability, safety, and access required to perform essential tasks that would otherwise be dangerous or impossible. From cleaning gutters to inspecting shingles, this specialized tool empowers you to take care of your home proactively. While the initial cost and storage requirements may seem like hurdles, the long-term benefits of owning a roof ladder are undeniable.
Safety must always be the priority. By understanding how to select, inspect, and use a roof ladder correctly, you significantly reduce the risks associated with working at heights. Remember to follow the installation protocols, respect the weight limits, and maintain the equipment properly. Whether you are a seasoned DIY veteran or a new homeowner, treating this tool with respect will ensure it serves you well for many years.
Don’t let minor roof issues turn into major leaks because you lacked access. With the right roof ladder, you can tackle problems early, saving thousands in potential water damage repairs. It is a tool that bridges the gap between ground-level helplessness and professional-level capability. Equip yourself properly, climb safely, and keep your home’s first line of defense—its roof—in perfect condition.
Other Resources
Home Depot – Category page showcasing roofing ladders and related access equipment.
Industrial Ladder – Product section featuring roofer ladders, hoists, and roofing access tools.
O’Keeffe’s – Collection page presenting access ladders designed for professional roofing use.
American Ladders – Product listing of roofing ladder accessories and safety components.
Other Helpful Articles
Metal Roof Ice Dam – Article explaining causes, risks, and prevention methods for ice dams on metal roofs.
RV Roof Repair Kit – Guide describing RV roof repair kits and their typical applications.
Roof Repair Bronxville NY – Local service article outlining common roof repair needs in Bronxville, New York.