
Top Roof Louver Installation: Critical Rules
Ultimate Roof Louver Guide 2026: Save Money Fast
What Is a Roof Louver and Why Do You Need It?
A roof louver, commonly referred to in the construction industry as a box vent, turtle vent, or static vent, is a critical component of a home’s passive ventilation system. Unlike active systems that require electricity or wind turbines to function, a roof louver operates on the principle of natural convection.
As the sun heats the shingles, the air inside the attic warms and rises. This buoyant, warm air seeks an escape route at the highest possible point of the structure. The roof louver provides this exit, allowing superheated air and moisture-laden vapor to escape into the atmosphere. Without this release valve, heat buildup can prematurely age asphalt shingles, cooking them from the underside, while trapped moisture can condense on rafters, leading to mold, rot, and structural decay.
The design of a modern roof louver is deceptively simple but highly engineered. It typically consists of a base that flashes into the roof deck to prevent water intrusion and a hooded cap that shields the opening from rain, snow, and debris. Inside the cap, angled slats—or louvers—are positioned to deflect wind-driven rain while still permitting airflow. This balance between weather protection and air exhaust is the defining characteristic of a high-quality roof louver.
How to Find the Right Roof Louver for Your Home
Finding the correct roof louver involves more than simply picking a color that matches your shingles. It requires a technical assessment of your attic’s square footage and the existing intake ventilation. The first step in how to find the right unit is to calculate the required Net Free Area (NFA). Every roof louver product specification sheet lists its NFA rating, which represents the open area available for airflow after accounting for the obstruction of screens and blades.
A standard rule of thumb is the 1/300 rule, which dictates one square foot of ventilation for every 300 square feet of attic floor space, split evenly between intake and exhaust. If your intake is insufficient, adding more exhaust power via an extra roof louver can actually cause weather infiltration, as the system tries to pull air from wherever it can, sometimes sucking rain in through other vents.
You can find high-quality roof louver options at specialized roofing supply houses rather than just big-box home improvement stores. Supply houses often stock professional-grade models made from heavier gauge metal with superior powder-coated finishes that resist fading and chalking. When searching, look for models with integrated insect screens. While cheaper models might skip this feature, a screen is vital to prevent wasps, birds, and squirrels from turning your attic into a nesting ground. Additionally, consider the wind rating of the roof louver. In hurricane-prone areas or regions with high wind gusts, you need a model tested to withstand uplift pressures and wind-driven rain.
Online resources are also valuable when learning how to find specific models. Manufacturer websites often provide calculators where you can input your roof pitch and attic size to get a recommendation for the number of roof louver units needed. Look for forums and reviews from professional roofers rather than just homeowners; pros will tell you which brands deform under heavy snow loads or which ones have flashing flanges that are too narrow to seal properly.
Pay attention to the material compatibility as well; if you have a copper roof, you cannot install an aluminum roof louver due to galvanic corrosion. Finding the right product is a balance of NFA requirements, material durability, and aesthetic integration with your home’s exterior.
How to Buy a Roof Louver: Selection and Sourcing
Once you have identified the specifications, knowing how to buy the right roof louver ensures you get the best value and performance. Buying strictly on price is a common mistake. A cheap plastic roof louver might save you twenty dollars upfront but can become brittle and crack after just a few years of UV exposure, leading to expensive leak repairs. When buying, prioritize materials like galvanized steel or aluminum, which offer a better lifespan. If you reside in a coastal area, aluminum is non-negotiable as it resists salt air corrosion better than steel. Conversely, in areas with heavy hail, a high-impact polymer roof louver might actually outperform metal, which can dent and lose its aesthetic appeal.
When you go to buy, always check the return policy and warranty. reputable manufacturers often offer lifetime limited warranties on their metal roof louver products, covering finish fade and structural failure. However, these warranties are often void if the installation does not follow strict guidelines, so ensure you have the correct nails and sealant in your cart as well. You should buy roofing cement that is compatible with asphalt shingles, usually a neoprene or polyurethane-based sealant, rather than standard silicone which often fails to adhere to granule-covered surfaces long-term.
Bulk purchasing is another strategy to consider. Since most roofs require multiple vents—often one every 8 to 10 feet along the ridge—buying a roof louver carton of six or ten units can significantly reduce the per-unit cost. Check with local roofing distributors who might sell directly to the public; they often have “boneyard” sections with discounted items that are perfectly functional but perhaps dusty or out of original packaging. When you buy, also verify that the flange size matches your shingle exposure. A standard roof louver has a flange that slides under the shingles; if this flange is too short, it won’t provide adequate overlap to prevent water from wicking in.
What Is the Cost of a Roof Louver Installation?
The cost to install a roof louver varies significantly based on whether it is a new installation or a replacement, the steepness of the roof, and the material chosen. For the material alone, a standard aluminum or galvanized steel roof louver typically costs between $20 and $50 per unit in 2026. High-end decorative copper models or those with specialized storm-proof baffles can range from $80 to over $150 each. Plastic or polymer versions are generally the most affordable, often found for under $20, though their longevity is lower.
Labor is the largest component of the cost. Professional roofers typically charge between $150 and $300 per vent for installation. This price includes safety setup, cutting the deck, installing the roof louver, and sealing the flashing. If the roof is particularly steep (a pitch of 8/12 or greater) or requires two stories of ladder work, expect labor costs to increase by 20% to 50% due to the additional safety equipment and time required. For a standard home needing 4 to 6 vents, the total project cost often falls between $800 and $1,800.
If you are replacing an existing roof louver, the cost might be slightly lower per unit since the hole is already cut, but the roofer must carefully remove surrounding shingles without damaging them to slide the new flashing in. This delicate work can sometimes take longer than a fresh install. Additional costs can arise if the deck around the old vent is rotted and needs patching. It is always wise to budget a 15% contingency for such unforeseen structural repairs. While DIY installation can save on labor, the cost of a mistake—such as a leak that damages drywall and insulation—far outweighs the savings, making professional installation a prudent financial decision for most homeowners.
How to Install a Roof Louver: A Step-by-Step Guide
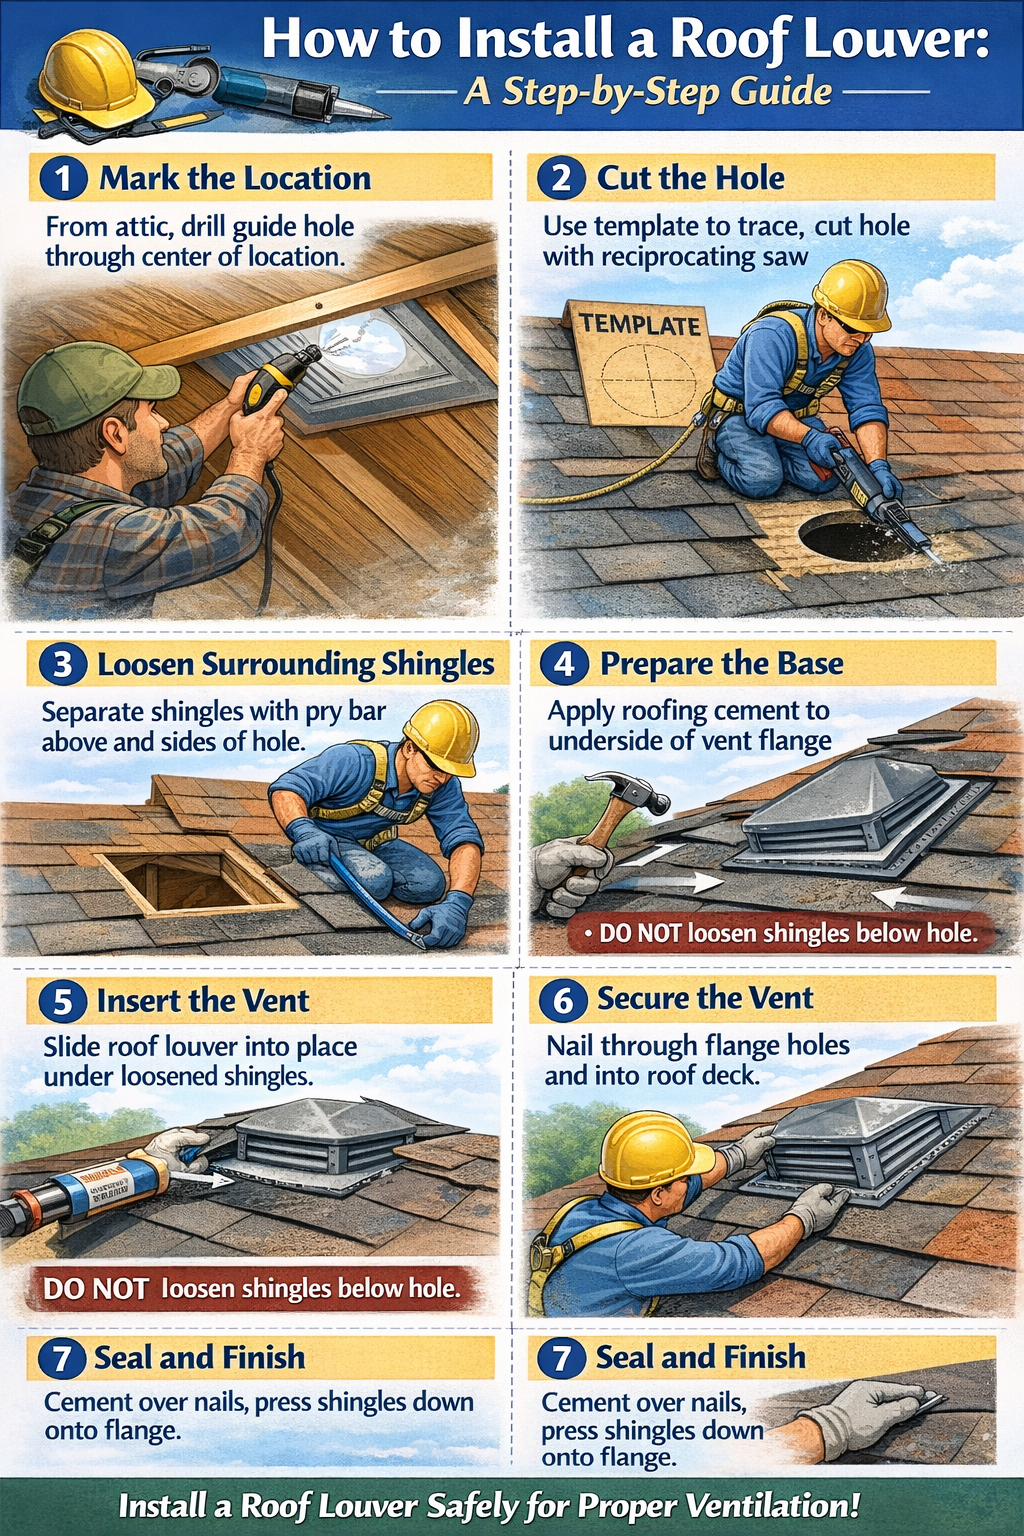
Installing a roof louver is a precise process that requires respect for safety and roofing mechanics. Before starting, ensure you have a stable ladder, a safety harness, a reciprocating saw, a pry bar, a hammer, roofing nails, and high-quality roofing cement. Do not attempt this on a wet or icy roof.
-
Mark the Location: From inside the attic, identify a location between two rafters near the ridge. Drill a guide hole through the center of the desired location so it is visible from the roof surface.
-
Cut the Hole: On the roof, use the roof louver template (usually on the box) to trace the circle or square to be cut. Using the reciprocating saw, cut through the shingles and decking, being careful not to cut the rafters below.
-
Loosen Surrounding Shingles: Use a pry bar to gently separate the shingles around the hole. You need to loosen the shingles above and to the sides of the hole to allow the flashing of the roof louver to slide underneath. Do not loosen the shingles below the hole; the flange will sit on top of these.
-
Prepare the Base: Apply a thick bead of roofing cement to the underside of the roof louver flange. This creates a primary seal against water intrusion.
-
Insert the Vent: Slide the roof louver into place. The top and side flanges must go under the existing shingles, while the bottom flange must sit on top of the lower shingles. This “shingle fashion” layering is critical for water shedding.
-
Secure the Vent: Lift the shingles to expose the flange and drive roofing nails through the pre-punched holes. Ensure the nails penetrate the decking securely.
-
Seal and Finish: Apply a dab of roofing cement over every exposed nail head to prevent rust and leaks. Press the shingles back down onto the flange. The heat of the sun will eventually seal them, but a small amount of adhesive can help secure them immediately.
How to Clean and Maintain Your Roof Louver
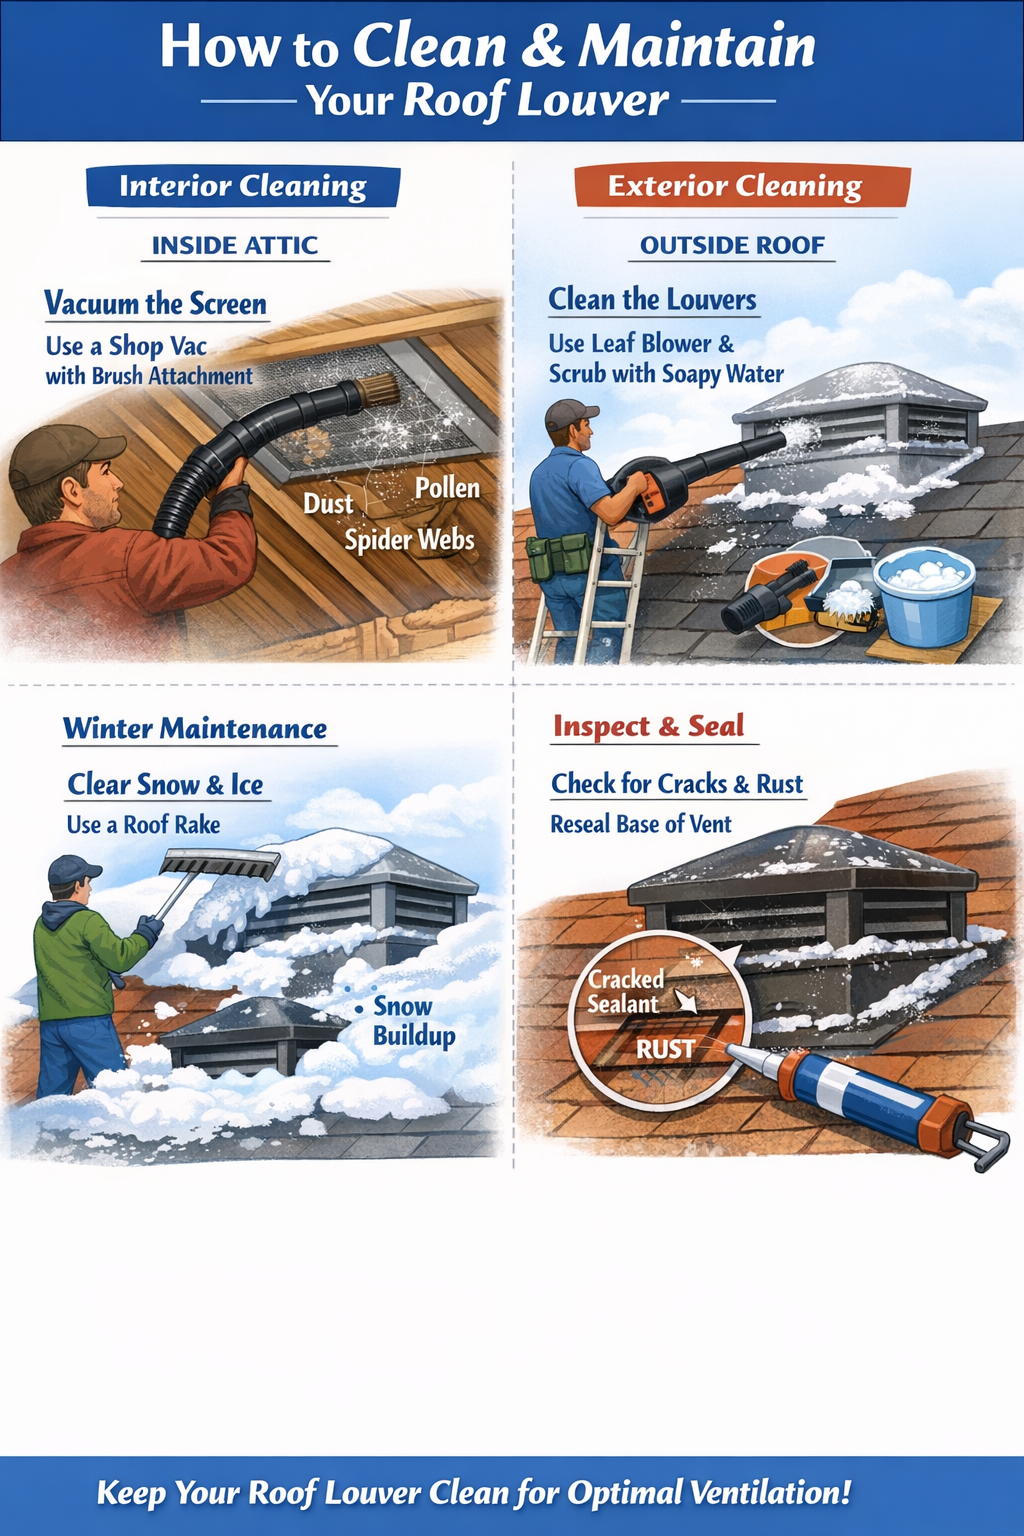
Maintenance of a roof louver is often overlooked, yet it is vital for ensuring the system continues to breathe. Over time, the screen inside the louver can become clogged with dust, pollen, bird feathers, and even spider webs. This blockage significantly reduces the Net Free Area, rendering the vent useless. To clean a roof louver, you often do not need to go onto the roof. From inside the attic, you can use a shop vacuum with a brush attachment to gently suction debris from the underside of the screen.
If the debris is stubborn or access from the attic is difficult, exterior cleaning is necessary. Using a ladder to reach the roof level, you can use a leaf blower to dislodge loose material from the roof louver fins. Avoid using a high-pressure power washer directly into the vent, as this can force water into the attic. Instead, use a soft bristle brush and a bucket of mild soapy water to manually scrub the fins and screen. This is also an excellent time to inspect the housing for cracks (if plastic) or rust (if metal).
Winter maintenance involves checking for snow blockage. While a roof louver is designed to rise above the roof plane, heavy drifts can cover them. If you notice ice dams forming, check if your vents are buried. Safely clearing the snow around the roof louver with a roof rake can restore airflow and help mitigate the ice damming. Additionally, inspect the sealant around the base of the vent annually. UV rays degrade roofing cement over time; if you see cracks in the sealant, apply a fresh layer to prevent water from seeping under the flashing.
Advantages and Challenges Connected to Roof Louver Systems
The primary advantage of a roof louver system is its reliability. With no moving parts, there are no bearings to screech, no motors to burn out, and no electricity costs. They are silent and work purely on physics. This makes them an excellent “set it and forget it” solution for many homeowners. They are also versatile; unlike ridge vents which require a long, horizontal peak, a roof louver can be installed on short hip ridges or on the back slopes of a house where they are less visible from the street, preserving curb appeal.
However, challenges exist. The most significant is the potential for leakage if installed incorrectly. Because a roof louver requires cutting a hole in the roof deck—a deliberate penetration—it introduces a weak point in the waterproofing system. If the flashing fails, water enters directly into the insulation. Another challenge is aesthetic; some homeowners find the “turtle” shape protruding from the roof to be unsightly compared to the sleek, invisible line of a ridge vent.
Furthermore, a roof louver has limited exhaust capacity per unit compared to a power vent or a turbine. To achieve the same airflow as one large power fan, you might need six or eight static louvers, which increases the number of holes in your roof and the labor cost. They also rely entirely on thermal buoyancy; on a hot day with no wind, the airflow can be slow. Conversely, on very windy days, a poorly designed roof louver might allow some rain infiltration if the baffles are not engineered to handle horizontal precipitation.
Special Insights: Varieties and Measurement Techniques
This section covers specific technical variations and measurements essential for professionals.
1: What is a roof louver
Technically, a roof louver is any static vent with fixed slats. It differs from a turbine (whirlybird) which spins, and a power vent which uses a fan. Its sole function is passive exhaust, relying on the pressure differential between the attic and the outside.
2: Pergola louver roof
A distinct category is the pergola louver roof. Unlike a standard attic roof louver, this is an architectural patio covering consisting of adjustable blades. These blades can rotate 180 degrees, allowing homeowners to control sunlight and rain on a deck. While an attic roof louver is fixed for ventilation, a pergola system is a dynamic, motorized or manual roof system for outdoor living spaces.
3: How to measure a gable roof louver
To measure a gable roof louver, you must calculate the rough opening, not the face size. Remove the existing vent (or measure from the inside) to get the width and height of the framed hole. Then, determine the required NFA. If replacing, ensure the new unit’s frame dimensions overlap the siding by at least an inch to allow for caulking and nailing.
4: Roof louver vent
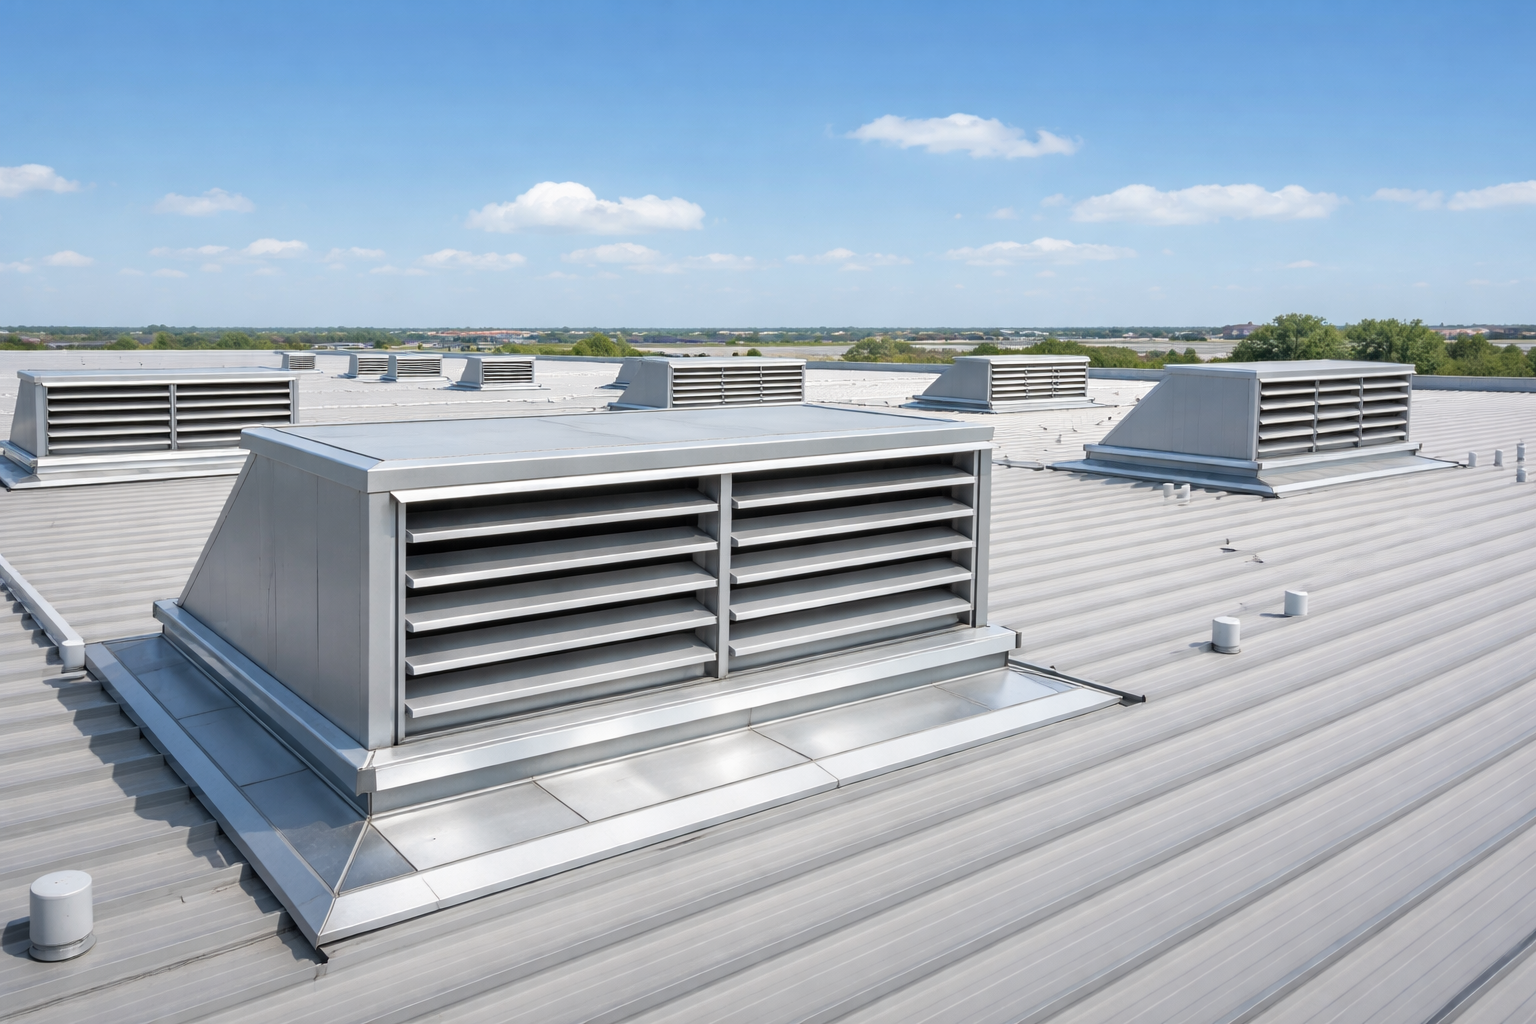
The term “roof louver vent” is often used interchangeably with “box vent.” However, in commercial roofing, it can refer to large, continuous louvered turrets. Ensure you verify if the spec calls for a residential “spot” vent or a commercial continuous run, as the installation methods for these roof louver vent types differ drastically.
How to Do a Roof Louver Inspection
Performing a professional inspection of a roof louver requires a keen eye for detail. Start from the ground with binoculars. Look for any physical damage to the cap—dents from hail or cracks in plastic housings are red flags. A compromised cap can allow water ingress. Look for “lifting” shingles around the base. If the shingles look humped or curled near the roof louver, it suggests the flange was not nailed flat or that nails are backing out, creating a pathway for water.
Move into the attic for the second phase of the inspection. With a flashlight, examine the decking around the hole cut for the roof louver. Staining on the wood (dark circles or white powdery mildew) indicates that water is leaking past the flashing or that condensation is dripping back down. Check the daylight visibility; you should see light coming through the vents, but not gaping holes that would admit rodents. If you see a solid wall of light, the screen may be missing. Conversely, if you see no light, the screen is likely 100% clogged with dust and needs immediate cleaning.
Finally, check the “chimney effect.” On a hot day, you should be able to feel a stream of warm air exiting the roof louver if you place your hand near the opening (safely, without touching sharp edges). If the air feels stagnant, check your intake vents at the soffit. A roof louver cannot work if there is no air coming in to replace the air going out. An inspection is incomplete without verifying that the intake path is clear of insulation baffles or painted-over screens.
How Much Does Replacement Cost and Is It Worth It?
Replacing a roof louver is generally more cost-effective than repairing a damaged one. If a metal vent is rusted through or a plastic one is cracked, no amount of sealant will provide a permanent fix. The cost of a replacement unit is minor ($30-$50) compared to the potential cost of water damage remediation ($2000+). Therefore, if a roof louver shows signs of failure, immediate replacement is the only professional recommendation.
The total cost for a professional to come out and replace a single vent typically involves a minimum service charge, often around $150 to $250. This covers the truck roll, insurance, and the small amount of time on site. To maximize value, if one roof louver is failing, it is highly probable that others of the same age are near failure too. It is usually much cheaper per unit to replace all vents at once rather than paying separate service calls for each one over a few years.
Upgrading is also a consideration. If you are replacing old vents, consider upgrading to a roof louver with a higher NFA rating or better storm protection. The incremental material cost is negligible, but the improved airflow can extend the life of your shingles and reduce your air conditioning load. However, do not mix ventilation types. If you replace a roof louver, do not mix it with a newly installed ridge vent on the same roof plane, as this can “short circuit” the airflow, drawing air from the vent rather than the soffit. Stick to one type of exhaust system for maximum efficiency.
Frequently Asked Questions : Roof louver
Can I mix a roof louver with a ridge vent?
No, mixing exhaust ventilation types is a major error. If you install a roof louver alongside a ridge vent, the ridge vent may pull air in through the louver rather than from the soffits. This short-circuits the system, leaving the lower part of the attic unventilated and potentially sucking rain or snow into the attic through the roof louver.
How many roof louver vents do I need?
You need 1 square foot of ventilation for every 300 square feet of attic floor, divided evenly between intake and exhaust. For example, a 1500 sq. ft. attic needs 5 sq. ft. of total ventilation. That means 2.5 sq. ft. of exhaust. If a roof louver provides 0.5 sq. ft. of NFA, you would need exactly 5 vents.
Do roof louvers leak during heavy rain?
A properly installed roof louver should not leak. They are designed with internal baffles and hoods to deflect wind-driven rain. However, leaks can occur if the flashing is damaged, the sealant has cracked, or if the vent is installed on a roof pitch that is too shallow for the product’s design (usually below 3/12 pitch).
Is a plastic or metal roof louver better?
Metal is generally superior for durability. An aluminum roof louver will not rust and resists UV degradation far better than plastic. However, high-grade polypropylene vents are resistant to dents from hail. In most professional applications, aluminum is the standard choice for its balance of longevity and cost.
Can I paint my roof louver?
Yes, you can paint a metal roof louver to match your shingles. Use a high-quality, direct-to-metal (DTM) spray paint rated for exterior use. Ensure the surface is clean and dry before painting. Do not paint the screen or the louvers themselves heavily, as clogging the holes will reduce the airflow capability of the unit.
Conclusion
In conclusion, the roof louver remains a cornerstone of effective attic ventilation. Its simple, passive design offers a reliable solution for removing heat and moisture, protecting the structural integrity of your home. Whether you are building a new property or retrofitting an older one, understanding the nuances of how to find, buy, and install the correct roof louver is essential. From calculating the correct Net Free Area to ensuring a watertight installation with proper flashing, every step matters.
Regular maintenance, including cleaning screens and inspecting for damage, ensures these systems function optimally for decades. By prioritizing high-quality materials and professional installation standards, you ensure that your roof louver system serves as a silent, efficient guardian of your home’s health, preventing costly repairs and ensuring a comfortable living environment year-round. Remember, ventilation is not just about cooling; it is about extending the life of your entire roof system.
Other Resources
Home Depot – Category page listing roof louvers used for ventilation and air intake or exhaust.
RoofVents – Air Intake Louvers – Product collection featuring roof louvers designed for air intake ventilation.
RoofVents – Exhaust Louvers – Product listing showcasing roof louvers used for exhaust ventilation.
Other Helpful Articles
Ultimate Cherry Hill Roofing Guide – Comprehensive guide covering common roofing topics and considerations in Cherry Hill.
Flat Roof Bubble Repair – Article explaining causes and repair methods for bubbles in flat roofs.
Flat Roof Scupper Installation Steps – Step-by-step guide outlining how flat roof scuppers are installed.